Applets are a special type of Java program. They are designed to be run inside of a web browser. But, you create them just like any other program. In fact, the only differences between an applet and an application program are the methods they contain and the classes they extend.
The most important part of an applet, in fact the very thing that designates it as an applet,
is the class it extends.
There are two classes that you can extend for this purpose.
The original was called simply Applet
, or more formally
java.applet.Applet
.
In Java 2 a new Swing-based extension of the Applet
called
the javax.swing.JApplet was introduced. We'll
use the newer applet in this lab.
The second important part of an applet is the
paint
method. The paint
method is
called to draw your applet on
the screen. The paint
method receives a
Graphics
object as input. It uses the methods
in the Graphics
object to "paint" things on the screen.
Because applets are designed to run inside of a web browser, your
applet must be referenced from a HTML file in
order to run. We will use the
<applet> tag inside of
an HTML file to tell your web browser to download and run an applet.
NetBeans automatically creates the HTML file required to run your
applet in the Netbeans' applet viewer.
None-the-less, we will still discuss the parts of this HTML file later
in this lab.
Although the <APPLET>
tag has been officially replaced
the <object>
in recent versions of HTML,
we're going sticking with <APPLET>
for the sake
of those folks who are forced to used out-of-date browsers such
as Microsoft Internet Explorer 6.
In this section we are going to create a project called
Stonhenge
that
contain a skeleton JApplet
called Stonehenge
.
Create a new project called Stonehenge. Next create
the directory csci/201/Stonehenge and then
mount it within the Stonehenge project
(Help).
Now it's time to create the JApplet file called
Stonehenge
(Help).
Start by clicking the new button
in the menu bar at the top.
This will bring up a list of templates for you to
use to create a file.
Select the Java Classes -> JApplet Template
and then click Next.
Next, type the name you want for the file,
making sure that the right filesystem
(?)The filesystem is the location that the files are stored in your project.
Every project can have multiple filesystems. For more information on filesystems, click here
is selected,
then click Finish.
This will create the default file with no extra pieces added on to it. If, instead, you click Next, you have the option of adding
variables, methods, and setting inheritance settings on your class.
Create the project for the Stonehenge
JApplet
.
Show your lab instructor your project.
Remember, to be a true applet,
your code must extend Applet
or JApplet
and must contain a paint
method.
Paste the following code at the beginning of the file
so that your code will important the JApplet
package and the many Abstract Windows Toolkit (awt) packages
need to perform graphs operations in Java.
import javax.swing.JApplet ; import java.awt.* ;
Now Copy the code for the paint
method given below
and paste it into the Stonehenge
class right after
the empty Stonehenge
constructor.
public void paint( Graphics g ) { g.setColor( Color.blue ) ; g.fillRect( 100, 150, 100, 300 ) ; g.fillRect( 300, 150, 100, 300 ) ; g.fillRect( 450, 150, 100, 300 ) ; g.fillRect( 650, 150, 100, 300 ) ; // New stuff goes here // End of new stuff }
Now compile and run the file.
Initially, you'll only get one small view of Stonehenge's
mystical vertical pillars.
This is how UNCA professors of ancient European history
believe that Stonehenge looked when approaching it from a distance
after the first 201 years of construction.
You may have to resize the new window to get the larger view.
But another myterious and wonderous event has transpired.
If you
look in the explorer window, you'll see a new HTML file called
Stonehenge.html.
This was automatically created by the NetDruids IDE.
Double click on this file to open it.
Within this file you should seen the following APPLET
tag.
<APPLET code="Stonehenge.class" width=350 height=200></APPLET>
This is the line that tells your browser to download and display the Stonehenge applet. But there is a problem, the width and height are much to small to see your full applet, change them to the following values: width=800 height=500.
Show your lab instructor the browser with your applet in it. If all goes well, you should see an incomplete Stonehenge:
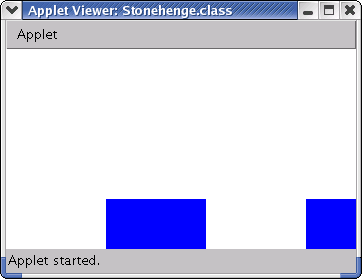
Your job is to modify your program so that it gives a more accurate,
though still boring,
rendition of Project Stonehenge, as shown below.
You improve Stonehenge by adding two rectangles to the applet. To help you out, let's talk a little about your present Java file. The file 
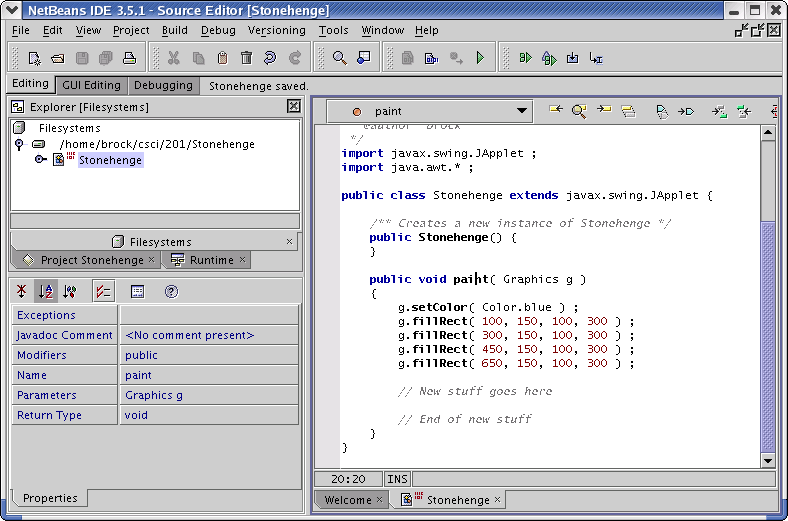
starts by importing classes from two packages, the class JApplet from the package javax.swing, and all classes from the package java.awt. We need the classes in the package java.awt to draw objects. We need the JApplet class so we can extend it. Notice the line of code:
public class Stonehenge extends JApplet {
This is where we tell the compiler that our applet is called Stonehenge and that it will be a subclass of the JApplet class which it is itself a subclass of the Applet class. JApplet is an updated version of the Applet class that uses the new Java Swing interface. Since web browsers are written to load any applet, you should be able to run Stonehenge in any up-to-snuff browser.
Our applet contains only one method. This method is
not main()
Applets do not need a main()
method because their
execution is controlled by the Web browser.
When we write an
applet, we need to define a paint() method which
is responsible for creating the applet display. This method always receives
a single parameter, a Graphics
object. We can give the parameter any name we choose, but it this case we
have named it simply g.
We use methods belonging to this Graphics object
to render text and shapes in our applet display.
Let's take a look at the Graphics object's methods that we use in the
body of paint().
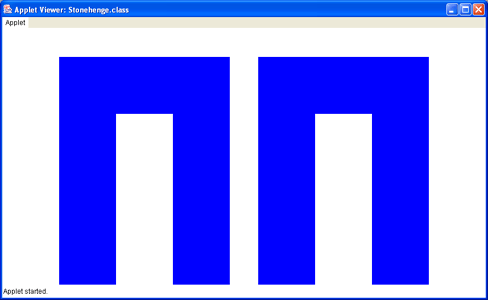
public void paint(Graphics g) { g.setColor( Color.blue ) ; g.fillRect( 100, 150, 100, 300 ) ; g.fillRect( 300, 150, 100, 300 ) ; g.fillRect( 450, 150, 100, 300 ) ; g.fillRect( 650, 150, 100, 300 ) ;
First we set the color to blue with g's setColor() method, giving it the object Color.blue as input. Then we draw rectangles and fill them with our chosen color using the method fillRect(). This method has four parameters corresponding to the four pieces of input it needs to do its job. Let's take a look, in order, at the four parameters used in our first call to fillRect().
g.fillRect( 100, 150, 100, 300 ) ;
You now know enough to add the two additional rectangles needed to complete this assignment. You may have to dust off your high school geometry skills to figure out how to size and place them. But give it a try.
Since it would be rather boring just to paint it all in blue, you might want to look at the Java documentation for the Color class to see how you could make a rainbow of stones. If you are really adventurous, you could think about using the drawSting method of Graphics to add your name to the drawing.
Show your instructor your final applet.