CSCI 107 Lab 13, Creating Queries and Forms in MS ACCESS
Raw data is worthless unless it is used somehow. There are times when we
want just portions of the actual data values, for instance a listing of all
the customers names and address who have an outstanding balance at the end of
the month. At other times, we might want only summary results, such as the
number of outstanding balances and the total of all the outstanding balances.
In the first part of this lab, we will create many different kinds of
queries. For our purposes we will just look at the results, but queries are
the basis for many other types of data processing, such as data entry forms,
reports, view forms, mailings, etc.
The second part of the lab will guide you though creating a data
entry/view form. In our previous lab you entered data directly into a row of
the datasheet view, where the prompts were the field names. A form allows you
to group related data, create better field prompts, and add color and in
general inhance the display of the data. We will follow the outline
below.
- Your instructor will give a brief discussion and demonstration of some of
the procedures that are necessary to create and modify a query in an ACCESS
database application.
- adding tables to a query and creating links between related tables
- Modifying queries by inserting/deleting fields, sorting by a selected
field(s)
- Filtering data by the QBE method
- Using functions such as Count , Sum and Group by
- Your instructor will briefly explain some of the procedures/principles of
creating a form to display data and allow data entry..
- Creating/Saving a form using a single table or a queryand moving objects
on the form.
- Inserting form objects to display data, such as text boxes, list boxes,
and combo boxes,
- Inserting other form objects, such as buttons, lines and graphics
- The remainder of this handout will guide you through some steps to create
various queries and a simple form.
Creating queries
We will create several queries on a single table, then create a query
using linked tables . If you do not already have an ACCESS folder on your
floppy disk, then use the WIndows Explorer or My Computer to create a new
folder on your floppy called ACCESS. Once you have the ACCESS folder
on your disk, copy the file Classdemo2.mdb from the folder
t:\massey into your ACCESS folder.
If Access is not already running
- Go to: Start, Programs, Office 97, Microsoft Access, Open an Existing
Database, OK
- otherwise Select: File, Open Database,
then set your Look in box to be your A:\ACCESS folder where
you should see the Classdemo2.mdb file. Double click on the
Classdemo2.mdb file.
Creating a Query on a Single table
Various lists of data can be created by creating a query. This is a
method to list only certain fields, or certain records or a combination of
the two,
- Click the Query tab, then New
- Double click on Customer and then Close the Show Table
form.
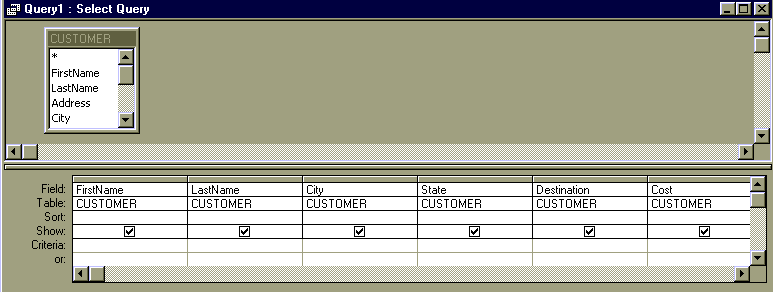
- Add fields to the view, by dragging the fields FirstName, LastName,
City, State, Destination, and Cost from the table list and drop them into
the Field row

- Click the DataSheet view icon
 in the main menu
to see the result of the query
- Click the Design View icon
 to return to the
query design
- To filter the records to display only certain records, we use the Query
By Example(QBE) method of typing in the Criteria row an example of the data
in that colum. For instance, to display only the customers from California,
- Type in CA in the criteria row in the State column
as below

- go to the DataSheet view, then return to the Design
view
- To see the Californians OR the Oregonians, type CA and OR
on separate lines in the Criteria under State
- To see the Californians going to England, type CA in the State
criteria and England in the Destination criteria all in the
same row

- To see the customers who paid more than $1200 for their trip, type
>1200 in the Cost criteria
- All the normal comarison sysmbols can be used with numbers and
dates.
- <, <=, >, >=, <>, =
In your ClasDemo Database, Create a different query file for each of the
following.
- Name the query QBE1: List the only the first and last names and the
states of the people who are going to Alaska
- Name the query QBE2: List the First and last names, the destination and
cost of all the customers in Arizona, sorted by lastnames
- Name the query QBE3: List the total cost of all passengers going to
Europe. Try to figure this out by your self. Look at the Menu options
- Name the query QBE4: Create your own interesting query
Creating Queries with linked tables
Create a new query and add both the tables Customer and
Countries Link the two tables by dragging the Destiniation
field of Customer over the Destination field of
Countries. Now drag only the fields FirstName, LastName,
Destination, Passport, MaxPassengers,and MinPassengers on to the Field
list. Add the criteria that would display only the England Tours and
save this query as QBE5
Creating a simple data entry/display form
We will use the wizard to create a form for the Customer table and then
customize the form by moving the fields around on the form To create a new
form
- Open the Classdemo2 database if it is not already open.
- Select the Tables tab, then double click on the Customer
table
- Click the down arrow attached to the New Object button
 , then AutoForm
Access automatically creates a separate line for each field and its
prompt. At the bottom of the form are the navigational buttons to move from
record to record. The buttons (in order) are First record, Previous record,
Next record, Last record and New record.
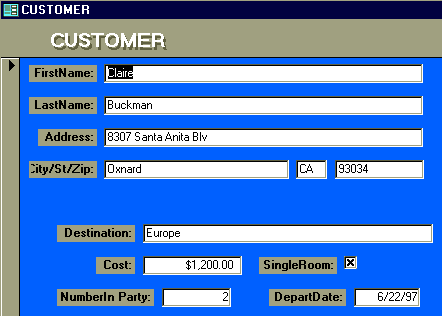
 In the
design view, use the following steps to make the form look like the one
below.

- Select the
esign view icon
 in the main
menu.
- Change City text prompt by making two separate clicks (not the
quick double click!) on the City prompt and then typing
City/St/Zip .
- Select the data field City, grab the right middle handle and drag
the field to a smaller width. similarly for the State and Zip
fields,
- Select each field and drag them by the large handle in the upper left
corner to the appropriate places. delete the State and Zip text
fields
- Similarly, move the remaining fields to their new positons on the
form
- Use the Rectangle tool to draw a rectangel around the last 5
fields.
- To change the background color, right click in the background,
select Fill/Back Color, Color
- Save the form asCustomerForm, close the database.Turn in your
disk

 in the main menu
to see the result of the query
 to return to the
query design

 , then AutoForm
 In the
design view, use the following steps to make the form look like the one
below.