In this lab you will finish a partially written Java GUI application that demonstrates the basic functions of a queue. This project is similar to your previous lab Lab 04 featuring a stack, but it introduces a queue as a list with different rules for adding and removing data. You should recall that in the case of a stack, additions and removals must both occur at one end of the list, which is called the top. For a queue, both ends of the list are given names, typically front and rear. The rules for additions and removals are almost as simple as those for a stack:
These rules are sometimes summarized by saying that a queue is a FIFO ("First In, First Out") list. In contrast, a stack is called a LIFO ("Last In, First Out") list.
In this lab you will implement a queue using an array, in a manner similar to that used for the Stack class that you implemented in Lab 04. In particular, the queue will also store values of type Object (which automatically includes objects of any class in Java).
Once again the GUI framework has already been created and tested, and a partially written source file of the Queue class will also be provided to you. Your task is to implement several essential Queue methods, which are presently only stubs. The GUI demo application will need correct versions of all these methods to work properly.
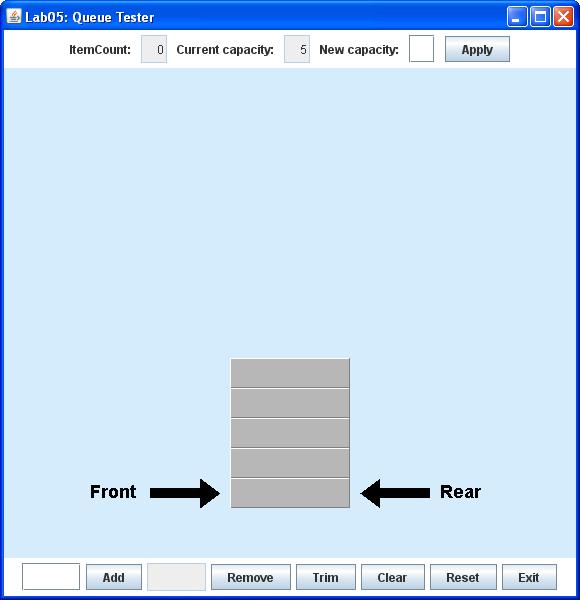
After you have completed the Queue class definition as described below, you should be able to compile all the files and run the project. Initially, the application should display the following window:
The GUI framework already includes event handlers that respond to user clicks on each of the buttons at the bottom of the window. These buttons are used to change the state of a single Queue object shown in the middle of the window.
The internal Queue array appears as the vertical pile of boxes, with the zeroth component on the bottom. But in contrast to the Stack, which had only one special index named top, the Queue must have two integer indexes pointing to the front and rear of the queue respectively. As in the Stack class, these indexes will be stored along with the array itself, as private instance variables. The rear index advances upward by one location whenever data is added to the queue, while the front index advances by one location whenever data is removed.
To establish a convention, the initial empty Queue will have both front and rear set to zero as indicated in the figure above. As it turns out, the only times that both front and rear have the same value are when the queue is either empty or full. But normally, you should interpret the rear index as indicating the next available location to store a new value. You may recall that this is identical to the role of the top index in the array-based Stack lab. In fact the only time when this is not the case is when there is no available location, namely when the Queue is full. As mentioned above, in that case the front and rear indexes become identical. Similarly, the front index usually indicates the location of the next valid data to be removed from the queue. The only time when this is not the case is when the queue is empty, as in the figure above.
The GUI application for this lab will allow you to store String values in the queue. To add a string (say a name) to the rear of the Queue, enter it in the leftmost text box in the bottom control panel and then click the Add button (or just press Enteron the keyboard, whichever you prefer). Whenever you click the Remove button, the item at the front of the Queue is removed and shown in the text box just to the left of the Remove button.
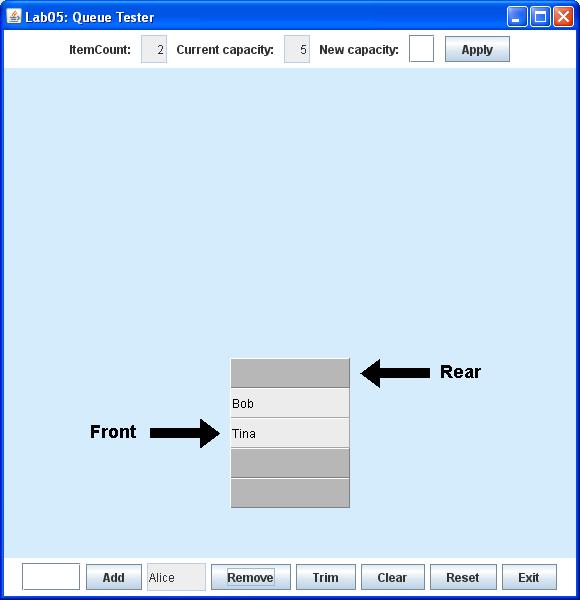
The following image was taken after adding the name "Fred":

After adding three more items (say for example "Alice", "Tina", "Bob"), and then removing two items from the front (first "Fred", then "Alice"), the display should appear as follows:
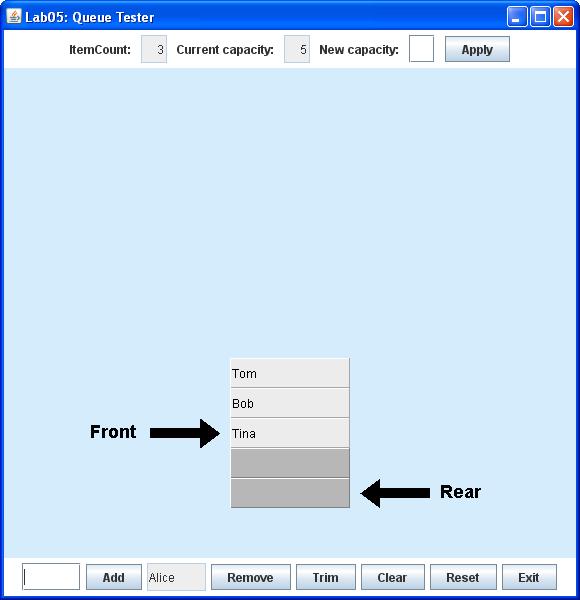
At any time you could go on to delete all the remaining items without encountering any problems. The only thing to note is that neither front nor rear would end up back at zero, at least not in the example used here. However, they would become equal. This will always be true of an empty queue in this implementation.
But by now maybe you have already detected a potential problem with the addition of any more items. After you add another item, say "Tom", you might expect that the rear index should be forced beyond the current array bounds. At first you might think you could avoid this by simply providing the queue with a setCapacity() method, similar to the method you implemented in Lab 04. Then whenever the rear index was about to go beyond the array bounds, you could just resize to a bigger array and save the day. But this is not a good solution if you look closely at the example above, since you can see that there is still room in the array below the current front pointer. Since items were removed as well as added, there are still vacant positions. It does not seem either necessary or efficient to resize the array in this case.
In fact there is a good solution to this problem, which is to introduce the notion of a circular array. Instead of going outside the array bounds, the rear index can be reset to 0, marking the zeroth component as the next available location. Thus after adding "Tom", the display should appear as shown below:
As you then proceed to insert more items, rear again advances upward from the bottom as it did originally. It turns out you will be doing similar things with the front index, so both indexes end up cycling repeatedly through the array.
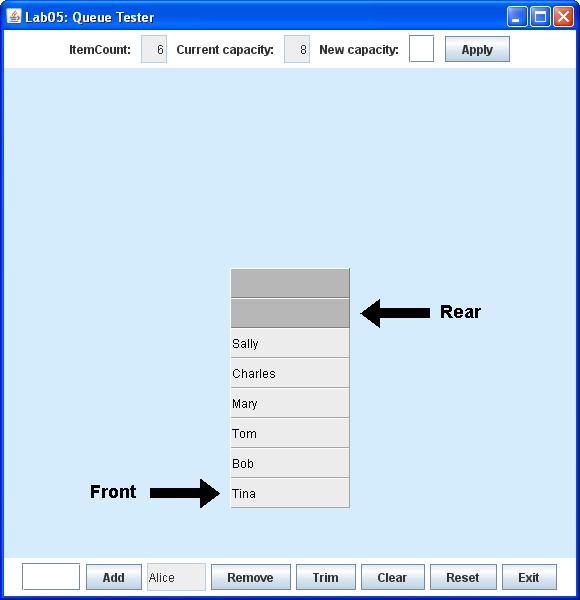
Of course it is possible to fill up the entire Queue array, say by adding first "Mary" and then "Charles":

Note that the front and rear pointers are equal for a full array, just as they are for an empty array. In the instructions below, you will be able to distinguish between these two extremes simply by checking an item counter that will be included as one of the Queue instance variables.
Since arrays can become full, later in this project you will in fact need to implement a method called setCapacity(), which is similar in purpose to the setCapacity() method you wrote for the Stack class in Lab 04. Just as in the case of the push() method you implemented for the Stack, the add() method for the Queue must automatically invoke setCapacity() whenever it detects that it is currently full, so that it can increase its capacity before it goes on to add the new item.
Note that setCapacity() may be used to increase the capacity by an arbitrary amount. For instance, if you decide to boost the capacity by 3 each time your add() method detects a full array, use the statement
Then if you added "Sally" to the full Queue shown above, the capacity would first be incremented by 3, after which "Sally" would be put into the first of the 3 new empty slots, as shown below:setCapacity (getCapacity() + 3);
Incidentally, you may have noticed that the positions of the array components were rearranged by setCapacity(), as were the front and rear indexes. This is perfectly legal, as long as all components are kept in the same (circular) order and both indexes still point to the values currently at the front and rear of the Queue.
Some remaining details need to be clarified before you plunge in:
The Trim, Clear, and Reset buttons all have the same functions as their counterparts in Lab 04. Trim adjusts the Queue capacity to match the number of currently stored components. Either Reset or Clear may be used to remove all values from the Queue, but Reset also resizes its internal array to its original length.
Finally, the GUI components at the top of the window also are similar to components provided in Lab 04. The text boxes on the left display the current number of values stored in the Queue and its current capacity (length of the internal array). Also note the text box labeled New capacity and its associated Apply button. These components will allow you to change the Queue capacity directly.
To complete this project, follow the steps listed below:
| DisplayFrame.java | DisplayPanel.java | Queue.java |
	DisplayFrame frame = new DisplayFrame();
	frame.setVisible(true);
Note, however, that Queue.java does define all the instance variables for the Queue class as well as two fully working constructors. It also includes a fully implemented render() method, which enables the DisplayPanel to draw the Queue object in the display area of the window. And it even contains a complete trim() method, since that one happens to be identical to what you should have used for the Stack in Lab 04. But even though some of the other methods listed above also have their Stack counterparts, they will all have to be implemented differently for a Queue.
Before proceeding, you should look over the declarations for both the instance variables and the constructors.. As usual, both are near the top of the class definition.
Now proceed to implement the bodies of the methods listed above, so that they perform the following tasks:
rear = (rear + 1) % array.length;
Finally, add() must increment the Queue instance variable itemCount, which keeps track of the current number of stored values.
front = (front + 1) % array.length;
Finally, remove() must decrement the itemCount instance variable before returning the value it just removed.
That being said, its first steps are quite easy: it must check whether its input parameter capacity, the requested new capacity, is at least as large as the number of stored items. If not, the method must immediately throw an IllegalStateException without making any change to the Queue.
Otherwise, setCapacity() must use the new operator to create a new Object array of length capacity. As with its Stack counterpart, you must declare a local reference to this array until you have copied all the contents of the current Queue array. After the copying is done, the instance variable array is reassigned to reference the new array.
The tricky part for a Queue is how the copying itself must be done. It cannot be the same sort of b[i] = a[i] loop that would copy an array a into array b. This is all it took for a Stack, but if you just stare at some of the figures above you should soon realize that a Queue must be handled differently.
But there is no need to panic just yet, since there is a fairly simple approach that works as follows: just load the new array starting at index 0, no matter where the front index is in the current array. In more detail:
Note that the range of this loop is easy to specify: you will need to copy exactly itemCount values, so a simple for loop with a loop counter should work well here.
When your project is complete and working correctly, demonstrate it to your lab instructor. Then, before you exit NetBeans, clean your Lab05 project. Finally, before you logout, open a terminal window and use the cd command to enter your csci/202/labs directory. Then create a JAR file of your Lab05 project folder, using the command
jar cf Lab05Project.jar Lab05Please leave both your project folder and Lab05.jar in your csci/202/labs directory for the remainder of the semester.