University of North Carolina at Asheville
CSCI 202: Introduction to Data Structures
Lab 04: Stacks
Introduction
In this lab you will finish a partially written GUI application
that demonstrates the basic operations of a stack.
The GUI framework has already been created and tested.
Your primary task is to complete a single Java source
file defining a Stack class. Specifically, you will have
to implement several Stack methods
which are presently only stubs. The demo application will need
complete and correct implementations of all these methods to work
properly. When you finish that part,
you can use the GUI framework to create a single Stack
object (or instance) and test its behavior.
First, some background for this project: in general, a
stack is a list of values, one end of which
is called the top. Additions of values to this list and removals
from it are subject to the following restrictions:
- To add (or push) a value onto the stack, you must add it
to the top.
- To remove (or pop) a value from the stack, you must remove
it from the top.
Because of these rules, a stack is sometimes referred to as a
LIFO (Last In, First Out) list.
In this lab the Stack will be implemented using an internal
array, whose components are of type java.lang.Object.
Actually, the Stack class as defined here can store objects
of any class, not just those declared as Object types.
This is due to a principle known as inheritance, which will be
covered in depth later in this course.
As you know by now, arrays in Java have a fixed size.
However, the Stack itself will effectively be resizable.
That is, it will be able to change its capacity at any time
by replacing its current array with another array of a different
size. Thus an application
will always be able to push items onto the Stack: if
the Stack detects that it is currently full, it will
automatically expand its capacity before pushing another value.
After you complete Stack.java as described below,
you should immediately be able to build and run the project.
Initially, the application should display the following window:
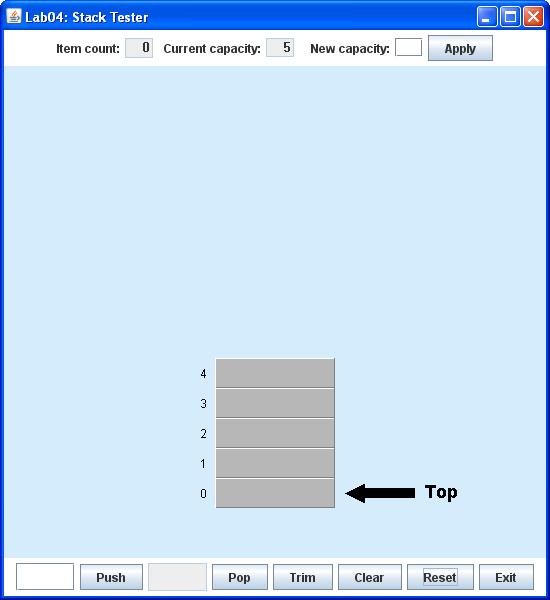
The GUI application includes event handlers that respond
to user clicks on each of the buttons in the control panel at
the bottom of the window. These buttons are used to update
a graphical representation of a Stack object in the middle
of the window.
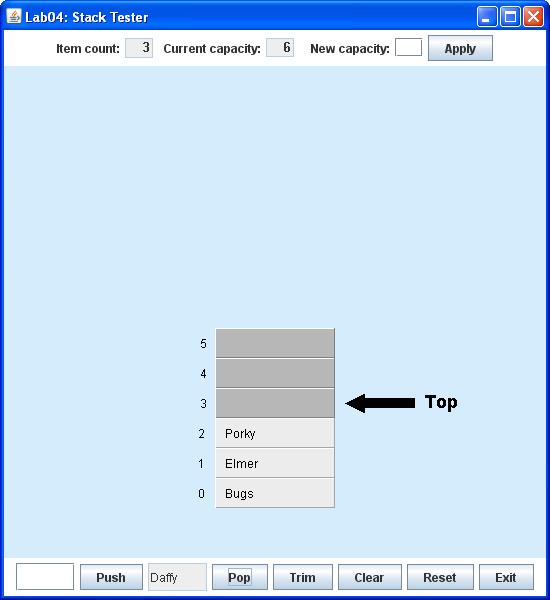
For example, if you first enter a String value in the text box
to the left of the button labeled Push and then click
Push, you will see that value pushed onto the Stack.
Whenever you click the Pop button, the topmost item on
the Stack is removed and displayed in the text box to the
left of the Pop button.
The functions of the other buttons
in the bottom control panel will be described below.
The text boxes at the top of the window display the
current number of items which have been pushed onto the Stack
and its current capacity. In the array implementation
used here, this means just the total length of the array.
The text box labeled New capacity may be used to enter a new
array length, which takes effect whenever the user clicks the
Apply button.
In this project you will implement a Stack method called
setCapacity(), which swaps out the original array
for a new array with a different length that keeps all the values
stored in the old array. The push() method will depend on
setCapacity(): it must first check whether the Stack
is currently full, and if so it must first invoke setCapacity()
method to make room before pushing the new value.
Since the push() method takes care of resizing automatically,
you will be able just to continue pushing values indefinitely:

Again, each click of the Pop button removes the top item from
the stack and displays it in the text box shown below. Thus after
popping the top three items from the previous (full) stack,
the display should appear as shown below:
The Trim button forces the stack to swap out its current array
for a copy whose capacity is just enough to hold the current number
of items (although it always retains at least a 1-component array
even if the stack is empty). If you click Trim when
the stack appears as shown above, you should see:

The Clear button removes all items currently stored
on the stack, but does not change its current capacity.
Thus after clicking Clear you should see:
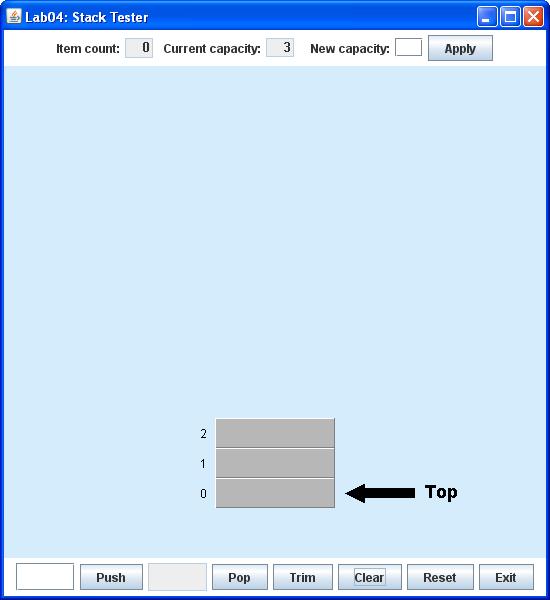
Similarly, the Reset button also removes all items from the
stack, but it also restores it to its original capacity as well.
Thus after clicking Reset you should see:

Instructions:
To complete this project, follow the steps listed below:
-
Launch the NetBeans IDE
and select the File/New Project... option in the toplevel menu
bar to create a new project named Lab04. Define the project to be
a General Application, and be sure that your Lab04 project
folder will be created in csci/202/labs.
Otherwise, accept all the default settings so
that NetBeans will automatically write a class named lab04.Main.
You should find the source file for this class in the folder
Lab04/src/lab04.
-
Download the following additional files into your Lab04/src/lab04
folder, which will automatically include them all as part of your
Lab04 project:
-
Open the file lab04.Main and add the following lines of code
into its main() method:
	DisplayFrame frame = new DisplayFrame();
	frame.setVisible(true);
-
Before you proceed, it might help you to have an overview of these
classes and their roles in this project. The only task of the
main() method in lab04.Main
is to create a DisplayFrame,
which actually represents the toplevel application window.
One key feature of the DisplayFrame is that it includes a
single Stack object as part of its internal data.
The DisplayFrame also owns all the buttons and other
GUI components in the panels at the top and bottom of the window,
as well as all the event handler methods that deal with button
clicks and so forth. Thus the DisplayFrame creates a single
Stack object and allows the user (that's you) to manipulate it
and test its behavior.
The DisplayPanel class represents the central portion
of the application window, which displays the current state of the
Stack object. The GUI event handlers force the
DisplayPanel to repaint itself whenever the state of
the Stack is changed in some way.
-
The Stack already contains a fully implemented method
called
render(), which the DisplayPanel uses to render the
Stack in the display area.
However, it contains only
stubs of the following methods, all of which are essential for
the application to work correctly:
- public void push(Object value)
- public Object pop( )
- public boolean isEmpty( )
- public void setCapacity (int capacity)
- public int getCapacity ( )
- public int getInitCapacity ( )
- public int getItemCount ( )
- public void trim()
- public void clear()
- public void reset()
You now need to implement each of these methods,
so that they perform the following tasks:
-
push() must first check whether the Stack array
is currently full, and if necessary invoke setCapacity()
to switch to a new, larger array before proceeding. Then it must set the
top component of the data
array
to the Object parameter value that is passed to it,
and finally increment the variable top.
-
pop() must first check whether the Stack is currently
empty. If so, it must immediately throw an IllegalStateException
and return without making any changes to the Stack.
Otherwise, pop() must first decrement top, and
then return the component of array stored at the new value
of top.
-
isEmpty() must return true if top is 0,
and false otherwise. Applications should use this method to check
if a Stack is empty, before attempting to use pop().
-
setCapacity() must first check whether its input
parameter capacity, the requested new stack capacity,
is at least as large as the current number of stored
items.
If not, the method should immediately throw an
IllegalStateException, without making any change to the Stack.
Since exception handling may be still unfamiliar to you at this
point in the course, please feel free to consult with your lab
instructor about this step.
Otherwise, setCapacity() must use the new
operator to create a new Object array, with the number of
components specified by .
Note that you must declare a local variable in the
setCapacity() method body to reference this array
initially, since setCapacity()
must go on to copy all items from the current stack array
into the new array. After all items have been copied, the
Stack array member variable must be reassigned to reference the
new array.
Note that the Stack instance variable top is unchanged
by setCapacity(), since this method does not itself attempt
to push a new item onto the stack.
-
getCapacity() must return the current capacity of the
Stack array. Note that this is the number
of array components allocated by the new operator,
not the number of items currently stored on the stack.
-
getInitCapacity() must return the original capacity of the
array, that is, the capacity when the Stack object itself
was created. This method is used to restore the Stack object
to its original state whenever the user clicks the Reset button.
-
getItemCount() must return the current number of items stored
on the Stack.
-
trim() must resize the array to match the current number
of stored items, leaving no unused array components. However, for the
special case of an empty stack, it must set the array length
to be 1, not 0. This convention insures that the stack will always
be visible in the GUI display. The trim() method will be invoked
whenever the user clicks the Trim button.
-
clear() must remove all items currently stored on the stack,
without changing the current stack capacity. This method will be invoked
whenever the user clicks the Clear button.
-
reset() must also remove all items from the stack, but it must
also restore the array length back to its initial value (when the
Stack object was instantiated). This method will be invoked
whenever the user clicks the Reset button.
-
Once you have completed the implementation of the new Stack class,
try to build your Lab04 project. Of course if you encounter
any compiler errors, you will have to fix them all before you can proceed...
-
Run the project. You should now verify the application behavior
as described in the introduction. You should experiment with pushing,
popping, clearing, and resetting, and directly changing the stack
capacity. Verify especially that the graphical representation of the
Stack changes in the way you would expect.
What To Submit
When your project is complete and working correctly, demonstrate it
to your lab instructor. Then, before you exit NetBeans, clean
your Lab04 project. Finally, before you logout, open a terminal
window and use the cd command to enter your csci/202/labs
directory. Then create a JAR file of your Lab04 project
folder, using the command
jar cf Lab04Project.jar Lab04
Please leave both your Lab04 project folder and
Lab04Project.jar in your csci/202/labs directory
for the remainder of the semester.