Although the main theme of this lab project is array processing,
you will also gain more experience working with Java control
statements. These will include both conditional
structures, such as if-else statements, and iteration
structures such as for loops.
And if all that isn't enough, you will also be given a chance to
work a bit with two-dimensional (2D) arrays.
- Overview:
Arrays are a fundamental component of most high-level languages
because it is usually not practical to declare separate variables
for each piece of data in programs which manage large amounts
of information. An array may be defined as a programming
language construct that allows us to organize data as a list
of values. Arrays allow us to declare one variable that can hold
multiple values or components, and access any desired component
by its position or index in the array.
- Array Syntax:
All values stored in an array must be of the
same data type. In the examples below, the variable
height is declared to be an array of integers:
Examples:

  int [] height;       // Preferred Java syntax
  int height [];       // C/C++ style syntax... allowed, but not preferred
- Array Instantiation:
A Java array is an object, and
the name of an array is a reference to the object.
Memory space for the actual array components must be reserved by
instantiating the array, normally by using the new
operator. Thus the statements above merely declare the reference
height to an integer array, not the array itself.
We may then instantiate the actual array as follows:
  height = new int [3];         // 3 components allocated
  height = { 4, 3, 7 };         // new not required here
Of course we could also have created both the reference and the actual
array in a single statement, as shown below:
  int [] height = new int [3];  // 3 components allocated
  int [] height = { 4, 3, 7 };  // new not required here
Note that we must specify the size of the array so the computer
can allocate the correct amount of memory space.
Another important thing to remember is that the square brackets
used to indicate the index of an array are treated like an operator
in Java. It is called the index operator ([]), and in fact has
the highest precedence of all Java operators. The index operator
performs automatic bounds checking, which ensures the index is in range
for the array being referenced. Whenever a reference to an array
component is made, the index must be greater than or equal to zero
and less than the size of the array. If the reference is in the
valid range of indexes for the array (0 to 9 for the example below)
the reference is carried out. If the index is not valid, an exception
called ArrayIndexOutofBoundsException is thrown.
- Array Length:
The size of an array is stored in a public
instance field called length. For example, the size of the
array height may be referenced as
height.length
The length is set when the array is first created and
cannot be changed. This means that once an array is declared,
the values at each position may change but the number of values the
array can hold is fixed.
- Array Indexing:
The number corresponding to each position
in the array is called the index. Array indexes may be integers,
integer variables, integer expressions, or some combination thereof
as long as the result evaluates to an integer. A Java array of size N
is indexed from 0 to N-1. This means the index in Java always starts
at the value 0 and if you want to store 10 elements in an array,
they would be stored at index positions 0 through 9. Likewise
the value stored at index 5 is actually the sixth value in the array.
To access a value stored in an array, you use the name of the array
followed by the index in square brackets. Be sure to never confuse
the value of the index with the value stored in the array at that index.
  height [2] = 72;
  int last_height = height [10];
  average = (height[0]+height[1]+height[2])/3;
  System.out.println("The middle value is " + height[MAX/2]);
  pick = height[(int)Math.random()*11];
- Arrays as Parameters:
A component of an array, as well as an
entire array, can be passed as a parameter to a method.
If the parameter being passed is a component - If the component is a
primitive
type, a copy of the value is passed. If the component is a reference to
an object, a copy of the reference is passed.
If the parameter being passed is an entire array -
Because an array is an object, when an entire array is passed as a
parameter, a copy of the reference to the original array is passed.
The method can change a component of the array permanently because it is
refering
to the original component value. The method cannot permanently change the
reference itself because a copy of the original reference is sent to the
method. These rules are consistent with the rules which govern any object type.
  public static void main (String [] args) {
    int [] array = { 3, 1, 2 };
    printAll (array);
  }

  public static void printAll (int [] array) {
    for (int i = 0; i < array.length; i++) {
      System.out.print (array[i] + " ");
    }
    System.out.println();
  }
What this means is the impact of changes made to a parameter
inside a method depends on the type of parameter...so be careful!.
-
Arrays and Control Statements
Programmers commonly use for loops when handling arrays
because, as discussed earlier, the number of components in an array
is constant. In the example below, the for loop declares an
an integer loop counter which is initialized and incremented
in a step-wise fashion up to a value which is less than the size of
the array. During each iteration
the for loop executes the code between the braces which may be used
to calculate, modify, or do whatever you like to the values
of the array. In this example, the sum of all of the array components
are added together:
  public int findSum () {
    int sum = 0;

    for (int i=0; i < array.length; i++) //don't confuse commas and semi-colons!
    {
      sum += array [i];  // Same as: sum = sum + array [i];
    }

    return sum;
  }
-
2D and Higher-Dimensional Arrays
Java treats two-dimensional (2D) arrays as arrays of
arrays. Think of a 2D array as a 1D array, each of whose values
is itself a 1D array of some component type (primitive or object).
Thus the declaration
int [][] matrix = new int [3][5];
allocates a 1D array of length 3 (which you may think of as the
number of rows in what follows here), each of whose
components is itself a reference to an array of integers. Each
of these arrays (a separate one for each row) has length 5, which
you should regard as the number of columns). The variable name
matrix is a reference to the entire array of arrays.
Typically you will see nested loops used in conjunction
with 2D array processing. For example, the following code prints the
values of all components of matrix, using a table-like format:
    for (int row = 0; row < 3; row++) {
      for (int col = 0; col < 5; col++) {
        System.out.print (matrix[row][col] + "\t");
      }
      System.out.println();
    }
-
Login to your home directory. If you have not already done so in
your previous lab, create a path csci/202/labs.
If necessary, get help from your instructor for this step.
The NetBeans project folder you will create in the next step
should be a subfolder of csci/202/labs, so this path
needs to be in your account before you proceed.
-
Launch the NetBeans IDE and
select the File/New Project... option in the toplevel menu bar.
A dialog box will appear as shown below:
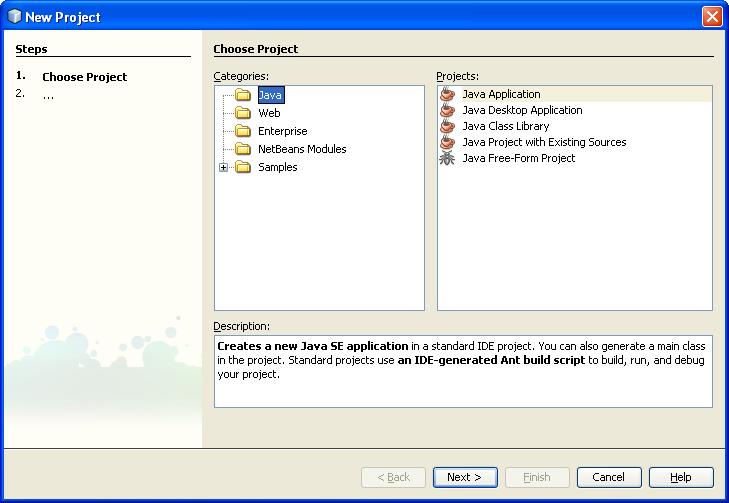
In the Categories and Projects panes shown above,
select Java and Java Application respectively and
then click Next. This raises a second dialog, as shown
below:

In this dialog, enter Lab02 as the Project Name
and set the Project Location to csci/202/labs.
Otherwise just accept all the default settings and click Finish,
so that NetBeans
will automatically create a class named lab02.Main for you.
In a later step you will add statements to the main() method
of this class, but for now just leave it as is.
Now go to the NetBeans explorer window and select the
Files tab
to view the directory structure that NetBeans has created
to hold your new project. Note the file named
Lab02/src/lab02/Main.java. As you should expect, this file
contains the source code for lab02.Main.
-
Use your browser to download the java source file
ArrayTester.java
and save it in the same directory that contains
Main.java, namely Lab02/src/lab02.
-
Attempt to compile ArrayTester.java in its original
form. You should not expect to succeed...
- ...So by now you should be staring at a lot of error messages in
the output window, which should look something like the
following:
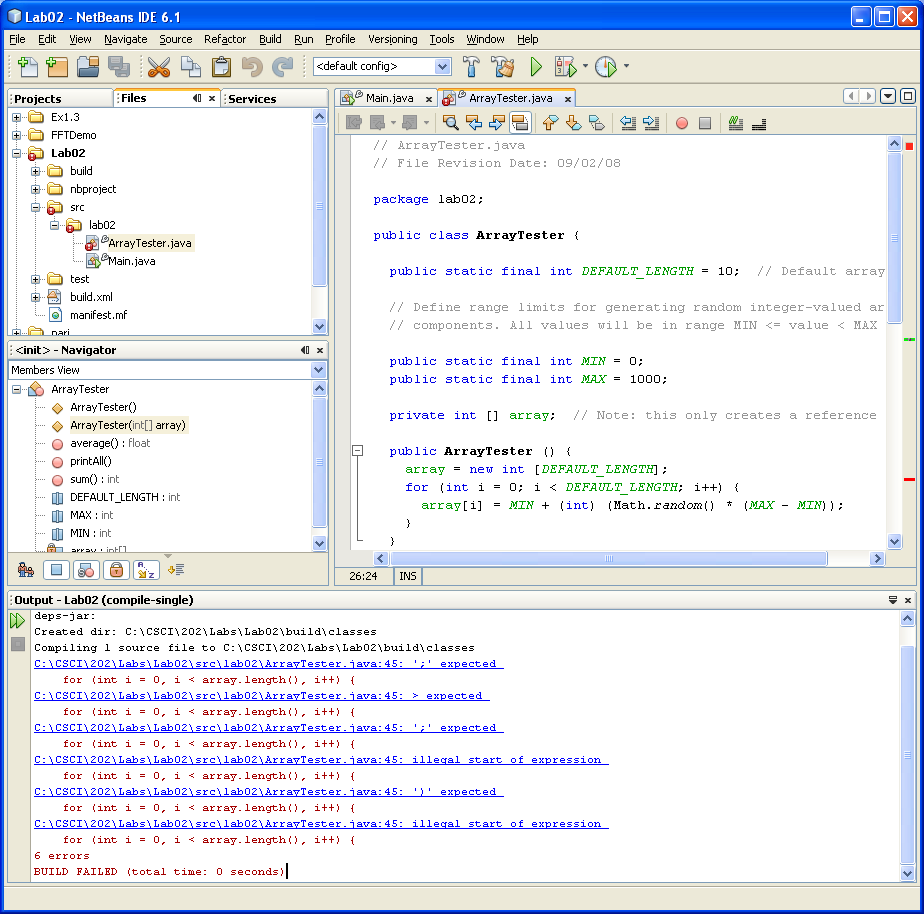
You will need to decipher these messages and identify the syntax
errors (aka compiler errors) in the file. One purpose of
this exercise is to make you familiar with some of the messages that
the Java compiler generates for syntax errors. As is usually the case,
all the syntax errors you will find in this file can be identified and
corrected without even knowing what the code is actually supposed to
do (more on that later). But you will have to fix all the syntax
errors before the compiler will generate a Java bytecode
(.class) file for you.
-
Proceed to correct each syntax error, starting with the first one
reported by the compiler. Work with your lab instructor as necessary to
learn some troubleshooting techniques. But for starters, note that if
you click on a reported compilation error in the output window,
NetBeans will take you to the line of code containing the error
in the edit window.
-
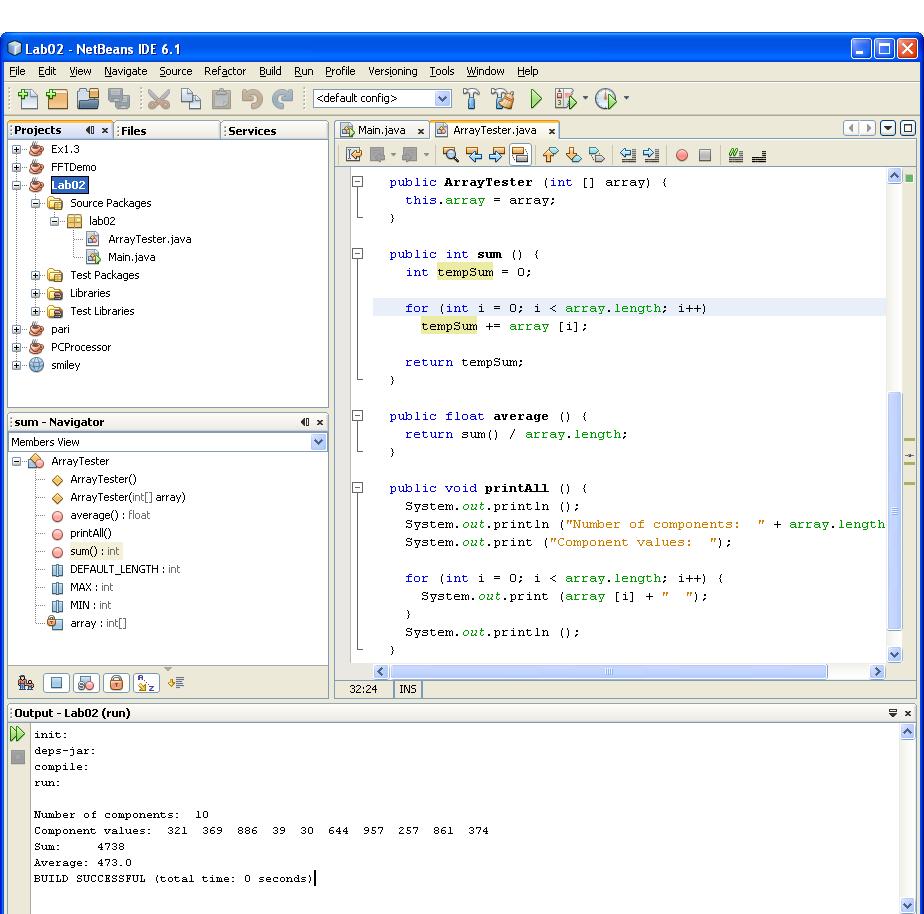
Once you have resolved all the syntax errors and successfully compiled
the ArrayTester class, you should see a display like the
following:
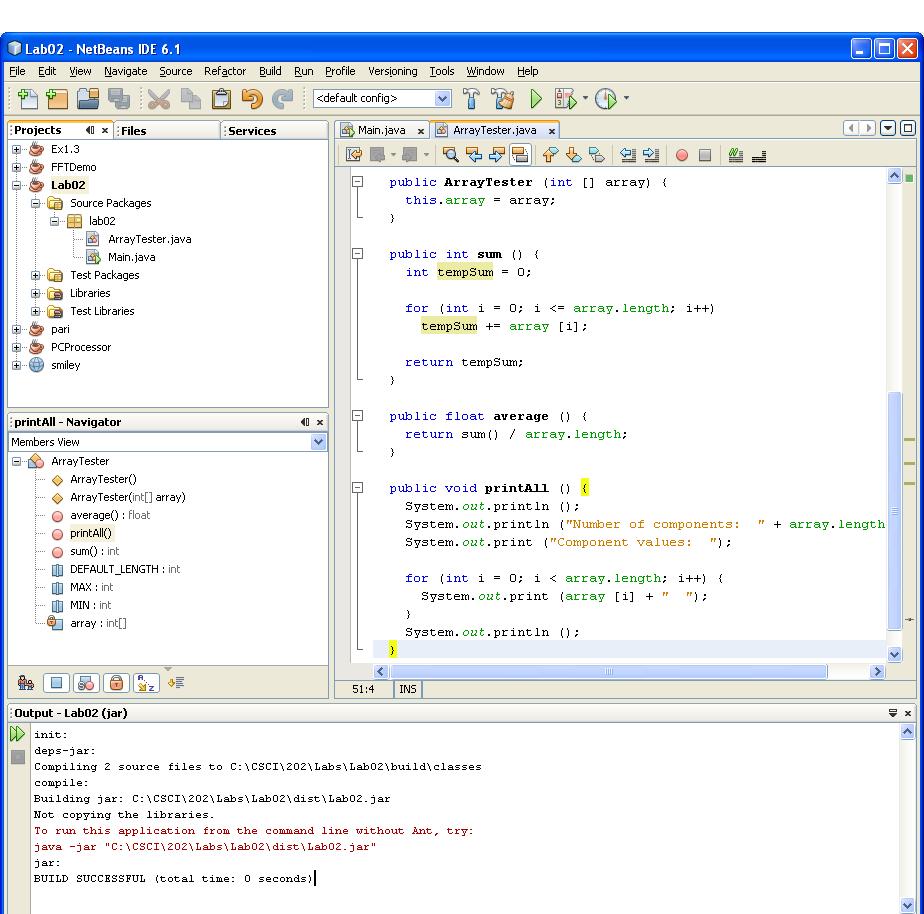
Now switch back to the source file Main.java.
Copy the following lines of code into its (initially empty)
main() method:
	ArrayTester tester;
        if (args.length == 0) {
          tester = new ArrayTester();
        }
        else {
          int [] inputArray = new int [args.length];
          for (int i = 0; i < args.length; i++) {
            inputArray[i] = Integer.parseInt (args[i]);
          }
          tester = new ArrayTester(inputArray);
        }
	tester.printAll();
	System.out.println ("Sum:     " + tester.sum());
	System.out.println ("Average: " + tester.average());
These lines will attempt to create an ArrayTester
object and invoke its methods. After you have added these lines,
try to Build the project.
Before you attempt to run the project, look over the statements
you added in Main.java. You should be able to see that when this
application runs, it should correctly calculate and display
the following values in the output window of the NetBeans
IDE:
- The number of components in the array.
- The components in the array.
- The sum of all the components in the array.
- The real-valued average of all the components in the array
(NOTE: this should keep any fractional part).
Now attempt to Run the project. Unless you have been very
alert and fixed more than just the syntax errors, you may end up
staring at the following results:
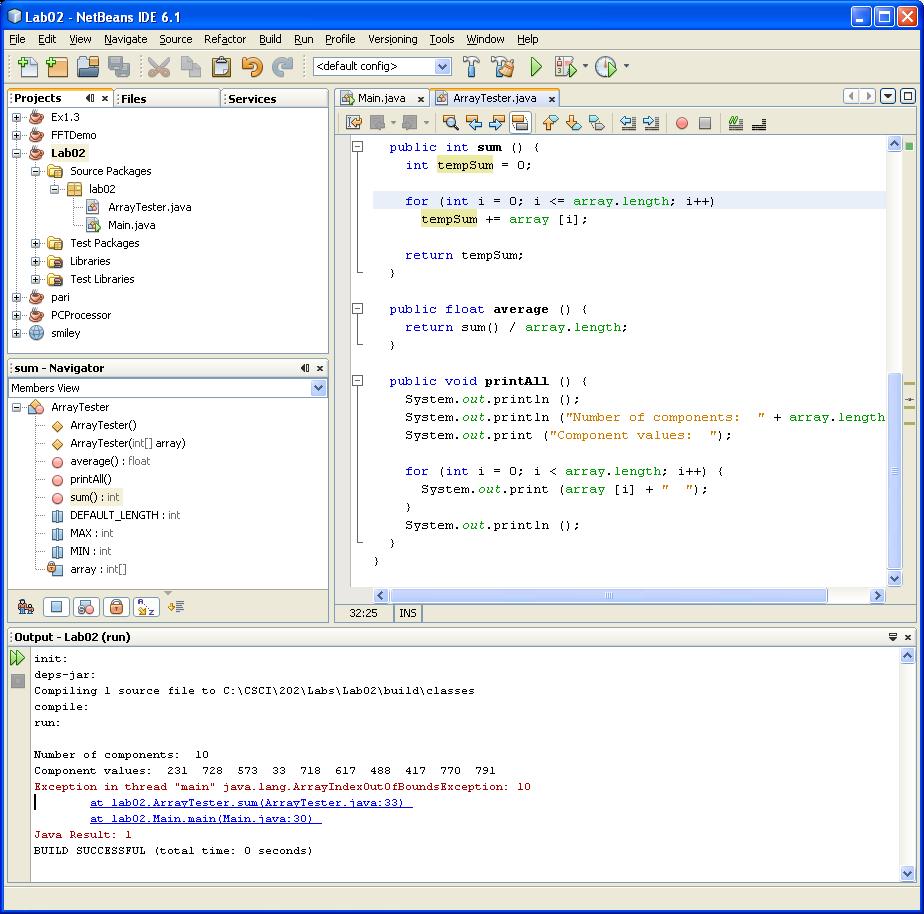
This is because the source code may still contain one or more
runtime errors. A program with only runtime errors compiles
successfully, perhaps even without generating any warning messages.
However, when you attempt to run it, at some point it "blows up",
meaning that the Java interpreter (JVM)detects some problem in the code
that it cannot abide and terminates your program abnormally. In such
cases the JVM should display an error message indicating why (and where)
it got so upset with your code.
OK... so if you see a screen like the one above, fix the problem(s).
Hopefully, you will eventually end up seeing results like the following:
Unfortunately, you may still have errors in your program,
of the type called logic errors. In this case your program runs
to completion without upsetting the JVM, but it just does not
produce all the results exactly as it should. These can be the most
aggravating errors to track down, so of course you should expect to
encounter at least one of them here...
- Proceed now to fix any logic errors in this program, so that it
compiles and executes correctly.
You may have to repeat the process of debugging, rewriting code, and
recompiling several times to find and fix all of the errors.
- When you think everything is ok, demonstrate your working program
to your lab instructor.
When your project is complete and working correctly, be sure to
demonstrate it to your lab instructor. Then, before you exit NetBeans,
clean your Lab02 project. This step removes all the
.class files, but leaves all your project sources (.java
files) intact.
Finally, before you logout, open a terminal window and use the
cd command to enter your csci/202/labs directory.
Then create a JAR file of your Lab02 project folder, using
the command