University of North Carolina at Asheville

CSCI 202: Introduction to Data Structures


Lab 01

Developing Programs in Java: Terminal Commands vs. IDEs


[Introduction] [Lab Project] [What To Submit]

Introduction

In this first CSCI 202 lab you will use both terminal commands and the NetBeans IDE (Integrated Development Environment) to build and test simple console applications. A working knowledge of both programming environments will be very helpful to you throughout this course, for your labs and also for your homework assignments.


Lab Project

  1. Login to your home directory and open a terminal window (essentially the same thing as a Command Prompt window in Microsoft Windows systems). One convenient way to do this in your Linux environment is via the popup menu that appears if you right-click on any blank region of the Desktop. Then enter the following sequence of terminal commands:
    
        cd csci
        mkdir 202
        cd 202
        mkdir labs
        mkdir homework
        cd labs
        
    If necessary, get help from your instructor for these steps. But don't worry, you should not have to go through all this again for the remainder of this semester...

    When the smoke has cleared, note that you have just created a new directory (folder) named 202 in your prexisting csci directory. And in 202 itself, you now have two new folders: one to hold your lab projects, and one for your homework. The path from your login (home) directory to your lab directory is just csci/202/labs. From now on, be sure to create all your lab project folders in csci/202/labs.

  2. If you entered all the commands as shown above, at this point your default directory should be csci/202/labs. For future reference, note that you can immediately enter this directory from your home directory using the single command
    
        cd csci/202/labs
        
    You may also find it useful to know that the command
    
        cd
        
    returns you to directly back into your home directory (this works with Unix/Linux systems, but unfortunately not with Windows command prompts).

    So now that you are in your labs directory, launch a simple text editor and use it to write your own version of the Welcome demo program in Chapter 1 of your text. One available editor is called gedit, which you can launch with the command

    
        gedit Welcome.java &
        
    The little & at the end of the command is there so that you can jump back and forth between the gedit window and the terminal window as necessary (without it, your terminal window is "locked up" until gedit terminates).

    Note: several text editors are actually suitable to use for this step, including gedit, nano, and even vi. If you happen to have preferences here, just use your favorite editor. But please feel free to consult your lab instructor if you have any questions.

  3. Once you have written your source file, save it using the same name as the Java class you defined (presumably Welcome), along with a .java extension (Welcome.java). Then try to compile it using the command
    
        javac Welcome.java
        
    If you get error messages, just jump back to your editor window, fix the errors, save the file, jump back to the terminal window, and repeat the javac command until all is well. At this stage you should enter the ls (directory listing) terminal command and look for two files, namely Welcome.java and Welcome.class. The .class file is what the compiler creates. It stores the sequence of bytecode instructions representing your program, which can now be executed by the Java Virtual Machine (JVM).
  4. Next, try to run your program, using the command
    
        java Welcome
        

    If all goes well, you should finally see the message that you specified in your program. If not, it's another good time to consult with your lab instructor...

  5. Now launch the NetBeans IDE and select the File/New Project... option in the toplevel menu bar. A dialog box will appear as shown below:

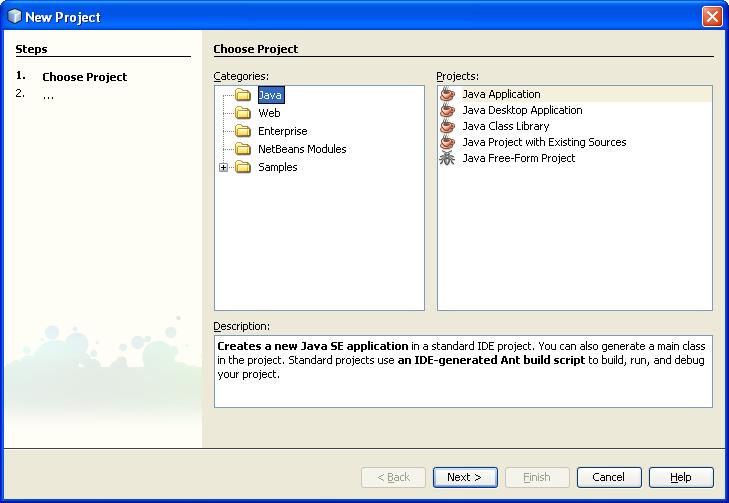
    In the Categories and Projects panes shown above, select Java and Java Application respectively and then click Next. This raises a second dialog with the title New Java Application, in which you are supposed to enter the name and location of your project. Enter Lab01 as the Project Name. and set the Project Location to csci/202/labs. Also, for this lab only, uncheck the Create Main Class checkbox:

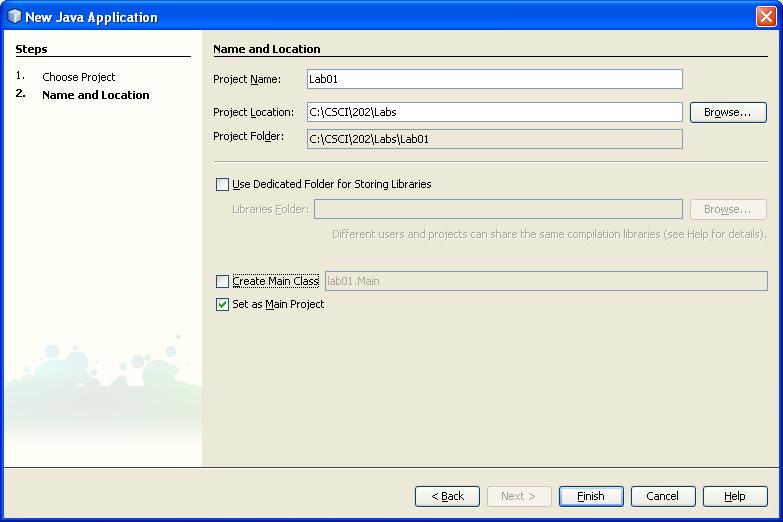
    Otherwise, accept the default settings and click Finish.

    Now go to the NetBeans explorer window. Make sure that the Projects view is selected, open your Lab01 project, then open Source Packages, and look for <Default Package>. If you want to create a new Java class in the default package, just right-click on <Default Package> and select the type of class you want (for example, Java main class), and start editing. But first you should check out the next step...

  6. Now switch from the Projects view to the Files view. Again, first open your Lab01 project folder, then look for a folder named src. This is where the Java source files in your "default package" actually reside. It is also the folder into which you now want to download a couple of demo source files. Do do this, just right-click on the links Hello.java and HelloWithArgs.java and select the Save Target As... option. (Note that neither of these files is a textbook demo.) Be sure that both files end up in Lab01/src/.
  7. Attempt to compile and run each of these files separately using the NetBeans environment. When you are satisfied that all is well, show your results to you lab instructor.
  8. Now build your complete Lab01 project. This not only compiles all the files in your project, but it also creates a JAR file named Lab01.jar and stores in in a subfolder named dist. After building, you should use the Files view to locate this JAR file.

    Note that Lab01.jar contains only the bytecode (.class) files for the project classes, not the project source files. But you can still run any of the classes in your project from this JAR file, using only terminal commands such as the following:

    
        cd
        cd csci/202/labs/Lab01/dist
        java -cp Lab01.jar Hello
        java -cp Lab01.jar HelloWithArgs
        java -cp Lab01.jar HelloWithArgs Alice
        java -cp Lab01.jar HelloWithArgs Tom Jerry
        java -cp Lab01.jar HelloWithArgs Larry Moe Curly
        
    It turns out to be convenient to use this approach when you want to try any of the textbook demos that require command-line arguments. In fact it is much more awkward to supply or change these arguments through the NetBeans IDE. But by combining the use of NetBeans with terminal commands, you have the benefit of working with a powerful editor with many good debugging features, plus a flexible way to supply and modify command-line arguments to Java programs.


What To Submit

When your project is complete and working correctly, be sure to demonstrate it to your lab instructor. Then, before you exit NetBeans, clean your Lab01 project. This step removes all the .class files, but leaves all your project sources (.java files) intact. Finally, before you logout, open a terminal window and use the cd command to enter your csci/202/labs directory. Then create a JAR file of your Lab01 project folder, using the command

jar cf Lab01Project.jar Lab01
Note that this JAR file differs from the Lab01.jar file that NetBeans creates when you build a project. Lab01Project.jar contains your entire Project "development" folder, including all your sources and NetBeans project management files. In fact you could upload this file to another system, extract its contents via the command
jar xf Lab01Project.jar
and use NetBeans to continue working on it.

Please leave Lab01Project.jar in your csci/202/labs directory for the remainder of the semester.


Last revised 25 August 2008, 1:20 pm