main 
but, as your move into
SwapEm, it displays variables of SwapEm. 
The information displayed in a variables window is the contents of C++ function activation records.
Download a ZIP'ed copy of the Lab 12 project and store it in the C:\files directory. Use PowerZip to extract the archive to the C:\ directory.
This should create C:\files\lab12\ with two subdirectories called SwapEm and Stoplite.
SwapEm are not reference variables.
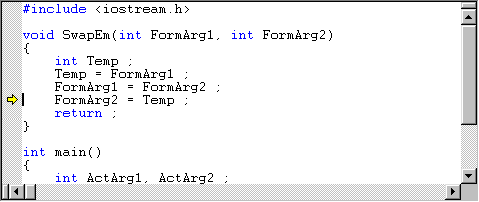
Rather than running the program, step through it with the debugger. Press
F10 to move one statement at a time through the main
routine. When the yellow arrow reaches the call to SwapEm, press
F11 to move into the SwapEm routine. Then contine to
press F10 to move through the statements of SwapEm.
As you step through the program, pay attention to the variables
window at the bottom off your Visual C++ window. At first, it will display
variables of main 
but, as your move into
SwapEm, it displays variables of SwapEm. 
The information displayed in a variables window is the contents of
C++ function activation records.
Step to the statement
FormArg2 = Temp 
Now move your
mouse into the variables and move between the activation records of
main and SwapEm. You do this selecting from a
pull-down menu that is displayed when you click on the down arrow at the right
end of the textbox labeled Context.
SwapEm has
reference parameters. Again step through to the statement
FormArg2 = Temp. Show your
instructor the activiation records for main and
SwapEm.
This time you'll see two windows. One window is our stoplights from
Lab 11. The North-South light should be a solid green, while the East-West
light is a blinking red. Right now the second window is nothing more than a
magenta background. Now press within the magenta. A car should appear! This car
will remain until the East-West light is green for at least fifty
Tick's.
The only files you'll change in this lab are stoplite.h
and stoplite.cpp.
If you'll look very carefully, you'll notice a slight difference between the Lab 11
stoplite.cpp and this
one. The difference is in the Tick routine which now takes a
single argument called carPresent. The variable
carPresent represents a car "pad" on the
East-West road. It is non-zero when a car is present, and it is zero when no car
is present.
Modify the StopLight class so that the EW light will stop flashing
when the car arrives.
Modify the StopLight class so that the NS light will change to Caution 20 ticks
after the car arrives at the EW light.
Modify the StopLight class so that the NS light will change to Caution 20 ticks
after the car arrives at the EW light and then to Stop 20 ticks later when the EW light changes to Go.
Modify the StopLight class so that it will go through a complete single cycle each
time an East-West car arrives and allow each car to cross the intersection 40 ticks after it arrives at the light. You
must hold the green light in the East-West direction for at least fifty Tick's
to allow the East-West car to pass.