Denne side viser hvorledse et multimeter bruges.
Håber du kan lide denne side her, så klik bare løs, husk at skrive til mig hvis du har ris/ros...
Jan R Steiniche
Dato: 030125
Se også Min kontakt side
The practical work introduces you to using a multimeter to make measurements from circuits. Once you are able to test circuits, you will understand better how they work and be able to locate and correct faults. |
Navigation
What do meters measure?
A meter is a measuring instrument. An ammeter measures current, a voltmeter measures the potential difference (voltage) between two points, and an ohmmeter measures resistance. A multimeter combines these functions, and possibly some additional ones as well, into a single instrument.
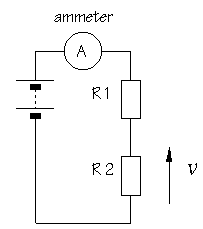
Before going in to detail about multimeters, it is important for you to have a clear idea of how meters are connected into circuits. Diagrams A and B below show a circuit before and after connecting an ammeter:
A |
|
B |
|
to measure current, the circuit must be broken
to allow the |
|||
ammeters must have a LOW resistance |
|||
Think about the changes you would have to make to a practical circuit in order to include the ammeter. To start with, you need to break the circuit so that the ammeter can be connected in series. All the current flowing in the circuit must pass through the ammeter. Meters are not supposed to alter the behaviour of the circuit, or at least not significantly, and it follows that an ammeter must have a very LOW resistance.
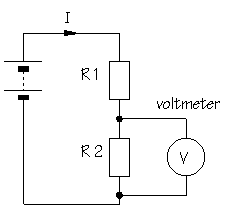
Diagram C shows the same circuit after connecting a voltmeter:
A |
|
C |
|
to measure potential difference (voltage),
the circuit is not changed: |
|||
voltmeters must have a HIGH resistance |
|||
This time, you do not need to break the circuit. The voltmeter is connected in parallel between the two points where the measurement is to be made. Since the voltmeter provides a parallel pathway, it should take as little current as possible. In other words, a voltmeter should have a very HIGH resistance.
Which measurement technique do you think will be the more useful? In fact, voltage measurements are used much more often than current measurements.
The processing of electronic signals is usually thought of in voltage terms. It is an added advantage that a voltage measurement is easier to make. The orginal circuit does not need to be changed. Often, the meter probes are connected simply by touching them to the points of interest.
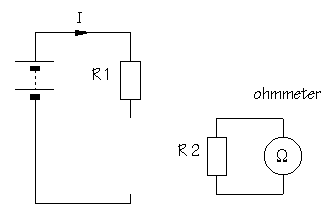
An ohmmeter does not function with a circuit connected to a power supply. If you want to measure the resistance of a particular component, you must take it out of the circuit altogether and test it separately, as shown in diagram D:
A |
|
D |
|
to measure resistance, the component must be removed from the circuit altogether |
|||
ohmmeters work by passing a current through the component being tested |
|||
Digital multimeters
Multimeters are designed and mass produced for electronics engineers. Even the simplest and cheapest types may include features which you are not likely to use. Digital meters give an output in numbers, usually on a liquid crystal display.
The diagram below shows a switched range multimeter:
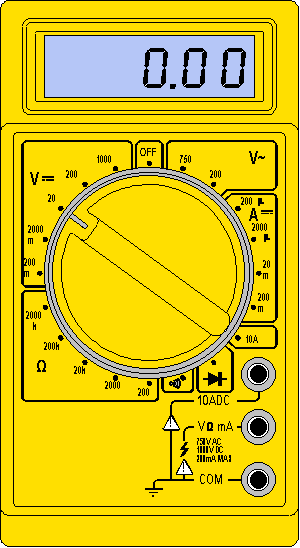 Switched range multimeter
The central knob has lots of positions and you must choose which one is appropriate for the measurement you want to make. If the meter is switched to 20 V DC, for example, then 20 V is the maximum voltage which can be measured, This is sometimes called 20 V fsd, where fsd is short for full scale deflection.
For circuits with power supplies
of up to 20 V, which includes all the circuits you are likely
to build, the 20 V DC voltage range is the most useful.
DC ranges are indicated by ![]() on the meter.
Sometimes, you will want to measure smaller voltages, and in this
case, the 2 V or 200 mV ranges are used.
on the meter.
Sometimes, you will want to measure smaller voltages, and in this
case, the 2 V or 200 mV ranges are used.
What does DC mean? DC means direct current. In any circuit which operates from a steady voltage source, such as a battery, current flow is always in the same direction. Every constructional project descirbed in Design Electronics works in this way.
AC means alternating current. In an electric lamp connected to the domestic mains electricity, current flows first one way, then the other. That is, the current reverses, or alternates, in direction. With UK mains, the current reverses 50 times per second.
![]()
For safety reasons, you must NEVER connect
a multimeter to the mains supply.
You are not at all likely
to use the AC ranges, indicated by ![]() , on your multimeter.
, on your multimeter.
An alternative style of multimeter is the autoranging multimeter:
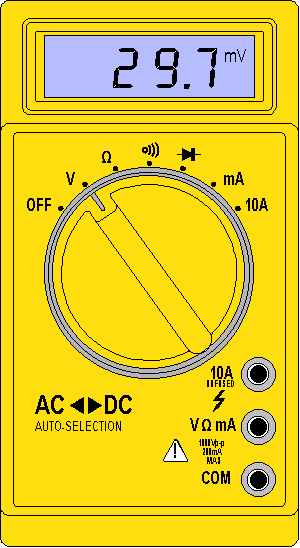 Autoranging multimeter
The central knob has fewer positions and all you need to do is to switch it to the quantity you want to measure. Once switched to V, the meter automatically adjusts its range to give a meaningful reading, and the display includes the unit of measurement, V or mV. This type of meter is more expensive, but obviously much easier to use.
Where are the two meter probes
connected? The black lead is always connected into the
socket marked COM, short for COMMON. The red lead is connected into the socket labelled V![]() mA. The 10A socket is very rarely
used.
mA. The 10A socket is very rarely
used.
.
Analogue multimeters
An analogue meter moves a needle along a scale. Switched range analogue multimeters are very cheap but are difficult for beginners to read accurately, especially on resistance scales. The meter movement is delicate and dropping the meter is likely to damage it!
Each type of meter has its
advantages. Used as a voltmeter, a digital meter is usually better
because its resistance is much higher, 1 M![]() or 10 M
or 10 M![]() , compared to 200
, compared to 200 ![]() for a analogue multimeter on
a similar range. On the other hand, it is easier to follow a slowly
changing voltage by watching the needle on an anlaogue display.
for a analogue multimeter on
a similar range. On the other hand, it is easier to follow a slowly
changing voltage by watching the needle on an anlaogue display.
Used as an ammeter, an analogue multimeter has a very low resistance and is very sensitive, with scales down to 50 µA. More expensive digital multimeters can equal or better this performance.
Most modern multimeters are digital and traditional analogue types are destined to become obsolete.
Making measurements
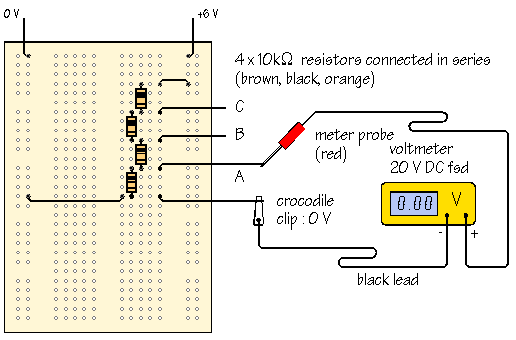
1. Voltage measurements:
Build
the circuit shown below using prototype board and four 10 ![]() resistors:
resistors:
Using the multimeter as a voltmeter, measure the power supply voltage and then measure the voltages at points A, B and C.
What do you notice about your results?
![]()
The four resistors are connected in series, making a chain known as a potential divider, or voltage divider. The total voltage is shared between the four resistors and, allowing for tolerance, each resistor receives an equal share. (You will find out a lot more about potential dividers in the next Chapter.)
Modify the circuit, replacing
one or more of the 10 ![]() resistors with 1
resistors with 1 ![]() or 100
or 100 ![]() values. Are the results as you
expect?
values. Are the results as you
expect?
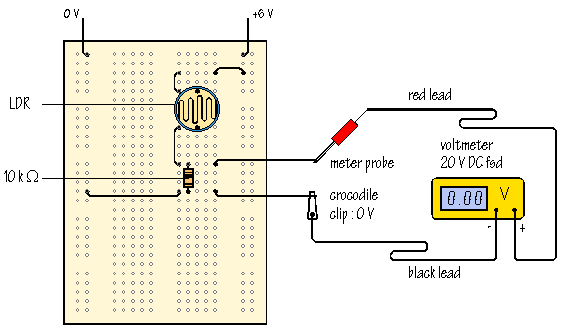
The diagram below shows a light sensor circuit built in a similar way:
The circuit uses an LDR, or light
dedpendent resistor.
The resistance of the LDR changes with illumination. In the dark,
the resistance is high, up to 1 M![]() or more. When light shines on
the LDR, the light energy increases the number of charge carriers
available to transfer current, and the resistance falls. In bright
light, the resistance can be as little as 100
or more. When light shines on
the LDR, the light energy increases the number of charge carriers
available to transfer current, and the resistance falls. In bright
light, the resistance can be as little as 100 ![]() .
.
What happens to the output voltage of the light sensor circuit when you cover the LDR with you hand?
![]()
Is the output voltage HIGH or LOW in the dark?
![]()
2. Resistance measurements:
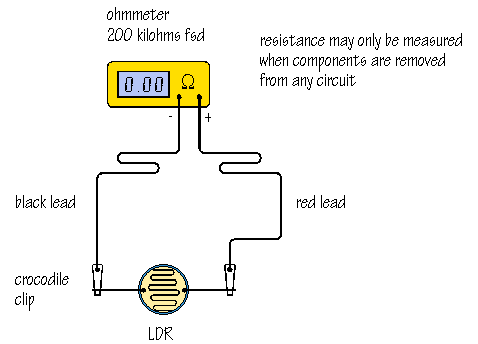
Remove the LDR from the circuit and measure its resistance, as follows:
To get the multimeter to function as an ohmmeter, you will need to select a resistance range. With a switched range meter, the 200 k position is usually suitable. You will see the resistance measurement change as the light level changes. Covering the LDR with your hand increases the resistance of the LDR.
If the meter reads ![]() this means that
the resistance is more than the maximum which can be measured on
this range and you may need to switch to a new position, 2000 k,
to take a reading. (How many megohms is 2000 k?)
this means that
the resistance is more than the maximum which can be measured on
this range and you may need to switch to a new position, 2000 k,
to take a reading. (How many megohms is 2000 k?)
You can check the value of any fixed value resistor in the same way, and confirm that you have worked out the colour code correctly. Don't forget that the colour code convertor program is available to help you.
3. Current measurements:
The diagram below shows a prototype board set up for the measurement of current:
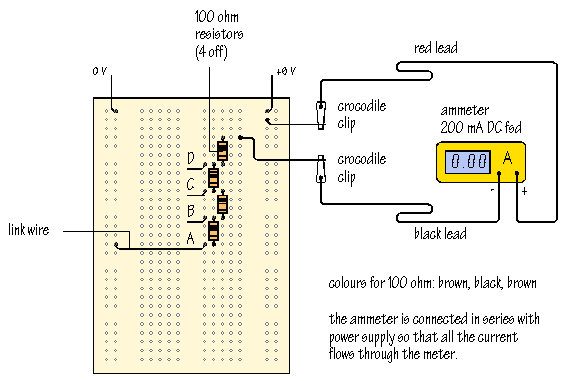
Note that the current must flow through the ammeter in order to reach the circuit.
Take a reading of the current with the link wire to 0 V in position A. Write down the current value you observe:
![]() A:
A:
Take new readings after moving the link to positions B, C and D:
|
B: |
C: |
D: |
Don't forget to write in the measurement units of your answer.
As the resistance is reduced, current increases. Calculate the current expected in each case using the formula:
|
Small variations, up to ±5%, can be attributed to the tolerance of the resistors.

