CSCI 201 Lab 8 -- Debugging in C++
Getting ready
If a directory called C:\files\Lab8
presently exists on your computer, delete it.
We're going to give you 2 Visual C++ project folders (i.e.,
workspaces) to start with this time. First download a ZIP'ed copy of all Lab 8 workspaces and store it
in the C:\files directory.
Use Powerzip to extract the files in it to the c:\files
directory.
This should create a C:\files\Lab08
directory with two subdirectories: weekdays and
buggy.
Open the weekday workspace and make sure it compiles. We
will uses this workspace to learn about the debugger.
Using the Visual C++ Debugger
This Lab will familiarize you with Microsoft Visual C++'s
Debugger. The debugger provides two powerful features which this lab
will demonstrate.
-
Executes your program line by line, instead of at full speed.
-
Allows for examination of any variable at any point in your program.
Starting a Simple Trace
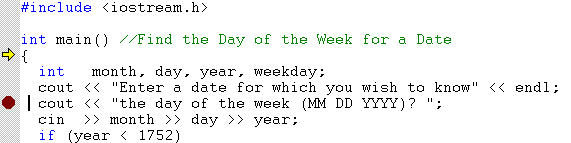
Start the debugger, by placing the "blinking cursor" on the top line of your code and
choose Run to cursor (Ctrl+F10)  from the Start Debug submenu of the Build menu (or floating toolbar).
This should bring up a code window with a yellow arrow placed after the first executable instruction. The yellow arrow
to the left of a statement means that execution is suspended at this line.
This will be the next statement executed.
Click somewhere lower in the code and again choose Run to cursor
(Ctrl+F10) from the Debug menu (or floating
toolbar). This will cause the program to run until it reaches the
line with the code you clicked on. Use this feature when you want the
debugger to jump to a specific line of code.
Continue the Trace
Step Over -- instruction by instruction stepping excluding functions:
Repeatedly press F10 or the Step Over  button.
Each click causes one statement to be executed. When you get to the part
of the code that needs keyboard input, you will need to type input into the console
window. To switch to the execution window, look on the
START menu bar and click on the MSDOS tab with the program name.
button.
Each click causes one statement to be executed. When you get to the part
of the code that needs keyboard input, you will need to type input into the console
window. To switch to the execution window, look on the
START menu bar and click on the MSDOS tab with the program name.
Step Into -- stepping inside functions:
Press F11 or the Step Into  button when the yellow
arrow marker is at a function call. This causes the debugger to step into a function as
opposed to stepping over, which traces all the code inside the function at once. Remember
that when you get to the part of the code that needs keyboard input, you will need to type
input into the console window.
button when the yellow
arrow marker is at a function call. This causes the debugger to step into a function as
opposed to stepping over, which traces all the code inside the function at once. Remember
that when you get to the part of the code that needs keyboard input, you will need to type
input into the console window.
If you "Step Into" a function that you do not need to examine, then get out, Press F11 or the Step Out  button. This allows the user to step out of the current function and return control back
to the line that called the function.
button. This allows the user to step out of the current function and return control back
to the line that called the function.
|
NOTE: As well as Stepping Into programmer-defined function, the debugger also allows for stepping
into C++ library functions.
|
Stop the Trace
To stop the debugger executing your program:
Choose Stop Debugging from the Debug menu or hit
Shift+F5 
Variable Examination
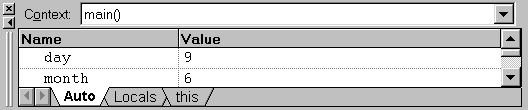
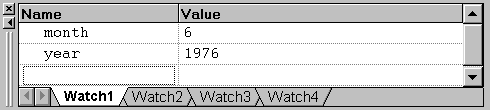
When in debug mode, the bottom portion of the Visual C++ window is divided into two windows--the "Variables"
window on the left side and the "Watch" window on the right side.
Examination Methods
- If you pause the mouse over a variable name, it's current value is
shown in a popup box. Try this on a few variables.
- The "Variables" window displays variables and their values from the the current
expression (the auto tab), local to the current function (the locals tab),
or in relation to the this pointer (the this tab).
- The "Watch" window allows variables & expressions to be
constantly evaluated while single-stepping through the
program. Variables can be typed directly into this window or dragged
into the window and dropped with the mouse from either the "Variables"
window or the source code window. An entry in the "Watch window" can
be deleted by selected the entry and pressing the Delete key. The
four tabs at the bottom of the window are used to group varibles.
|
NOTE: The variable values listed in the "Watch" & "Variables" windows can be modified
by the user for testing purposes. To modify a value in either of these windows, click the "Value"
field and enter a new value. All modified values are colored red to indicate that changes
were made during debugging.
|
Lab Checkoff 1
In the watch window, type the names of a couple of variables and
demonstrate that the values of these variables change as you step
through the program.
Importance of Breakpoints
Breakpoints are markers that are placed at specified lines of code
that cause the debugger to suspend execution of the program upon
reaching that line of code. Breakpoints are important because they
give the programmer a means to stop at a particular line of code and
verify that a program is executing correctly.
Setting Unconditional Breakpoints
To set an unconditional breakpoint, click the line in the program where the breakpoint
is to be places and select the breakpoint toggle icon
 or press F9.
A big red dot should appear to the left of the line, if a breakpoint has been set.
(To remove breakpoints, this same method is used on lines that have breakpoints.)
or press F9.
A big red dot should appear to the left of the line, if a breakpoint has been set.
(To remove breakpoints, this same method is used on lines that have breakpoints.)
Start Debugging Process
Now since your breakpoints have been set, start the debugging process by pressing the Go icon
 or press F5.
This will cause the program to run until it reaches the next breakpoint.
or press F5.
This will cause the program to run until it reaches the next breakpoint.
Set another breakpoint further along in the code. Then repeat this procedure
to get to the next breakpoint.
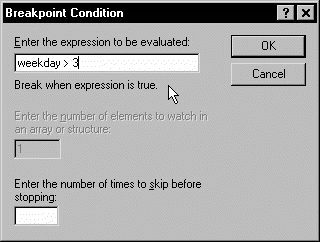
Conditional Breakpoints
Conditional breakpoints only stop/pause program execution if a specified
condition is true. They are commonly used to halt the program during loop execution.
To make a conditional breakpoint, first make an unconditional breakpoint. Then select
Breakpoints from the Edit menu (Alt + F9).

Click on one of the breakpoint you created or select the cursor line from the
 popup menu to choose your breakpoint. Its easier
to select your breakpoint by clicking on it in the window entitled
"Breakpoints:"
popup menu to choose your breakpoint. Its easier
to select your breakpoint by clicking on it in the window entitled
"Breakpoints:"
Now click the Condition button and type the Boolean expression that
you wish to check, as shown in the following example. Now close this
window by pressing the "OK" button and then close the "Breakpoint"
Window by pressing "OK".
Now you need to enter the debugger to execute your conditional breakpoint. Use the
Go command to execute the program until your
conditional breakpoint is reached (if, indeed, it is).
|
NOTE: Breakpoints are persistent. When a project is closed and reopened, any breakpoints
set during a debugging session will still be set.
|
Lab Checkoff 2
Demonstrate the execution of your conditional breakpoint.
Expression Evaluation
Quickwatch
Activating Quickwatch
To activate quickwatch, click on the quickwatch button
(  ) or
hit (Shift + F9).
) or
hit (Shift + F9).
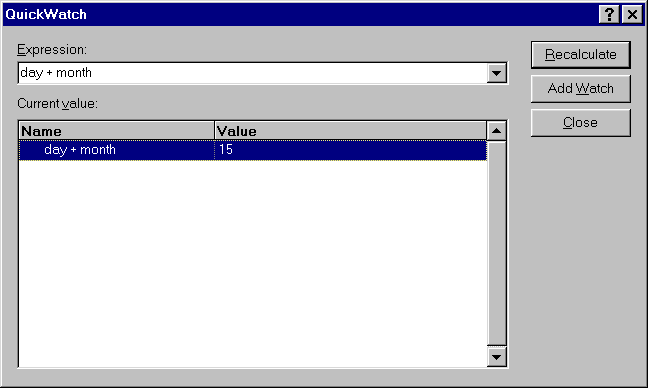
When you click the "Recalculate" button, the value of the expression is recalculated.
If you hit the "Add Watch" button, the expression is included in the watch window and is continuously updated there.
Lab Checkoff 3
Demonstrate the execution of your quick watch selection.
Fixing a program
Open the workspace c:\files\lab08\buggy\buggy.dsw. The
program in this project has several problems. Build this program and
run it. It should first ask you to enter two integers, the second one
larger than the first, and then it should print out all the prime
numbers between the first integer and the second integer. For example,
if you enter 3 5, it should print out
3
5
Instead, it
gets stuck in an infinite loop. Hit Control-C (hold down the ctrl key
and press the C key) to break out of the program. (Remember that key
combination - there will probably be infinite loops in your future
programs.)
Now use your knowledge of the debugger to find why this program
doesn't work and fix it. There will be several things that you need
to fix.
Lab Checkoff 4
Show the instructor the corrected program.