main 
but, as your move into
SwapEm, it displays variables
of SwapEm. 
The information displayed in a variables window is the contents of C++ function activation records.
If a directory called C:\files\lab9 presently exists on your computer, delete it.
Download a ZIP'ed copy of the Lab 9 project and store it in the C:\files directory. Use PowerZip to extract the archive to the C:\files directory.
This should create C:\files\lab9\ with two subdirectories called SwapEm and Plot3D.
In this lab we'll experiment with different ways of passing
parameters. First open and build C:\files\lab9\SwapEm\SwapEm.dsw.
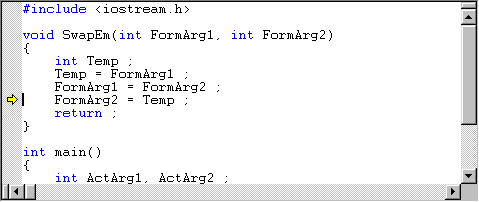
Take a look at the program SwapEm.cpp.
The program should look familiar. Notice that the two formal
arguments of the SwapEm are not reference variables.
Rather than running the program, step through it with the
debugger. Press F10 to move one statement at a time
through the main routine. When the yellow arrow reaches
the call to SwapEm, press F9 to move into
the SwapEm routine. Then continue to press F10
to move through the statements of SwapEm.
As you step through the program, pay attention to the variables
window at the bottom off your Visual C++ window. At first, it will
display variables of main 
but, as your move into SwapEm, it displays variables
of SwapEm. 
The information displayed in a variables window is the
contents of C++ function activation records.
Step to the statement FormArg2 = Temp

Now move your mouse into the variables and move between
the activation records of main and SwapEm.
You do this selecting from a pull-down menu that is displayed when
you click on the down arrow at the right end of the textbox labeled
Context.
Modify the code so that SwapEm has reference
parameters. Again step through to the statement FormArg2 = Temp.
Show your instructor the activiation records for main
and SwapEm.
The driver program Main3D.cpp
will call the function (also called a
| Range | Color |
|---|---|
| .00 to .1666.. | Red |
| .1666.. to .3333.. | Yellow |
| .3333.. to .50 | Green |
| .50 to .6666.. | Cyan |
| .6666.. to .8333.. | Blue |
| .8333.. to .00 | Magenta |
Go ahead and build and run the program.
float MyFuncN( float & x, float & y, float & z)
{
        z=x+y;
	return ;
}
The modifications that you need to make are as follows: