(The material in this lab was taken from a laboratory exercise presented in ECE3724: Microprocessors developed by Jones, Reese and Bruce and offered at Mississippi State University.)
If you not already done so, download and unzip the following ZIP archive. This is the complete code archive for the course, and this lab uses files from the chap3/ directory.
View these video tutorials before you enter the lab, and try and duplicate the actions of the videos on your own PC.
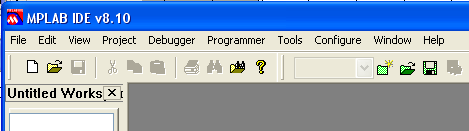
This lab introduces you to the Microchip MPLAB Integrated Design Environment. This writeup was done using MPLAB 8.10; later versions may have slightly different menus.
The tasks in this lab are:
Unzip the archive and use MPLAB to simulate the PIC24 assembly language program in the mptst_word project to become familiar with the MPLAB environment.
Do some simple programming tasks using PIC24 assembly language.
This portion of the lab writeup is an introduction to the MPLAB environment. In this section, you demonstrate that you can use MPLAB to assemble and simulate an assembly language program.
Start the MPLAB IDE. The basic menu is:
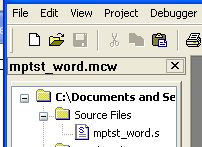
Use Project -> Open and open the mptst_word.mcp project. Use Project -> Build All to assemble the program. If the source file is not already open, double-click on the mptst_word.s source file to open it.
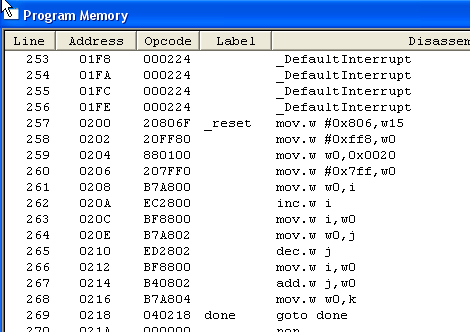
After the project is assembled, use View -> Program Memory and open the program memory window. Scroll the window until you find your program in memory. It will start at program memory address 0x0200.
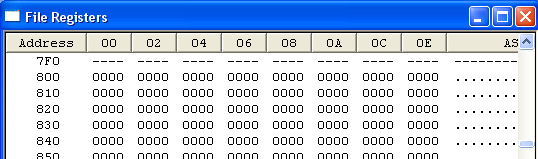
Use View -> File Registers to view data memory. Scroll to location 0x800 which is where your variables will start.
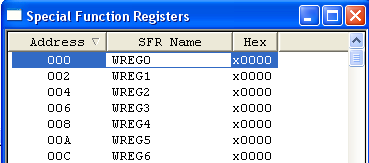
Use View -> Special Function Registers to view the special function registers (W0-W15, etc).
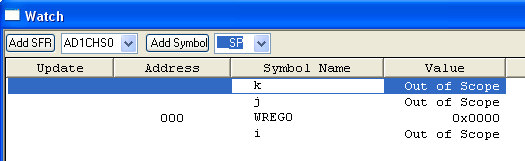
Open a watch window (View -> Watch) and use the ‘Add Symbol’ and ‘Add SFR’ to watch variable values and special function register values, respectively, of the i, j, k variables and W0 special function register:
Use Debugger -> Select Tool -> MPLAB Sim to select the MPLAB Simulator. Use Debugger -> Step Into (F7) to single step the program. Watch both the memory locations and watch window locations, and correlate their changing values with the instructions being executed.
Modify the avalue assignment (statement avalue = 2047) to be the last four digits of your student ID. Reassemble the program, and re-simulate it. Verify that the values displayed in memory match the expected values (warning, avalue is in decimal, as is the last four digits of your student ID, the values in memory are in HEX).
| Take a screen shot of both the Watch window contents (View -> Watch) and the data memory window contents (View -> File registers). Show your instructor that you have verified the screen values – show your calculations! |
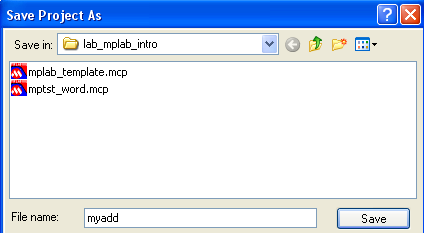
Use Project -> Save Project As and save the mptst_word project as a new project named myadd.
Save the mptst_word.s file as myadd.s. Right-click on the mptst_word.s file in the left-hand workspace window and use the Remove option to remove it from the myadd project. Right click on the Source Files and use Add Files to add the myadd.s file to the project. Edit the myadd.s file and remove all of the instructions from mov #avalue,W0 through mov WREG,k . You can now use this file as a start for a new program.
Your student ID is a 9-digit decimal number: Y8Y7Y6Y5Y4Y3Y2Y1Y0
Write a program to add the four digit number formed by Y3Y2Y1Y0 to the four-digit number formed by Y7Y6Y5Y4. Reserve space for two 16-bit variables in data space named lsp and msp to hold the values Y3Y2Y1Y0 and Y7Y6Y5Y4 respectively. Reserve space for a variable named sum to hold the sum of lsp and msp.
The following C code describes our program. You must translate each line of the C program to assembly instruction(s).
uint16 lsp, msp, sum;
lsp = Y3Y2Y1Y0;
msp = Y7Y6Y5Y4;
sum = lsp + msp;
Section 3 of the programming reference manual document contains the instruction set of PIC24. The instruction set is also available here.
Use the watch window to watch variables lsp, msp, and sum. Also, use the data memory window to monitor the memory locations corresponding to these variables. Write your program, simulate it, and verify that you receive the correct results.
| Take a screen shot of the Watch window contents, the data memory window contents, and your program listing. Show your instructor the calculations that verify the screen shot values match the expected result. |
Create a project named mysub using the same procedure given in Part 2 (Project -> Save Project As, etc.) corresponding assembly language file named mysub.s. Using the digits of your student ID, write an assembly language program that does the following C program. You must translate each line of the C program to assembly instruction(s).
uint8 i, j, k, l, m;
i = Y1Y0;
j = Y3Y2;
k = Y5Y4;
l = i + j;
m = k – l;
Variables i, j, k, l, m are all 8-bit (byte) variables. ALL operations are byte operations.
Use the watch window to watch variables i, j, k, l, m. Also, use the data memory window to monitor the memory locations corresponding to these variables. Write your program, simulate it, and verify that you receive the correct results.
| Take a screen shot of the Watch window contents, the data memory window contents, and your program listing. Show your instructor the calculations that verify the screen shot values match the expected result. |