CSCI 255 Lab
Lab 10 -- Making Music with the PIC24
Part 0: Review & Background
Review
In this lab, you will apply what you've learned about pin I/O in Lab 9 to making music. Specifically, you'll use a pin in digital output mode to drive a speaker. Begin by reviewing the material in Part 2 of Lab 9 regarding configuring and controlling an output pin.
Background: Making Music with Digital Output
It is possible to make great sounding music using a microcontroller, just look at a Moog synthesizer. But that's not what we are going to do. We're going to make music using square wave pulses. But before explaining exactly what that means, let's learn a little bit about sound.
Sound
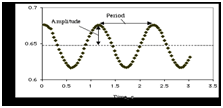
Sound is a wave. Not a wave like this:
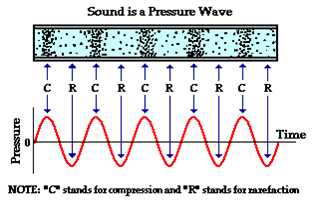
But rather, a wave like this:
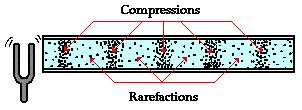
a longitudinal pressure wave that is detected by your ears. The changes in pressure detected by our ears occur at regular time intervals that can be described as "periodic." A plot of pressure versus time could (for certain sounds) appear as a sine curve. The peak points of the sine curve correspond to
compressions; the low points correspond to rarefactions; and the "zero points" correspond to the pressure which the air would have if there were no disturbance moving through it.
Sound is make by movement because movement produces pressure waves in the air. When you tap your finger on a table, the vibration causes the table to shake a bit which sends vibrations out through the air around the table.
Most movement has associated vibration and vibration implies periodicity like the sinusoidal sound wave pictured above. Indeed, almost any sound can be produced by mixing together
sound waves with different periodicity or frequency. But wait---let's slow down a little.
The sinusoidal sound wave depicted above is produced by something, maybe a guitar string, vibrating at a specific frequency. Frequency is defined by the number of oscillations a sound wave produces per second. If the time range of the graph above were one second, the the frequency of the above wave would be 5 cycles/sec and "cycles per second" are measured in hertz. Using this terminology, the frequency of the above wave is 5 Hertz, abbreviated 5Hz.
The last piece of the picture is the tie to music: The frequency of a sound wave determines it's pitch which defines its musical note.
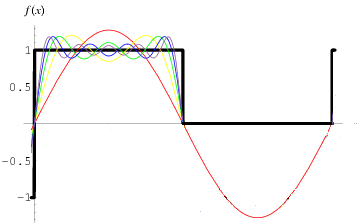
A square wave, such as we'll be generating, is depicted in black below along with a sine wave
(in red) of the same frequency---the same note. The other
wave forms (in different colors) are the additional sound frequencies that must be added to the sine wave to produce a square wave (or at least an approximation of a square wave). Note also that our square wave drops to zero as opposed to matching the negative pressure of the sine wave. For these reasons, as well as the quality of our speakers, the music we produce will not be that pleasing to the ear. But, if the square waves we produce occur at a frequency corresponding to a musical note, you should be able to recognize that note.
Part 1: Making Music
Begin by opening an existing project from the chap8 directory of the example code archive; I suggest chap8/ledflash.mcp. Create a new music.mcp project by saving the project with that name. Remove the file ledflash.c from the project and in its place add music.c. Next download pitches.h to the include directory in the example code archive and add it to your music project.
Your first job is to complete the program by writing the missing playTone() procedure. The music.c program that you downloaded should compile but won't do anything without that procedure.
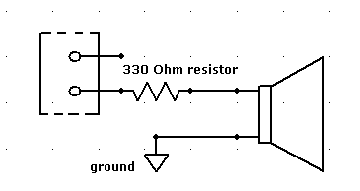
After you have written the playTone() procedure, add a speaker and resistor to the appropriate pin as shown schematically below and try your program. If you think that you've got it right, show it to your instructor.
| Show your instructor your music program in action. |
|
Part 2: Making It Louder
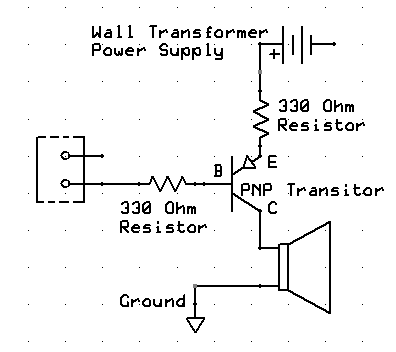
As I'm sure you noticed, your speaker was not booming with sound. The problem is that the PIC 24 can not provide the power needed to drive the speaker. To increase the volume of sound (but, unfortunately not the quality) produced by the speaker we'll use a transistor as an amplifier. Create the circuit shown below on your PIC development board and enjoy the increase volume of sound produced by your speaker.
| Demonstrate your improved sound system for the instructor. |
|
Part 3: Making It Yours
Your last task is to customize your music program. Make a change that's noticeable and interesting, and that you can explain to your instructor. The simplest change would be to play a different tune, but the choice is yours.
| Show your instructor your new music program in action, and explain the change that you made. |
|