CSCI 201 Lab 4 -- Applets
In this lab you will write your first Applet. An Applet is a
java program that is intended to be embedded into an HTML document and
executed using a web browser. In contrast, a java application,
the kind of programs that we have written so far, is a stand-alone
program that can be executed using a java interpreter.
Cleaning up
Before you start to work on a new project you must first make sure a
project by the same name is not already on the computer you are
using. Check to see if there is a directory C:\Files\Stonehedge on
your PC. If one exists, delete it now.
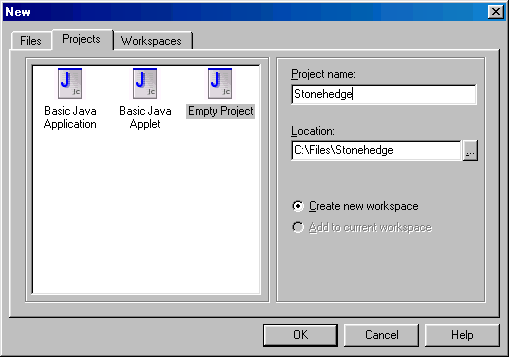
Creating the project
Start today's lab by opening up JCreator and creating a new
project. Here's how...
- From the Start button menu, select Programs
- From the list of Programs, select JCreator
- In the JCreator application window, select File, New, and select "Empty Project".
- Be sure to store your new project folder in the "Location"
C:/Files/
- Type Stonehedge for the name of your project folder.
Your window should now look like the one below.
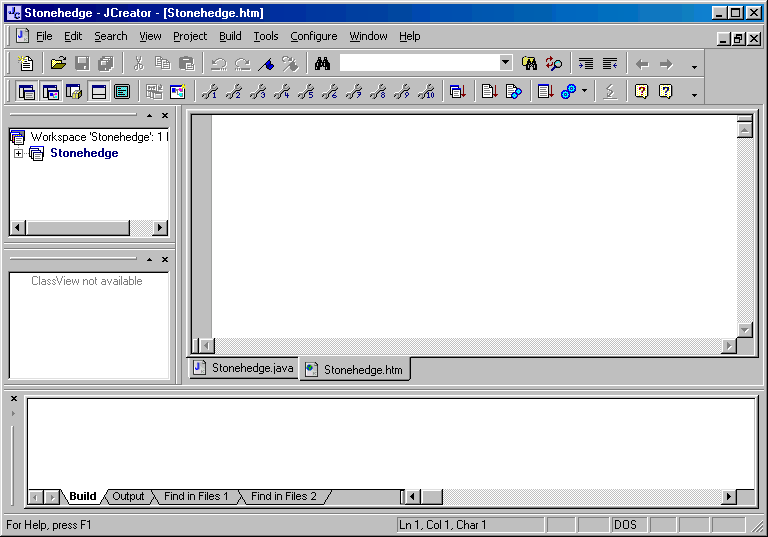
- Again, select File, New, but this time make sure the Files tab is
selected. Choose "Java File" and type Stonehedge for the file name and
click OK.
- And yet again, select File, New, make sure the Files tab is
selected, but choose "HTML File". Type Stonehedge for the file name
and click OK. Your JCreator should look like the one below.
Nitty Gritty
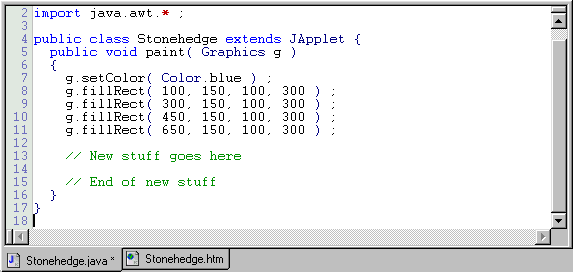
We are now ready to get down to the nitty gritty of this lab. First,
copy the code from Stonehedge.txt (Use
the browser's Back button or arrow to come back here after
copying). Paste it into the "Stonehedge.java" file in your project.
Select the "Stonehedge.java" file by clicking the "Stonehedge.java"
tab in the JCreator window as shown below.
Now, copy the code from Webpage.txt,
(again, use the browser's Back button or arrow to come back
here after copying), and paste it into the "Stonehedge.html" file in
your project. In some browsers, selecting the Webpage.txt link above
displays a grey browser window as opposed to the text of the file
Webpage.txt. If this happends to you, select View from the
browser tool bar and then select Source to get to the text
that you need to cut and paste into "Stonehedge.html".
Let's talk a little about "Webpage.txt", (we'll learn about
"Stonehedge.txt" later in the lab). "Webpage.txt", which you copied
into "Stonhedge.htm" is an HTML document. A HTML file describes how
text, images, and multimedia are to be displayed by a Web browser.
Because Applets are designed to be run by internet browsers, each
applet must be linked into the web by creating an HTML document
that references the compiled applet (i.e., the .class
file). Notice how "Stonehedge.class" is referenced in "Webpage.txt":
<applet code="Stonehedge.class" width=850 height=450>
In this line of HTML, "applet", tells the browser to run an
applet, "code="Stonehedge.class"" defines the location of the applet
code, and the width and the height of the display are specified in the
last portion of the line.
Now compile and run your project. Do this by selecting the "Build"
menu and then "Compile Project", or "F7" will do it for you. Next,
choose "Build" and then "Execute Project", or "F5". First, a MS-DOS
window will open and then the appletviewer will open. It
should look like the following:
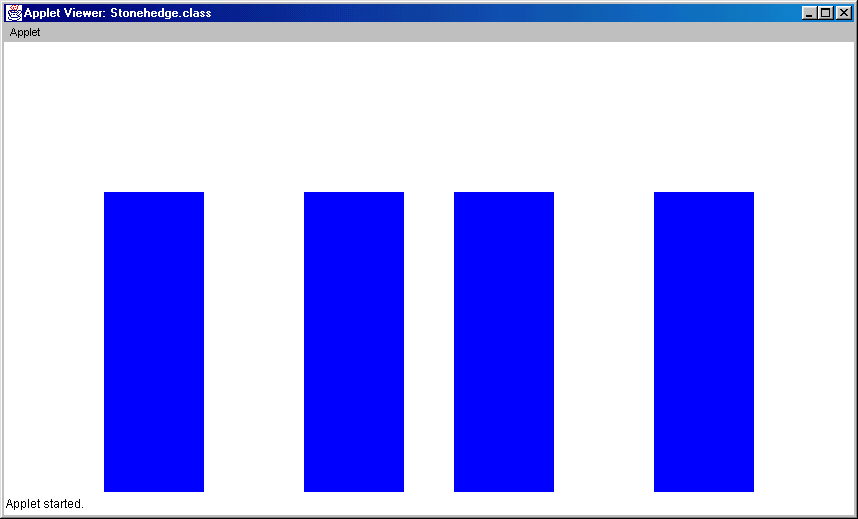
JCreator uses a program called an appletviewer, which comes
as part of the SDK to display your applet. It is possible to
reconfigure JCreator to display your applet in a web browser, if you
prefer (see JCreator's "Help" for more information).
Lab Check-off 1
After you get your project to run, you need to show the appletviewer
to your lab instructor before proceeding.
Lab Assignment
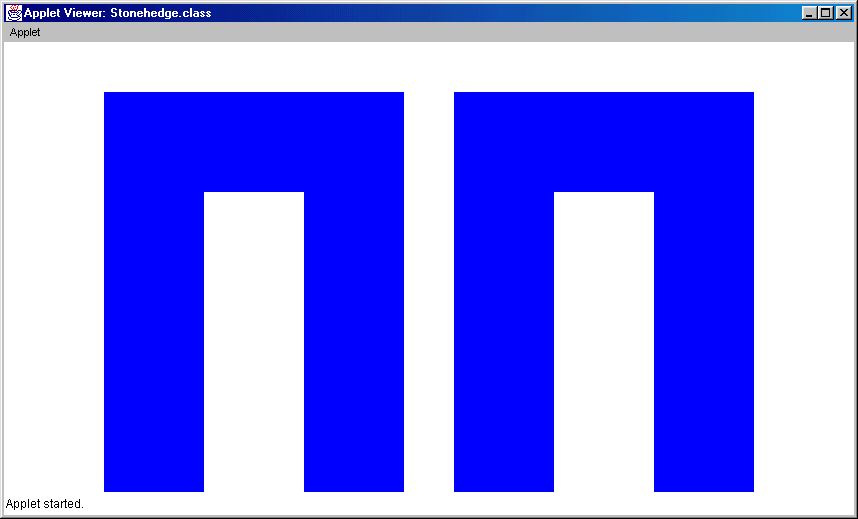
Your job is to modify your program so that it gives a more accurate
rendition of the final version of Project Stonehedge, as shown below.
You do this by adding two rectangles to the applet. To help you out,
let's talk a little about the Java file that we already have. The file
starts by importing classes from two packages, the class "JApplet"
from the package "javax.swing", and all classes from the package
"java.awt". We will not discuss these classes in-depth right now, but
we need the classes in the package java.awt in order to draw
things. We need the JApplet class because all applets are
created by modifying this class. Notice the line of code:
public class Stonehedge extends JApplet {
This is where we tell the compiler that our applet called "Stonehedge"
will be a modification of the "JApplet" class.
Our applet contains only one method. Notice that this method is
not main(); applets do not need a main() method because their
execution is controlled by the Web browser. When we write an
applet, we need to define a method called paint(); the "paint()"
method is responsible for creating the applet display. It always has
a single parameter (the value in ()'s) that is a Graphics
object. We can give the parameter any name we choose, it this case we
have named it "g". We use methods that belong to this Graphics object
to draw things in our applet display. (The Graphics class is defined
in the package "java.awt".) Let's take a look at the methods we use.
	public void paint(Graphics g) {
		g.setColor( Color.blue ) ;
		g.fillRect( 100, 150, 100, 300 ) ;
		g.fillRect( 300, 150, 100, 300 ) ;
		g.fillRect( 450, 150, 100, 300 ) ;
		g.fillRect( 650, 150, 100, 300 ) ;
                 ...
        }
First we set the color to blue with g's setColor() method,
giving it the object Color.blue as input. Then we draw
rectangles and fill them with the color we have already specified
(i.e.,blue) using the method "fillRect()". This method has four
parameters corresponding to the four pieces of input it needs to do
its job. Using the first call to "FillRect()" as an example, the
inputs are:
g.fillRect( 100, 150, 100, 300 ) ;
- The x coordinate of the upper-left corner of the rectangle which
is 100 pixels from the left edge of the drawing area.
- The y coordinate of the upper-left corner of the rectangle which
is 150 pixels down from the top of the drawing area.
- The rectangle's width which is 100 pixels.
- The rectangle's height which is 300 pixels.
You now know enough to add the two additional rectangles needed to
complete this assignment. You may have to dust off your high school
geometry skills to figure out how to size and place them. Have Fun!!!
Lab Check-off 2
Ask your lab instructor to verify that you've modified the Stonehedge program to produce
the display shown above.
Extra Credit
Just to show off your knowledge of geometry, make the first set of
three connected rectangles in Stonehedge Red and rotate them ninety
degrees so that the rectangles are standing on their sides and form
what looks like a "C".
Extra Credit Checkoff
After you have modified and
tested your code, ask your instructor to run it.