Creating an account
ssh csci373@uncacsci-piN-L
id
sudo adduser YOURUNAME
sudo adduser YOURUNAME sudo
sudo adduser YOURUNAME gpio
sudo adduser YOURUNAME i2c
ls /home
logout
Various Linux commands
id
ssh csci373@uncacsci-piN-L
touch empty.txt
echo CSCI 255 file
echo CSCI 255 file > file.txt
mkdir playpen
cd playpen
echo Raspberry Pi > another.txt
cd
ls
ls -l
ls -ld
ls -la
ls -lR
ls -laR
ls /home
grep csci373 /etc/passwd
grep YOURID /etc/passwd
grep YOURID /etc/shadow
sudo grep YOURID /etc/shadow
grep YOURID /etc/group
logout
Creating ssh access
Just take the defaults on the third command. Read the Ubuntu documentation on SSH keys if you want to know something about secure connections.
ssh-keygen
ssh-copy-id YOURID@uncacsci-piN-L
ssh uncacsci-piN-L
If you had to give a password, get in touch with us.
Installing the Pi Cobler
Power it down before continuing. Many have messed up the next step.
sudo shutdown -h now
Unplug the Pi and read about the Adafruit Pi Cobbler Kit. There are three version available. Try to use one with at least one 26-pin side.
You must have the side of the ribbon with the white stripe in the corner of the Raspberry Pi. You must have the side of the ribbon with the white stripe in the corner of the Raspberry Pi. You must have the side of the ribbon with the white stripe in the corner of the Raspberry Pi. Once you do, power up the Pi again.
Turn the Raspberry Pi on. Most Raspberry Pi’s should have the GPIO configuring. Make sure the directory /sys/class/gpio is installed. If it isn’t look at Adafruit’s Configuring GPIO to make sure you have all the modules
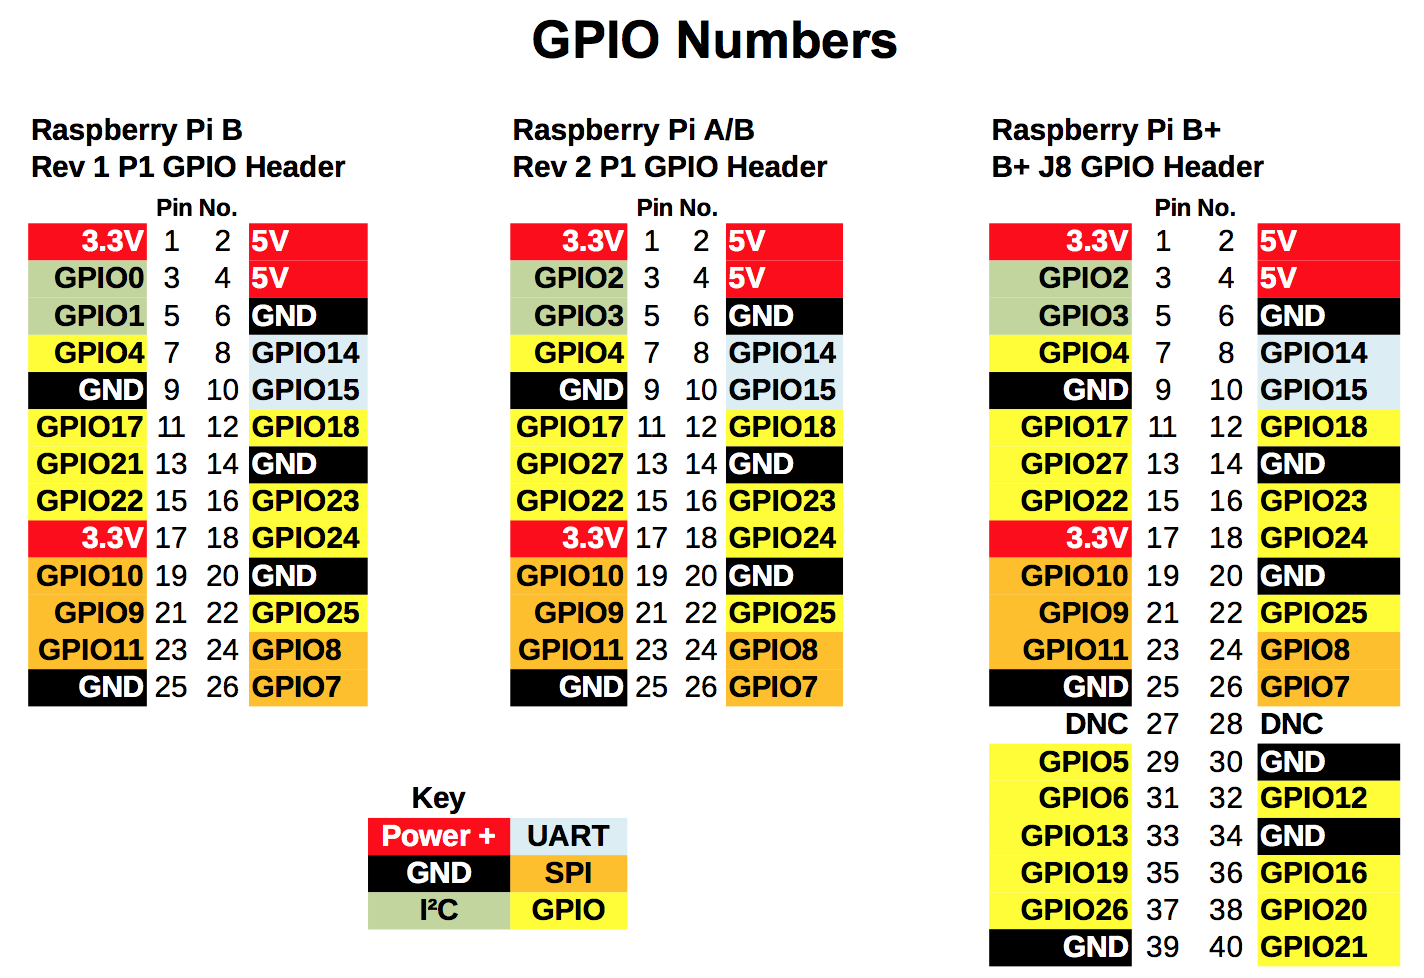
Raspberry Pi Pinout
What to do next
Start with the Idiot's Guide To Getting Started with Raspberry Pi's GPIO Pins. You may want to unplug the Cobbler while you are wiring. From there you can try some more advanced tasks. Take a look at some of the following for inspiration.