home | homework index | labs index
|
|
CSCI 201
Introduction to Algorithm Design home | homework index | labs index |
SPRING 2007 |
One of the main motivations for Java was to allow the programming of graphical applications. One of these type of applications is the Applet, Java programs that run inside of a web browser. Applets use Java frames to create a drawing space for pictures and animations.
In this lab we will also draw some pictures, but we'll put
out frames inside a normal application window.
Your biggest challenge for the lab will be reading
about Java's Graphics class. It's powerful
and has lots, maybe even too many, methods.
Download Stonehenge.zip, a ZIP file containing a NetBeans project named
Stonehenge and unZIP this project
into your csci/201 directory.
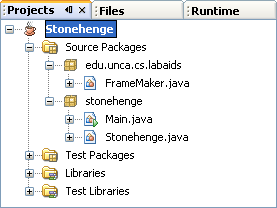
Try to make your Projects panel look
something like the following picture before continuing.
Take a minute to look at the StonehengeMain.java
file. This contains the main method for your application.
There isn't much to it, only a single line.
public static void main(String[] args) {
    edu.unca.cs.labaids.FrameMaker.component2Frame(new Stonehenge(), "Stonehenge") ;
}
We've actually done the hard work for you by providing a
Java method component2Frame that places a frame
around a simple component. You don't need to modify this
file unless you think it would be fun to change the title of
your frame.
By the way, the Java code for component2Frame is
present in your project. It in a file called
FrameMaker.java within the
edu.unca.cs.labaids project.
You can and will use this class to create other Java graphical
applications; however, you should not modify this class.
Now take a look at the Stonehenge class within
the Stonehenge.java file.
This is the class that implements a Java component.
This is done by extending a java.swing.JComponent
in your class definition.
There is a class constructor that is used to specify the preferred size of the graphical component. This size isn't fixed in stone. You'll still be able to resize the window with your mouse.
Stonehenge() {
    setPreferredSize(new Dimension(900, 600)) ;
}
Continue to look on down your program until you find the
paint method. This method is invoked, by
the Java run-time system, to
draw objects on the screen. Right now it's pretty simple.
It sets the drawing color to blue and then draws
four rectangles.
    g.setColor( Color.blue ) ;
    g.fillRect( 100, 200, 100, 300 ) ;
    g.fillRect( 300, 200, 100, 300 ) ;
    g.fillRect( 500, 200, 100, 300 ) ;
    g.fillRect( 700, 200, 100, 300 ) ;
Go ahead and build and run the project
You'll get a view of a few of Stonehenge's
mystical vertical pillars.
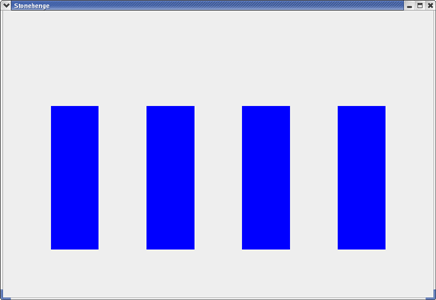
This is how UNCA professors of ancient European history
believe that Stonehenge looked
after the first 201 years of construction.
Run your program. If all goes well, you should see an incomplete Stonehenge.
Your job is to modify your program so that it gives a more accurate,
though still boring,
rendition of Project Stonehenge, as shown below.
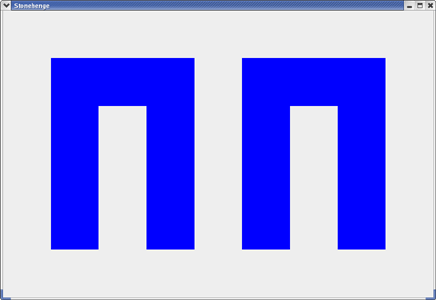
You improve Stonehenge by
adding two rectangles to the display. To help you out,
let's talk a little about your present Java file. The file
starts by importing classes from the
java.awt package.
Stonghenge contains only one method, paint,
which is responsible for creating the display.
This method always receives
a single parameter, a Graphics
object. We can give the parameter any name we choose, but in this case we
have named it simply origG.
You might note that we immediately copy origG
into another Graphics variable g.
This is because one of us read some Sun documentation that
told us that we shouldn't modify the Graphics object
passed to the paint method. We're not sure why,
but we do as told.
Let's take a look at some of the statements of the paint method.
The first three statements obtain the size of the window.
    Dimension PanelSize = getSize() ;
    int PanelWidth  = PanelSize.width ;
    int PanelHeight = PanelSize.height ;
This may seem unnecessary as we set the size of the window when we created it; but the "user" may have resized the window, so we really do need to check.
Next we create a copy of the graphic object and then
we make the drawing
blue by passing in the
color Color.blue to the
setColor() method.
    Graphics g = origG.create() ;
    // All modifications go here!
    g.setColor( Color.blue ) ;
Now we can draw the four rectangles and fill them
with our chosen color using the
fillRect. This method has four
parameters corresponding to the four pieces of input it needs to do
its job. Let's take a look, in order, at the four parameters used in
our first call to fillRect.
g.fillRect( 100, 200, 100, 300 ) ;
By the way, a pixel is one of those million tiny dots that make up the monitor screen.
You now know enough to add the two additional rectangles needed to complete this assignment. You may have to dust off your high school geometry skills to figure out how to size and place them. But give it a try.
Since it would be rather boring just to paint it all in blue,
you might want to look at the
Java
documentation for the Color class to see
how you could make a rainbow of stones.
If you are adventurous, you could think about
using the
drawString method
of Graphics to add your name to the drawing.
And, if you are truly adventurous, you can modify the
code so that the pillars shrink and grow as you resize the window.
Show your instructor your running application.
Download Face.zip, a ZIP file containing a NetBeans project named
Face and unZIP this project
into your csci/201 directory.
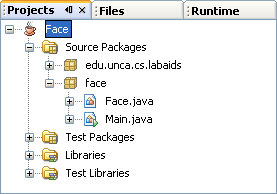
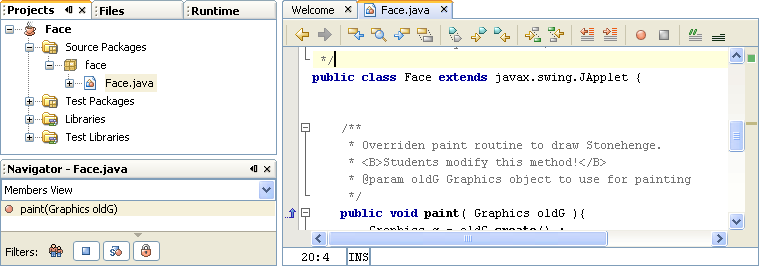
Try to make your Projects panel look
something like the following picture before continuing.
Click on the icon for the Face.java file.
This should bring up the source code for the Face class.
Build and run the project.
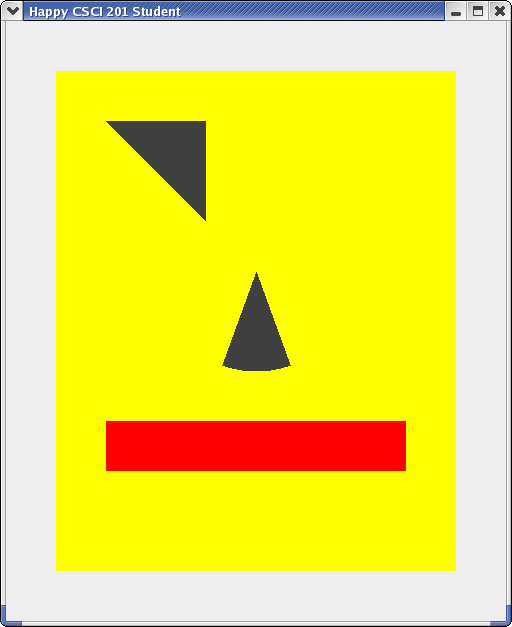
You should see a rather abstract face with only a nose, mouth, and one eye.
You need to modify the paint method of the
Face class to produce an improved face. (Ah,
if all of life were so easy.) You are expected to be creative, both
in designing the face and in using Java classes. Look at Sun's
documentation for the Color
and Graphics
classes to see what colors and graphic objects are available. You
might also find your textbook to be useful.
Take a look at Sun's on-line documentation for the fillArc method of Graphics. Everything we needed to know to draw that nose is located in this information. You just have to read and understand it. So give it a try! (By the way, reading and understanding documentation is a major part of the work life of a computer professional.)
In order to use the methods defined in the Graphics
class, you need to remember how the display coordinate system is
setup. The origin of the coordinate system is the top-left corner of
the display, with the positive x-axis running horizontally
to the right, and the positive y-axis running vertically
down, not up, the right side of the display. Also, distances
are measured in terms of pixels, the little dots that make up
your screen.
Remember, the order in which the objects are drawn to the screen makes a difference. If you want to draw a black pupil in the center of a green iris, you must draw the surrounding iris first.
Here are some of the faces that students have created in the past when CSCI 201 was taught using C++. Most of these folks actually graduated from UNCA in spite of this assignment.
This lab has more flexible rules than the others. However, it has few definite rules:
Graphics object. We suggest you
choose fillOval for one of your two.
Show your artistic effort to the lab instructor.
There are a couple of ways you could put your face program on the network.
If you look within NetBean's various files, you will find one called
Face.jar within your
csci/201/Face/dist directory.
This is a Java archive file that
contains your compiled classes, both Face and Main,
along with the helper class, edu.unca.cs.labaids.FrameMaker,
in a rather tidy package which can be run simply by typing the
command "java -jar Face.jar" on
any computer where Java is installed.
However, the more exciting way to distribute your program would be to turn it into an Applet where it could be downloaded in a browser. Making your program into an Applet isn't that hard. In addition to a little manipulation of your Java code, you must create an HTML file, something we hope you did in CSCI 107,
You really must read these directions carefully. These steps do work, but if you skip any of them you must come back to this point and try again.
You're going to perform he following steps that are described in the next few sections. This is a preview and checklist. Don't perform these actions, until you have read the relevant lab section. Notice that you
javax.swing.JComponent to
javax.swing.JApplet
in Face.java.
Face() constructor
in Face.java.
Main class
(Main.java file)
from the face package.FrameMaker class
(FrameMaker.java file)
from the edu.unca.cs.labaids package.edu.unca.cs.labaids package.
To make a Java Applet, you must write a program that extends
the applet interface. This isn't hard at all.
Right now your Face program extends
javax.swing.JComponent. Change the
javax.swing.JComponent to
javax.swing.JApplet and you are done with the extension.
By the way, this only works because a JApplet itself is
already an extension of a JComponent.
Your Face class contains a constructor that calls the
setPreferredSize method. There's no point in doing this,
go ahead and delete, or comment out, the entire constructor.
Removing code is always easier than adding it.
While you're deleting code, you ought to delete the
Java classes Main and FrameMaker
along with the entire package edu.unca.cs.labaids.
When you are done, your Projects,
Navigator, and
Face.java panels
must look like those shown below.
There is no point in continuing if you can't match the above panels.
If you do try to continue without getting your
project in order and your applet doesn't work, do not expect
your lab instructor to be kind and caring.
Instead of
Build Main Project,
select Clean and Build Main Project
to compile your project
to remove all traces of
Main and FrameMaker.
Isn't it nice to have such a small tidy package.
If you try to run your program using the
Run Main Project
icon, you'll get an error message because you no longer have
a class with a main method.
To run your applet, you must to right-click on the icon
for Face.java and then
select Run File. This will
start Java's appletviewer.
The results will
be a tad disappointing because the applet window will be much
too small to display the entire face. However, you can resize
the appletviewer window to get a
larger picture of your work.
What you need to do now it copy your Face.jar file into your public_html directory. The following sequence of commands should accomplish movement.
[yourid@yourmach currentdir] cd
[yourid@yourmach yourid] mkdir -p public_html
[yourid@yourmach yourid] cp csci/201/Face/dist/Face.jar public_html/Face.jar
Now you need an HTML file that runs your Applet. We're going to give this one to you. Use the gedit text editor to store the following HTML code into a file called public_html/face.html within your home directory.
<html>
<head>
<title>CSCI 201 Face Applet</title>
</head>
<body>
<h1>CSCI 201 Face Applet</h1>
<applet archive="Face.jar" code="face.Face.class" width="500" height="600">
</applet>
</body>
</html>
Some of you HTML experts may know that the applet tags was deprecated in HTML 4.0. However, we are using it here because some popular browsers do not conform to standards.
You should be able to display your applet in your favorite browser by loading the URL http://www.cs.unca.edu/~yourid/face.html. Be sure to email this URL to your friends and family so they can see that you have been attending your classes.
If this doesn't work and you have to re-build your project, you'll need to restart your browser before reloading it. This is the case for both Firefox and Internet Explorer.
Load your applet into your browser and show it to your instructor.
Last modified: 03/20/07