Building and running
Now take a look at the Stonehenge class within
the Stonehenge.java file.
This is the class that implements a Java component.
This is done by extending a java.swing.JComponent
in your class definition.
There is a class constructor that is used to specify the
preferred size of the graphical component.
This size isn't fixed in stone. You'll still be
able to resize the window with your mouse.
Stonehenge() {
    setPreferredSize(new Dimension(900, 600)) ;
}
Continue to look on down your program until you find the
paint method. This method is invoked, by
the Java run-time system, to
draw objects on the screen. Right now it's pretty simple.
It sets the drawing color to blue and then draws
four rectangles.
    g.setColor( Color.blue ) ;
    g.fillRect( 100, 200, 100, 300 ) ;
    g.fillRect( 300, 200, 100, 300 ) ;
    g.fillRect( 500, 200, 100, 300 ) ;
    g.fillRect( 700, 200, 100, 300 ) ;
Go ahead and build and run the project
You'll get a view of a few of Stonehenge's
mystical vertical pillars.
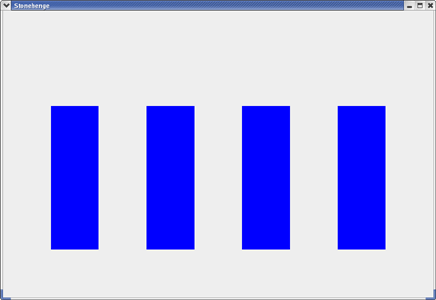
This is how UNCA professors of ancient European history
believe that Stonehenge looked
after the first 201 years of construction.
Run your program. If all goes well, you should see an incomplete Stonehenge.
Completing Stonehenge
Your job is to modify your program so that it gives a more accurate,
though still boring,
rendition of Project Stonehenge, as shown below.

You improve Stonehenge by
adding two rectangles to the display. To help you out,
let's talk a little about your present Java file. The file
starts by importing classes from the
java.awt package.
Stonghenge contains only one method, paint,
which is responsible for creating the display.
This method always receives
a single parameter, a Graphics
object. We can give the parameter any name we choose, but in this case we
have named it simply origG.
You might note that we immediately copy origG
into another Graphics variable g.
This is because one of us read some Sun documentation that
told us that we shouldn't modify the Graphics object
passed to the paint method. We're not sure why,
but we do as told.
Let's take a look at some of the statements of the paint method.
The first three statements obtain the size of the window.
    Dimension PanelSize = getSize() ;
    int PanelWidth  = PanelSize.width ;
    int PanelHeight = PanelSize.height ;
This may seem unnecessary as we set the size of the window
when we created it; but the "user" may have resized the
window, so we really do need to check.
Next we create a copy of the graphic object and then
we make the drawing
blue by passing in the
color Color.blue to the
setColor() method.
    Graphics g = origG.create() ;
    // All modifications go here!
    g.setColor( Color.blue ) ;
Now we can draw the four rectangles and fill them
with our chosen color using the
fillRect. This method has four
parameters corresponding to the four pieces of input it needs to do
its job. Let's take a look, in order, at the four parameters used in
our first call to fillRect.
g.fillRect( 100, 200, 100, 300 ) ;
- The x coordinate of the upper-left corner of the rectangle.
This is 100 pixels from the left edge of the drawing area.
- The y coordinate of the upper-left corner of the rectangle.
This is 200 pixels down from the top of the drawing area.
- The width of the rectangle, 100 pixels.
- The height of the rectangle, 300 pixels.
By the way, a pixel is one of those million tiny dots
that make up the monitor screen.
Your Assignment
You now know enough to add the two additional rectangles needed to
complete this assignment. You may have to dust off your high school
geometry skills to figure out how to size and place them.
But give it a try.
Since it would be rather boring just to paint it all in blue,
you might want to look at the
Java
documentation for the Color class to see
how you could make a rainbow of stones.
If you are adventurous, you could think about
using the drawSting method
of Graphics to add your name to the drawing.
And, if you are truly adventurous, you can modify the
code so that the pillars shrink and grow as you resize the window.
Show your instructor your running application.