
is a small window that is actually displayed by a small C program used to control jGRASP. You can ignore this window unless you need to terminate jGRASP.
This week we are going to show you how to use jGRASP, a Java IDE (Integrated Development Environment) developed at Auburn University. Because jGRASP itself is written in Java, it can run on any platform that supports Java. This means that you will be able to use jGRASP on both Linux and Windows platforms.
We will only describe a few features of jGRASP in CSCI 201. To become a jGRASP guru, you should consult the jGRASP Handbook which may be found on the CD-ROM bundled with your textbook or downloaded from the GRASP project home page.
On your Linux machine, start a terminal session and then type the command "jgrasp". You can also configure GNOME to start jGRASP through the menu system, but we won't discuss that here.
Linux jGRASP starts with two initial windows (as does the Windows version).
The first
is a small window that is actually displayed by a small C program
used to control jGRASP. You can ignore this window unless
you need to terminate jGRASP.
The second window gives an ominous disclaimer about "bugs".
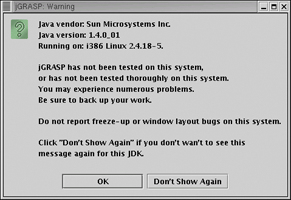
Just press the Don't Show Again button and
go about your business.
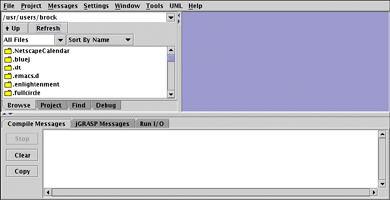
Soon the Metal interface will be displayed which should look something like this:
jGRASP, like many IDE's, uses projects to organize programming tasks. A project is a collection of related files used to solve a problem. Although you really don't need projects in your early CSCI 201 assignments, you might as well get into the habit of using them.
Projects will be stored in subdirectories of your personal csci/201 directory. Although these projects will persist between Linux login's, you may want to transfer these projects to a floppy you can take home. We'll show you how to do that later in this lab.
First follow the menu bar choices
Project ⇒ New Project ...
to bring up the New Project dialog. This dialog was created using
the Java Swing file search interface, something you may want to learn more about in the future.
There are two boxes near the words "Look In".
The box to the right can be used to move
down the directory hierarchy (toward the root)
or to move to different drives.
The much larger box, which is below
Look In,
is used to move into subdirectories.
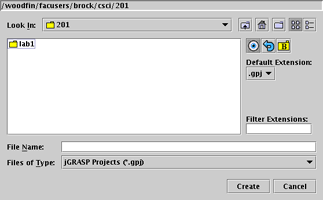
Now head toward csci/201. If you are having trouble following the "path", you might check out our Extremely Tedious and Detailed Guide to jGRASP Directory Search.
In our labs, we're going to create a new subdirectory for each
project. We recommend you also follow this practice in your
programming assignments.
To do this, press on the icon that vaguely looks
like a file folder, ![]() .
When you pass your mouse over this icon, the words
"Create New Folder" should appear.
.
When you pass your mouse over this icon, the words
"Create New Folder" should appear.
A new folder called New Folder will appear. Rename this new folder Lab2a. This maneuver can be difficult for even the most experienced Windows or Linux user. You must gently and patiently click the words "New Folder" until they are highlighted. Then you can edit the file name. If you are getting very frustrated in your renaming, check out our Extremely Tedious and Detailed Guide to jGRASP Directory Creation.
Double click on your newly created Lab2a directory icon to move into it. Finally, type the word "Lincoln" into the text box labeled File Name and click the button labeled Create. A new project named Lincoln.gpj will be created in the Lab2a directory.
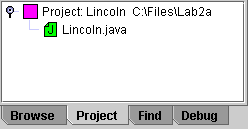
If you look in the left pane with the Browse
tab selected, you should see something resembling the following:
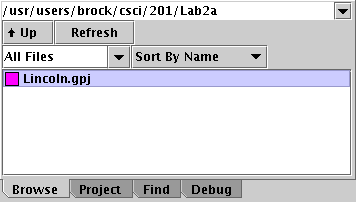
This is your first checkoff point. Show your lab instructor your jGRASP window, so that he/she can verify that you have created the project in the right directory.
Yes, it's finally time to actually create a Java file in jGRASP. First you must create an new CSD, or Control Structure Diagram, window for the code. Do this from the menu bar as File ⇒ New File ⇒ Java.
The new CSD window will appear in the right pane. Notice that the CSD window has its own title bar and menu bar. Note that menu bars of both the main jGRASP window and the CSD jGRASP window have a choice labeled File. This can get confusing.
You'll probably want the CSD window to fill the right pane.
Mash the CSD's Maximize icon,
![]() ,
to make this happen.
,
to make this happen.
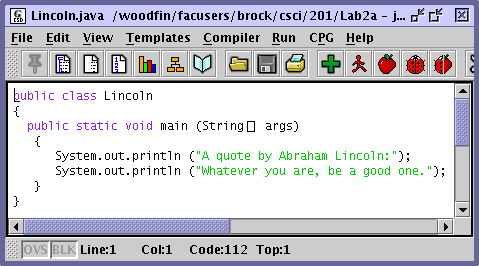
Cut and paste the following familiar Java program into the CSD window using the CSD's Edit ⇒ Paste.
public class Lincoln
{
   public static void main (String[] args)
   {
      System.out.println ("A quote by Abraham Lincoln:");
      System.out.println ("Whatever you are, be a good one.");
   }
}
Using the CSD's File ⇒ Save As ... menu choices,
save your Java code in the file Lincoln.java within the
Lab2a directory.
|
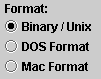
(Note: If you are using Windows at home or in another lab, you should save your file in "Binary/Unix" format. If you don't you will discover that, when you reload your Java program into jGRASP, the two-letter "word" OD will appear at the end of each line. This is actually, 0D (zero-D) the hexadecimal representation of the enter key. You may consider this a jGRASP bug.) |
|
|
Follow the CSD's File ⇒ Add to Project ⇒ Relative Path trail to actually add your Java code to the project. If you press the Project tab of the right pane, you should now see your Java program associated with the jGRASP project. |
 |
At last it's time to generate some bytecode. You have three choices for doing this.
The bottom panel of jGRASP should display a message that indicates successful compilation of your program. If it doesn't, you need to get the attention of your lab instructor.
You have three ways to run your program.
The bottom panel of jGRASP should automatically select the Run I/O tab and display the output of your program.
Show your lab instructor the result of running your program.
Use the "main" jGRASP window to terminate jGRASP. You may also have to terminate the smaller jGRASP control window.
We all know floppy disks are a somewhat dated way to transfer data, but they'll do in a pinch.
First of all, it is recommended that you format your floppy disk on a PC running Windows before using it on the Linux computer. After you place a floppy disk into your Linux computer, the root directory of the floppy disk will appear as the directory /mnt/floppy as soon as you mount it. Then you can use the cp -R, copy recursively, command to move all the files of a specified directory, such as your jGRASP project directory, to the floppy disk. Next, use ls -R, list recursively, to view the entire contents of the floppy disk. Finally, unmount your disk. Here are the commands for performing the transfer to floppy disk. Notice that the last command is "umount", not the more natural "unmount".
[user@mach dir] mount /mnt/floppy
[user@mach dir] cp -R csci/201/Lab2a /mnt/floppy
[user@mach dir] ls -R /mnt/floppy
[user@mach dir] umount /mnt/floppy
Show your lab instructor that you have copied your project directory to your disk.
In this course you're must frequently download collections of files for use in labs and assignments. We're going to use jar, or Java archive, files for this purpose in CSCI 201.
In your browser right click on the following link for the Java archive for part B of Lab 2. We recommend that you save the file in the directory csci/201.
Although jGRASP offers jar file extraction capabilities, it is easier to use Sun's jar file extractor as follows:
[user@mach dir] cd csci/201
[user@mach dir] jar xfv Lab2b.jar
   created: META-INF/
  inflated: META-INF/MANIFEST.MF
   created: Lab2b/
  inflated: Lab2b/Lab2b.gpj
  inflated: Lab2b/TryIt.java
In the first command, cd csci/201, we are setting our current working directory to be csci/201, the directory containing the archive file Lab2b.jar. The command jar xfv Lab2b.jar unpacks or "expands" the archive file. Now give the command ls -R to see the directory (and its contents) created by unpacking the archive file.
(Note: if you are using the Windows version of jGRASP at home, it is very important that you use the jar command to extract files. The Windows version of jGRASP has a bug in its jar file extract routines.)
Restart jGRASP. Use the Project ⇒
Open Project ...
menu choices to open project Lab2b .
Select the Project tab of the left pane and then
double-click on the TryIt.java entry.
A CSD windows containing Java code should appear in the
right pane. You'll probably want to maximize the CSD window.
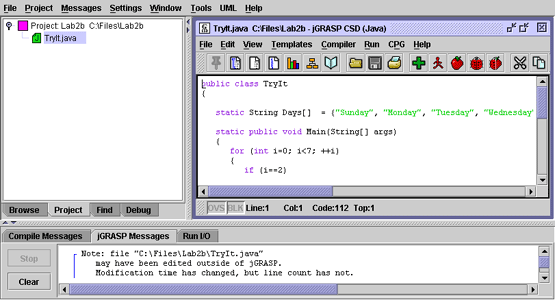
Ignore the jGRASP message that your files may have been
edited outside of the control of jGRASP.
Show your lab instructor that you have extracted your project into the right directory.
Yes, there are a lot of checkoff points in this lab. We're just trying to make sure you get started on the right track.
Let's take a little time to look at your first Java programming assignment and learn a few principles of program design that will help you throughout this course. Remember, programming is problem solving and the first thing that you have to do in solving a problem is understand the problem. In your first assignment, you are asked to convert seconds into hours, minutes, and seconds; for example, 11,111 seconds is equivalent to 3 hours, 5 minutes and 11 seconds. You have to understand how to do this conversion, before you can tell a computer how to do it. Write down the steps involved in converting seconds to hours, minutes, and seconds. You don't need to write in complete sentences, just a brief two or three word phrase can be used to describe each step. Contact your instructor if you have trouble formulating these instructions.
Now that you know how you would solve the problem, you can begin to write instructions for the computer to solve it. Remember, in addition to performing the necessary calculations, the computer must also obtain the necessary data (read input) and print the answer (write output), so, at very high level, most programs consist of the following three steps:
We can refine these steps to provide more detail without writing complete Java statements. For example, we could provide more detail about input and output as follows:
Of course, since you are writing these instructions for yourself, they could be briefer or more code-like, for example:
Semi-English representations of a program such as those above are called pseudo-code. Write the pseudo-code for the calculations that need to be performed in your program. Remember two things:
The remainder operator can be very useful in your problem; for example, the total number of seconds remaining after converting 11111 to minutes is 11111 % 60 .
Show your lab instructor the pseudo-code for your first program.
While it's a good idea to design your program "from the top down"--- looking at the entire problem and breaking it into small pieces, it's equally important to implement your program "from the bottom up"---implementing the pieces one at a time. Don't implement your entire program at once, instead, test the pieces one at a time so that if a piece doesn't work, you know which piece it is.
A good starting implementation for your first program might look something like this:
import cs1.Keyboard;

public class Time
{
   public static void main (String[] args)
   {
      System.out.println ("enter a number of seconds");
      int totalSeconds = Keyboard.readInt();
      System.out.println ("You have entered " + totalSeconds + " seconds");
   }
}
This implementation verifies that you can do input and output before you start trying to do your calculations. If this implementation works, then start adding your calculations checking them as you go. For example, your next implementation might look something like this:
import cs1.Keyboard;

public class Time
{
   public static void main (String[] args)
   {
      System.out.println ("enter a number of seconds");
      int totalSeconds = Keyboard.readInt();
      int seconds = totalSeconds % 60;
      System.out.println ("seconds = " + seconds);
	...
   }
}
Don't make the process of implementing your code too tedious by implementing and testing un-necessarily small chucks of code. Use your own judgment in deciding how much code to implement and test at once, but don't forget the advantages of incremental implementation.
Go home.