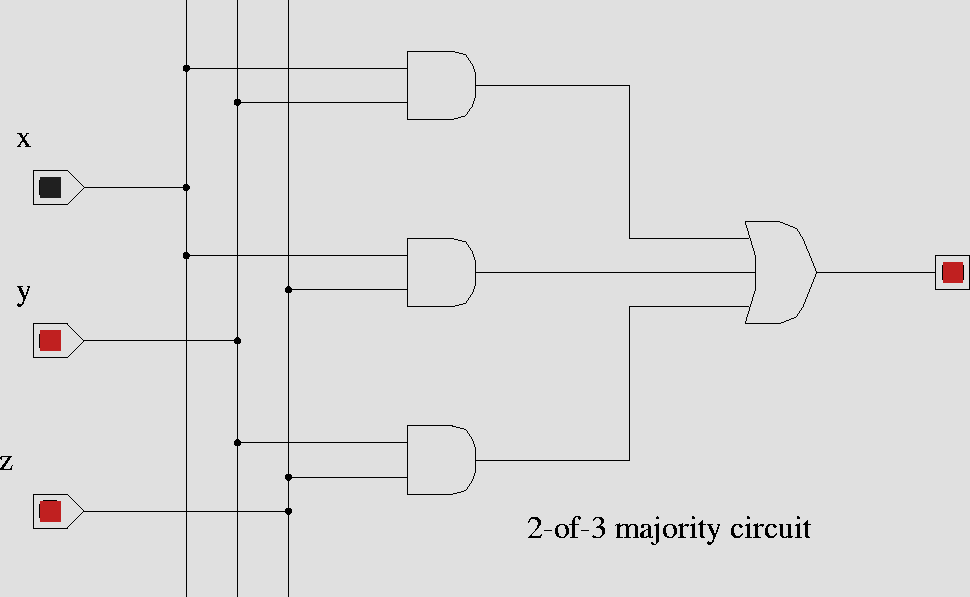
The circuit elements on the left are input switches. Red is logical 1, and black is logical 0. Press the switch to change its state. The circuit element on the right is an LED. Of course, you recognize the AND and OR gates in the middle.
The circuit design and simulation tool we'll use in CSCI 255 is diglog. diglog is a rather ancient program originally designed for the HP chipmunk and later ported to Unix and recently ported to DOS. Wayne Lang started using diglog at UNCA over a decade ago. We continue this fine tradition in CSCI 255.
If you want to download diglog for your home PC or Linux computer, connect to the Cal Tech Chipmunk distribution site and follow the appropriate links.
If you are using a PC on the UNCA campus and diglog is not available, download our copy of the PC installation file to your PC. We suggest you create a directory called
and store log304.exe there. Then execute log304.exe from its new home. This will create several files, among them log.exe, the actual executable.
Because diglog predates the windows interfaces found on Unix and Windows, you will find its user interface to be strange. However, this is an opportunity to explore a program written in the early days of window-based user interfaces. Enjoy it.
Because diglog is a DOS application, it will insist on running in full screen mode on your PC. You can use ALT-TAB to switch between diglog and your browser, but don't expect to see both at the same time.
If you read UNCA's copy of the diglog documentation, you will know much more about the program than your lab instructor.
For now, listen and follow your lab instructor through a brief lesson in which you will construct and run a circuit and then save it to a file. At the end of the lesson, your instructor will stop by for the first lab check-off.
Your next task is to use diglog to "build" the majority circuit
show below

The circuit elements on the left are input switches. Red is logical 1, and
black is logical 0. Press the switch to change its state. The circuit element
on the right is an LED. Of course, you recognize the AND and OR gates in the
middle.
Once you are done, save the circuit by pressing the Misc and then Save page labels in diglog. If you finish a bit before your neighbors, use NAND gates instead of the AND and OR gates. You'll get the same result.
This is the lab's second check-off point.
Now it's time for the lab's third check-off point. Remember the 7-segment display. We did the upper-right hand segment in class. It's your time to do the rest. First, find a partner or two. We need six groups to do the remaining segments. The lab instructor will assign a segment to your group. You may find the Karnaugh map spreadsheet useful.
Return to CSCI 255 home page.