You must make sure the Microchip MPLAB Integrated Development Environment is installed on your PC. If it isn't you can connect to the Microchip web site to download it. To speed up MPLAB-IDE installation on the UNCA campus, we have stored a ZIP'ed copy of the MPLAB installation files on the UNCA CSCI server. You should be able to download, unzip, and install this on any UNCA lab PC -- and it should stay there least until the PC reboots.
If you are in Robinson 142, you should be able to very quickly install MPLAB-IDE by running the executable:
You might also find it convenient to connect to Microchip and download the reference manual for the PIC67X processor and the user guide for MPLAB-IDE. Again, for fast local downloads, copies of both the PIC67X documentation and the MPLAB User Guide are stored on-campus.
Go through the Windows Start menus and begin execution of
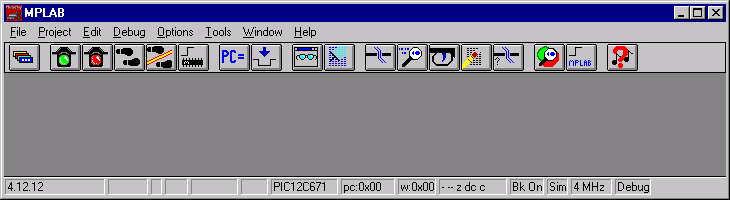
MPLAB. You should see a window somewhat like the following:
Take a minute to slowly move your mouse across the various toolbar icons. You can also bring up some of the pulldown menus. However, don't select any of them yet.
First, we need to set the development mode. Use the menu selections
to make sure you are in MPLAB-SIM Simulator mode for processor PIC12C671. If you've done this you should see PIC12C671 and Sim in some of those boxes at the bottom of the MPLAB window.
Next, we'll create a project. Go through the pulldown menu selections
and name your project lab01.pjt.
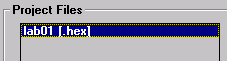
This will bring up an Edit Project dialog box. Go into the
Project Files section of this dialog and select
lab01. [.hex].
Now you should be able to press the Node Properties... button and bring up the Node Properties... dialog log. Be sure the selected Language Tool is MPASM. Then click OK and return to the Edit Project dialog.
Now you can select Add Node.... This will bring up a dialog box for adding your assembly language program file to the project. Call your file lab01.asm.
At this point, you should have an Edit Project dialog
similar to:

At this point you should ask the lab instuctor to verify your project setup.
Use the
menu choices to create a new program file. Follow this with
to save your file as lab01.asm. (Yep. It ain't the slickest interferface.) lab01.asm now becomes the assembly language file for your project.
Type in the following program:
        list    p=12c671
        include <p12c671.inc>

        org     0h      ; reset vector
reset   goto    start

        org     5h
start                   ; this is where execution begins

        clrf    20h     ; F20 = 0
        clrf    21h     ; F21 = 0

        clrf    30h     ; F30 = 0
        clrf    31h     ; F31 = 0
        incf    31h,F   ; F31 = F31 + 1

loop    movlw   7       ; W = 7
        addwf   20h,F   ; F20 = F20 + W
        incfsz  20h,F   ; F20 = F20 + 1, skip if F20==0
        goto    loop
        movlw   D'15'   ; W = 15
        addwf   21h,F   ; F21 = F21 + W
        incfsz  21h,F   ; F21 = F21 + 1, skip if F21==0
        goto    loop

        incf    30h,F   ; F30 = F30 + 1

        movf    31h,W   ; W = F31
        addwf   31h,W   ; W = F31 + W
        addwf   31h,F   ; F31 = F31 + W

        goto    loop

        end
Now use the
menu choices to compile your assembly language program lab01.asm into a Hex file lab01.hex which can be simulated within MPLAB or downloaded onto a PIC processor.
Have your lab instructor look at the Build Results window that MPLAB generates. Hopefully, this window will end with the line:
If it doesn't, you may have some assembler syntax errors in your code. Stamp them out with the aid of your instructor.
Pause while you read our description of the arithmetic operations of the PIC processor.
Listen while your lab instructor gives a demonstration of some of the debugging capabilities of MPLAB-IDE. Play around with debugging your program by trying out the Run, Stop, Step, and Reset Processor buttons of the MPLAB toolbar. You can also use the corresponding "hot" keys: F9, F5, F7, and F6.
Return to CSCI 255 home page