In today's lab you will be introduced to the personal computer (PC) that you will use through the remainder of the semester. Today you will learn the following:
Start your computer by turning on the Master switch.
After you have turned on the computer there will be a reasonably long period during which the computer runs through its start-up, orbooting, process.
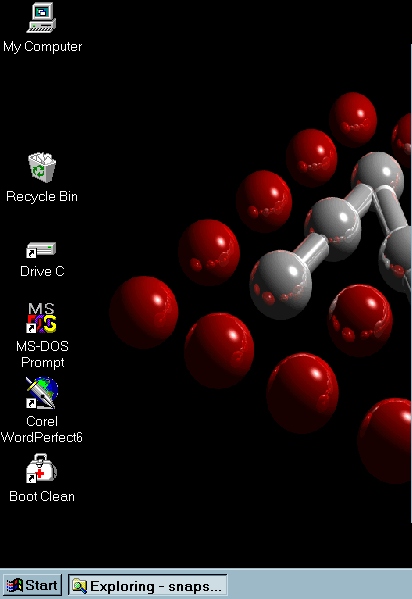
After the computer has finished booting the display that you see is called the desktop seen in the picture below:
At the bottom of the screen is the taskbar. It contains the Start button, which can be used to quickly start a program or find a file.
Select the Start button with the left mouse button and you will see a menu that takes you to the various programs you can run by selecting them with your left mouse button. When a menu option has an arrow to its right side, it represents a group of related programs.
Move your mouse so that the cursor (the small arrow on the screen) moves up and down the selection of programs on the Start button menu. Notice that when you move the cursor to a menu selection with a right arrow, a sub-menu is displayed showing you the detailed selections that you can make.
We will now start a program using the Start button menu. The program that we will run is called WordPad and we will start it by selecting (clicking with the left mouse button) the program name from the Start button menu. Find the program named WordPad:
This will cause the WordPad program, or application, to start running. Each running program in Windows95 has its own window.
Observe the window for the WordPad application.
WordPad is a word processing application, we will learn more about such applications later. Right now we will learn something about the structure of a window. Below is a picture of the WordPad window.
At the top of the window is the titlebar which shows the name of the
application that is running. On the right side of the titlebar are three
control buttons: ![]() These buttons control the window. The right most button, the button with a
large "X", stops the application from running and closes the window. The
middle button is used to resize the window, and the left-most button is used
to minimize the window, that is, suspend the application and place it on the
task bar where it can be restarted later. Select each of these three buttons
on the WordPad window starting with the left-most button.
These buttons control the window. The right most button, the button with a
large "X", stops the application from running and closes the window. The
middle button is used to resize the window, and the left-most button is used
to minimize the window, that is, suspend the application and place it on the
task bar where it can be restarted later. Select each of these three buttons
on the WordPad window starting with the left-most button.
After you have selected the left-most button you will notice that the window disappears and the program name shows only on the taskbar. To reopen the window, select the program name from the taskbar.
Notice that you can enlarge and reduce the size of the window by repeatedly selecting the middle button.
When you select the right-most button, the application will terminate and the window will close. You must restart the application from the Start button menu as described above; please do that now.
The last thing that we'll do in this section is look at other ways to change the size of a window. Once you have restarted the WordPad window, move the cursor to the right corner of the window. When the cursor is place directly on the corner of the window, it changes shape to become a double-headed arrow. When the cursor has the shape of a double-headed arrow, depress the left mouse button and hold it down while moving the mouse, this is called dragging. You can change the size of the window by dragging any of the corners; try that now. Notice that you can also move the window in the desktop environment by dragging the titlebar; try that now.
Answer the following three questions on a sheet of paper.
In this section, we will learn to use Netscape to access the Internet. As part of this section, you will find the class homepage on the Internet and you will print the class syllabus.
Begin by starting the Netscape program, you will find it on the Start button menu or one of the sub-menus. Find the Netscape program and start it now.
When Netscape first starts running, it displays the contents of the UNCA home page. This is the file located at the Internet address http://www.unca.edu/. That is the address shown in the location text window near the top of the Netscape window.
Your first task is to change the file that is displayed in the Netscape window. To do this, select the open button which is located in the toolbar near the top of the Netscape window. When you select that button, a small text window will appear and you should enter the URL, Universal Resource Locator, of the information you wish to display. The URL is as follows:
The first part of the URL "http" indicates the transfer protocol, Hypertext Transfer Protocol, used to retrieve the page. The second part, ei.cs.vt.edu, is the name of the computer containing the page. This computer is located in the computer science department at Virginia Tech. The final part, ~netinfo/videos/netgen/0.html, is the name of a file stored on that Virginia Tech computer.
Type the URL shown above in the open location window and then select the Open button.
This will open a Netscape tutorial in your Netscape window. Your task now is to run that tutorial. Begin by using the vertical scroll bar on the right side of the Netscape window to scroll the display down until you see the words RealAudio Version. Select that text and the tutorial will begin running. Proceed to each new display in the tutorial by selecting the light blue arrow.
Use what you have learned in the tutorial to do the exercise for this section.
The telnet protocol is used to connect to a remote computer over the Internet. There are many programs that use the telnet protocol. The one we'll use in CSCI 107 is called NetTerm. To start NetTerm, go from the Start button menu, to the TELNETs and FTPs program group, and then to the NetTerm (bulldog & uncavx) program.
Once NetTerm is running, go to the File item on the menu bar and select Connect from the pull-down menu. You should see the login prompt from bulldog.unca.edu:
Digital UNIX (bulldog.unca.edu) (ttyp4)

login:
Type your bulldog user-id. (Most likely your userid is your initials followed by the first six characters of your last name.) Now you should then see the password prompt. Enter your bulldog password. Your password will not be echoed as you type it. You should now see the Unix command, or shell, prompt:
bulldog.unca.edu>
The program for reading and sending email on bulldog is called pine. Simply type the letters "pine" at the prompt to start the program pine.
This will bring you to pine's main command menu:
          ?     HELP               -  Get help using Pine

          C     COMPOSE MESSAGE    -  Compose and send a message

          I     FOLDER INDEX       -  View messages in current folder

          L     FOLDER LIST        -  Select a folder to view

          A     ADDRESS BOOK       -  Update address book

          S     SETUP              -  Configure or update Pine

          Q     QUIT               -  Exit the Pine program
Go ahead and type C to compose, or send, a message.
You'll then see the following simple form for sending email.
To      :
Cc      :
Attchmnt:
Subject :
----- Message Text -----
Fill in the To: line with the names of your CSCI 107 lab and lecture instructors which are given in the table below:
| Dean Brock | brock@cs.unca.edu |
| Rebecca Bruce | bruce@cs.unca.edu |
| Charles Massey | massey@unca.edu |
Then hit the enter key a couple of times to go to the Subject:line. There type some appropriate subject, such as, "Sending a test message for CSCI 107."
Hitting the enter key again takes you past the headers down into the message text area. Just type a couple of paragraphs about yourself. Be sure to say why you are taking CSCI 107 and what you hope to learn during the course. You can use the arrow keys and the delete key to correct any mistakes.
When you are ready to send your message, type ^X (control-X). You should then be back at the main pine menu where you can type Q to quit pine and return to the Unix prompt.
Now connect to the realPine tutorial Getting Started With Email Using Pineand read a bit more about this useful and easy-to-use program. Don't read the entire tutorial now, but do far read enough through the section "Listing, Viewing, Replying to, and Forwarding Messages" to figure out how to read an email message.
Be sure to always log out of bulldogby simply typing the command logoutafter you are finished reading and sending email.
Send an email message to your lab and lecture instructor.
Return to CSCI 107 labs page
Return to CSCI 107.001 lecture page
Return to CSCI 107.002
lecture page
![]() Return to the UNCA Computer Science home page
Return to the UNCA Computer Science home page