In this lab, you are going to do a little Java and C/C++ using NetBeans. You’ll use the bit-wise operations of these languages. These are the same logical operations we will be using in our circuits.
Printing powers with Java
First, start NetBeans from the Gnome menu buttons: Applications ⇒ CSCI @ UNCA ⇒ NetBeans 7.3.1 IDE.
From NetBeans, create a project called Powers, using the menu choices Files ⇒ New Project. At the New Project window select the project type of Java Application and then press Finish.
Delete as many of the built-in comments as you want.
Before the main method add the following additional method
which receives a single argument and prints
a list of the powers of that argument.
    static void printPowers(int i) {
        int p = 1 ;
        while (p*i>0) {     /* This fails on overflow */
            System.out.println(p) ;
            p *= i ;
        }
    }
We really must call printPowers, so add the following
three invocations inside the main method.
    printPowers(2) ;
    printPowers(6) ;
    printPowers(10) ;
Run the program and look at the output. You will notice something rather odd about the last printed line. This is an artifact of a multiplication resulting in a number too big to store in a Java integer. That’s a topic for next week’s lecture.
However, notice how sloppy those output lines are. We need to straigthen them up a little. This is a job for a feature passed down from FORTRAN to C to Java, formatted I/O.
Replace the call to System.out’s
println method with a call to its
printf method.
System.out.printf("%20d %35s\n", p, Integer.toBinaryString(p)) ;
On the right is a call to the static method
Integer.toBinaryString which generates an almost
appropriate string
of 1’s and 0’s for an integer.
In the middle is the format specifier which is explained in
the Java documentation of the format string syntax.
Once you’ve made this change you, should be able to run your program and get some pretty nice output; except for those missing 0’s at the beginning of the binary string.
Using Java’s bitwise operators
Now we’re going to use a few Java operators that you are unlikely to encounter in introductory programming classes. Start by creating a new NetBeans project called BitOps. Just accept the defaults.
You can’t do serious testing without data and the easiest
way to get data is with random number generators.
Start by adding the following line before the class
definition.
import java.util.Random;
Next add the following code inside the main method.
        Random gen = new Random() ;
        for(int i=0; i<10; ++i) {
            int a = gen.nextInt() ;
            int b = gen.nextInt() ;
            System.out.printf("%s  %s\n",
                    Integer.toBinaryString(a),
                    Integer.toBinaryString(b)) ;
	}
The call of the Random constructor creates and
seeds a random number generator. The calls of its
nextInt method generates a sequence of random numbers.
Go ahead and run your program.
Those numbers are random, but they are pretty hard to read. Instead of printing binary numbers, we should print hexadecimal numbers. Hexadecimal numbers are in base 16. One hexadecimal digit can take the place of four binary digits. Hexadecimal numbers are a convenient way of expressing long binary strings. That’s why they are used to write the MEID that identifies your cell phone.
Let’s replace that those binary strings with some hex. And, while we’re at it, let’s print a little list of the results of adding those pairs of random numbers. The output may look puzzling, but there are many people who know their hexadecimal addition table as well as you know the decimal addition table.
            System.out.printf("%08X  %08X\n", a, b) ;
            System.out.printf("ADD(%08X,%08X) -> %08X\n", a, b, a+b) ;
Run your program and verify at least one of these additions.
Remember 9+5=E and A+7=11.
You’ve used Java’s boolean operators,
&&, || and ! in 181 or 182.
Java, like C and C++,
also has three corresponding bitwise operators,
&, | and ~,
that can be applied to integers.
Add the following lines to your program to see the result of applying these operators. Again, be sure to verify the result of at least one application of each of the three.
            System.out.printf("AND(%08X,%08X) -> %08X\n", a, b, a&b) ;
            System.out.printf(" OR(%08X,%08X) -> %08X\n", a, b, a|b) ;
            System.out.printf("NOT(%08X)          -> %08X\n", a, ~a) ;
            System.out.println() ;
C, C++, and Java also have three shifting operators.
These allow the bits of an integer to be moved left and right.
In C and C++ these are written as
<< for right shift and
>> for left shift.
Java adds an additional >>> left shift
operator which we will soon explain in class.
It’s time to add some shifty operators to your program.
            int sb = b&31 ;
            System.out.printf("SHL(%08X,%2d)       -> %08X\n", a, sb, a>>>sb) ;
            System.out.printf("SHR(%08X,%2d)       -> %08X\n", a, sb, a<<sb) ;
There are a bit harder to verify, but do make a try. Start with one where
the shift offset (sb),
is divisible by four. You’ll soon see why this
is a good idea.
Let’s end the section with one final real-life example. Every time an IP (Internet Protocol) packet is received, its IP header must be examined. These happens gazillions of times every day.
Here is a couple of lines of Java that “look” at 32-bits that could be an IP header and print the length of the packet and header. Try them out and then learn to admire what they do.
            System.out.printf("PKTLEN(%08x)       -> %08x\n", a, a&0xFFFF) ;
            System.out.printf("HDRLEN(%08x)       -> %08x\n", a, (a>>24)&0xF) ;
The final expression, (a>>24)&0xF), illustrates a
very common idiom in C, C++ and Java for bit extraction
by shift and mask.
In this instance we want to extract
4 bits that start 24 bits from the little (rightmost) end of the number.
These would
be called ”bits 27 to 24&lrdquo; because we usually number bits from
the little end. The >>24 shifts the bits over
24 places. Now the bits we want are on the rightmost end of the number.
The &0xF) extracts the rightmost fours bits by
masking.
The constant &0xF is a sequence of four binary 1’s.
You’ll frequently see constants like
&0xFF or &0x3FFF in network programming
because that a sequences of consecutive binary 1’s.
Becoming a C and C++ guru
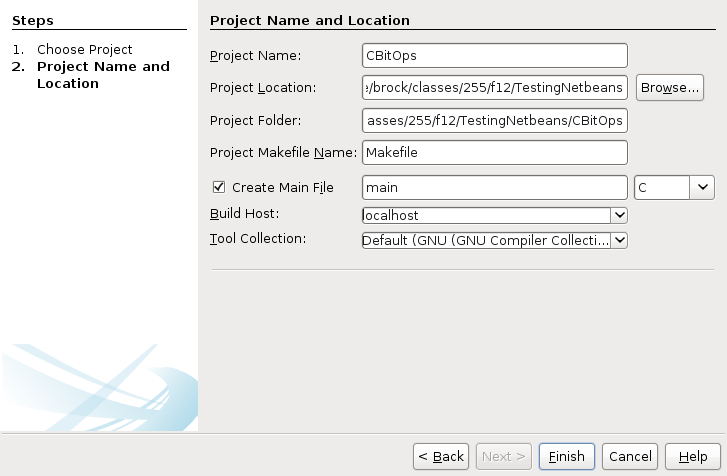
Now we are going to write some C and C++. It won’t be as hard as you think. Start by creating a new NetBeans project. At the New Project menu create a C/C++ application within the C/C++ category.
You will need to use the little arrow on the side to specify that
you are creating a C, rather than C++ or FORTRAN, application.
Copy the contents of Java’s main method into
C’s main function.
Expect NetBeans to light up your C program.
Let’s start removing some of those red lines.
First, delete the line containing the invocation
of the Random constructor and
replace the calls of the gen.nextInt() method
with a call to the random() function.
System.out.’s
that are in front of the printf.
C isn’t a classly language.
Then change System.out.println() into putchar('\n').
At this point, the red lines should be gone.
However, if you try to run the program, you will see errors.
C doesn’t have a >>>. Replace it with
>>.
Also, in the pre-C99 version of C, you are not allowed to place
declarations inside the body of a for.
You must declare the variable i before the for
and remove the int within the for.
At this point, you have a program that should be acceptable as both C and C++. It may not be the best, but it could be another line on your resume.
Another C program
Now create another C project. This time replace its main program with this C program. Just cut-and-paste. Go ahead and run the project now so that you can be sure you’ve got the C program installed correctly.
The
purpose of this lab is to give you some practice in bit extraction
and increase your understanding of floating point representation.
The C and Java float uses
single-precision
IEEE 754-1985 floating-point numbers.
The bit fields of the float is shown below:

Within the program you downloaded, you should see
three “/* FIX THIS! */ comments.
After the second
“/* FIX THIS! */” comment,
you will see three lines for setting the variables
signBits,
expBits,
and fracBits. Set these using shift
(>>) and mask (&&) instructions
to match the IEEE 754 format.
Use rawBits, not f, in your shifts.
Then run your program and see if the output looks reasonable.
You will need to think a bit to figure out what the right answer should be.
But you should see one line that looks like the following:
7.500e+00 -> 40F00000 -> 0, 129, 7340032
The second
“/* FIX THIS! */” comment
proceeds two lines for setting
sign and fraction using
signBits and fracBits.
Complete these lines. Setting sign is easy.
It should be either 1.0 or -1.0.
Setting fraction is harder. The Wikipedia page
doesn’t do a good job of describing the fraction field.
You might try out a
tutorial page for ECE 381 at Iowa State.
The important thing is to remember to add 1 to the fraction.
   7.500e+00 -> 40F00000 -> 0, 129, 7340032
1 * 1 * 1.875 =~ 1.875
At this point, we still don’t have the exponent correctly
computing. You’ll need to go to the first
“/* FIX THIS! */” comment
and complete the expbits2real function.