Using graphics classes

One of the main motivations for creating Java was to allow the programming of graphical applications which would could be run as applets inside a web browser.

You won't be programming applets in this lab, but you will be drawing some pictures. Your biggest challenge for the lab will be understanding about Java's Graphics and Graphics2D classes. These classes have lots of useful methods. You can also read Section 7.4.4 (pp. 247 & 248) of the textbook for more information.

Downloading the starter program

Download Stonehenge.java and store it within your csci/201 directory.

Start up DrJava and load up your Stonehenge.java file.

Modifying the project

Building and running

Now take a look at code with your Stonehenge.java file. Find the main method and look for the five Java statements that set the drawing color to blue and then draw four rectangles.

    // Modifications start here
    g.setColor( Color.blue ) ;
    g.fillRect( 100, 200, 100, 300 ) ;
    g.fillRect( 300, 200, 100, 300 ) ;
    g.fillRect( 500, 200, 100, 300 ) ;
    g.fillRect( 700, 200, 100, 300 ) ;
    // Modifications end here

Go ahead and build and run the project You'll get a view of a few of Stonehenge's mystical vertical pillars.
First Run
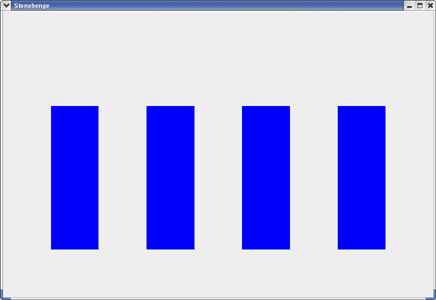
This is how UNCA professors of ancient European history believe that Stonehenge looked after the first 201 years of construction.

Run your program. If all goes well, you should see an incomplete Stonehenge.

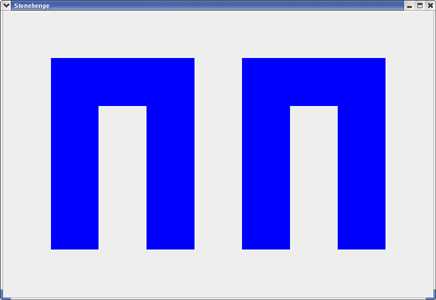
Completing Stonehenge

Your job is to modify your program so that it gives a more accurate, though still boring, rendition of Project Stonehenge, as shown below.
Later Run

All of the "work" of your program is done within the main method which starts with the following two statements:

    Picture facePict = new Picture(900, 600) ;
    Graphics2D g = facePict.createGraphics() ;

The first statement creates a Picture object. The second statement extracts a Graphics2D object which can be used to paint on your picture. Through the magic of inheritence, a Graphics2D object is also a Graphics object; and, consequently, you can use both Graphics and Graphics2D methods in your code. For this part of the assignment, you'll only really need Graphics methods.

With our Graphics object in hand, we can draw the four rectangles and fill them with our chosen color using the fillRect. This method has four parameters corresponding to the four pieces of input it needs to do its job. Let's take a look, in order, at the four parameters used in our first call to fillRect.

    g.fillRect( 100, 200, 100, 300 ) ;
  1. The x coordinate of the upper-left corner of the rectangle. This is 100 pixels from the left edge of the drawing area.
  2. The y coordinate of the upper-left corner of the rectangle. This is 200 pixels down from the top of the drawing area.
  3. The width of the rectangle, 100 pixels.
  4. The height of the rectangle, 300 pixels.

Your Assignment

You now know enough to add the two additional rectangles needed to complete this assignment. You may have to dust off your high school geometry skills to figure out how to size and place them. But give it a try.

Since it would be rather boring just to paint it all in blue, you might want to look at the Java documentation for the Color class to see how you could paint with a rainbow of stones. If you are adventurous, you could think about using the drawString method of Graphics to add your name to the drawing.

Show your instructor your running application.

More on Graphics

Now Download Face.java and store it in your csci/201 directory. This should bring up the source code for the Face class. Build and run the project. You should see a rather abstract face with only a nose, mouth, and one eye.
primative face

Enhancing your Face

A bit more about the Graphics class

You need to modify the main method of the Face class to produce an improved face. (Ah, if all of life were so easy.) You are expected to be creative, both in designing the face and in using Java classes. Look at Sun's documentation for the Color, Graphics, and Graphics2D classes to see what color and graphic methods are available. You might also find your textbook (pp. 247 & 248) to be useful.

Understanding the Documentation

Take a look at Sun's on-line documentation for the fillArc method of Graphics. Everything we needed to know to draw that nose is located in this information. You just have to read and understand it. So give it a try! (By the way, reading and understanding documentation is a major part of the work life of a computer professional.)

In order to use the methods defined in the Graphics class, you need to remember how the display coordinate system is setup. The origin of the coordinate system is the top-left corner of the display, with the positive x-axis running horizontally to the right, and the positive y-axis running vertically down, not up, the right side of the display. Also, distances are measured in terms of pixels, the little dots that make up your screen.

The order in which the objects are drawn to the screen makes a difference. If you want to draw a black pupil in the center of a green iris, you must draw the iris first.

Some examples from the past

Here are some of the faces that students have created in the past when CSCI 201 was taught using C++. Most of these folks actually graduated from UNCA in spite of this assignment.

Your Assignment

This lab has more flexible rules than the others. However, it has few definite rules:

  1. You are strongly encouraged to work with a partner.
  2. You must use at least one color not seen in the original Face.java code.
  3. You must use at least two additional methods of from the Graphics object. We suggest you choose fillOval for one of your two.
  4. Your Java-generated face must not resemble that of your lab instructor.

Show your artistic effort to the lab instructor.