home | homework index | labs index
|
|
CSCI 201
Introduction to Algorithm Design home | homework index | labs index |
FALL 2006 |
This lab will introduce you to the NetBeans IDE. An IDE, or Integrated Development Environment, is a powerful programming tool. It provides a graphical interface for managing program source files, compiling and debugging code, and generating installation packages.
The NetBeans IDE is written totally in Java. Consequently, it can run on any computer that supports Java. NetBeans can be used to create programs in a number of different languages, but in CSCI 201 we use it only for Java. In CSCI 202, a few of the more complex features of NetBeans will be introduced, but even professional programmers only use a small part of NetBeans' capabilities.
The goals of this lab are to:
If you are sitting in a Computer Science Lab room right now, then NetBeans should already be installed on your computer. If you need to install NetBeans on your home computer, you should first download a recent version of the Java Software Development Kits from Sun's Java site. Be sure to download the JDK, Java Development Kit, and not merely the JRE, Java Runtime Environment. You must install version 1.5 for CSCI 201.
Once the Java SDK is installed, you can download the
NetBeans IDE.
We are using
NetBeans 4.1 this term in the lab.
CHANGE URL TO 5.0
Windows users can click through the start → All Programs → NetBeans 5.0 → NetBeans IDE start menu sequence of selections to run NetBeans.
Linux users have two options. First, they can start up a Linux terminal session and type the command netbeans to start the NetBeans IDE.
EXPLAIN THE ROUTE THROUGH THE GNOME MENU
Now use your button to start up NetBeans and wait
patiently for the splash to display
followed by the initial NetBeans screen.
MUST UPDATE TO NETBEANS 5.0

Like many IDEs, NetBeans uses projects to organize your work. Normally the project stores your Java program files and the instructions for building and running your compiled code within a directory on your computer. In the CSCI 201 labs we will create a project for each application you develop. This keeps your work in tidy little units.
Right now, you can start creating a NetBeans project by pressing that
New Project button in your NetBeans
windows. However, you'll soon discover that NetBeans does not always
start up displaying this Welcome
windows, so let's try another method for creating a project.
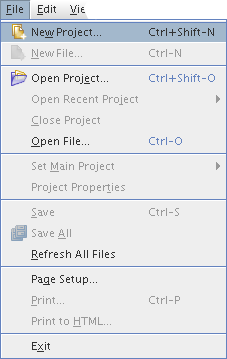
It's not hard: Just use the NetBeans menu sequence
File
→ New Project..., or
use three fingers to type Ctrl+Shift-N.
You should then see a New Project menu.
Your next step is to choose the type of your project.
Our type will be a simple Java application.
Under Categories
select General,
and under Projects select Java Application.
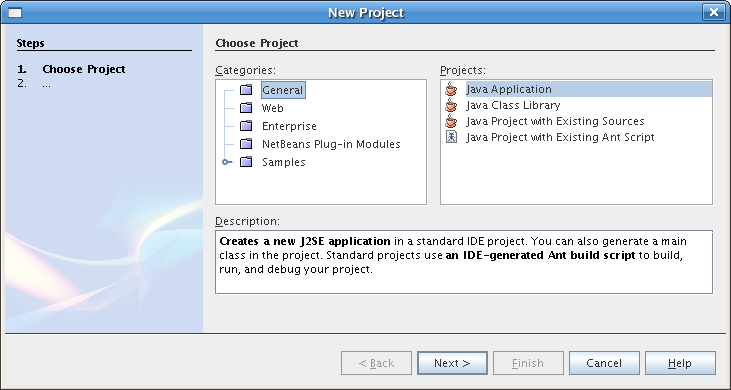
Then press Next>.
Now you have a New Java Application window. This is where you specify the location of your project. In the CSCI 201 labs all projects are going to be stored under your csci/201 directory, so go to the Project Location field and specify this directory. It will be a directory name ending in yourid/csci/201. Enter the name of our first project, lincoln, in the Project Name field. Notice that this automatically sets the directory used for the Project Folder.
This next step is very important.
Go to the
Create Main Class field and change the class name from lincoln.Main to
lincoln.
If you do not do this you class will be stored in
a Java package. The textbook doesn't cover packages so
we don't want you using them.
IS THIS THE CASE WITH THE NEW TEXTBOOK
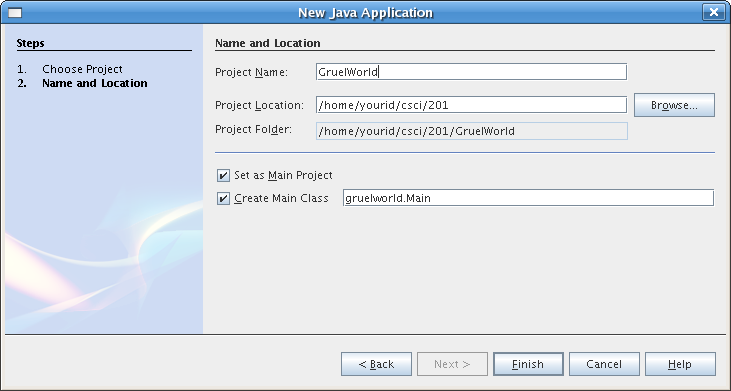
Finally press Finish.
You should now have a project that contains the framework for a working Java program. Actually, it is a working Java program. It just doesn't do any useful work.
It's time to show your project to the lab instructor. The lab instructor may ask you to right-click on the project's name and bring up the Project Properties window so that the location of your project folder can be checked.
Right below NetBeans menu bar you see a row of
icons for creating files and projects and building applications.
However, most of NetBeans' screen real estate is consumed with two big panels.
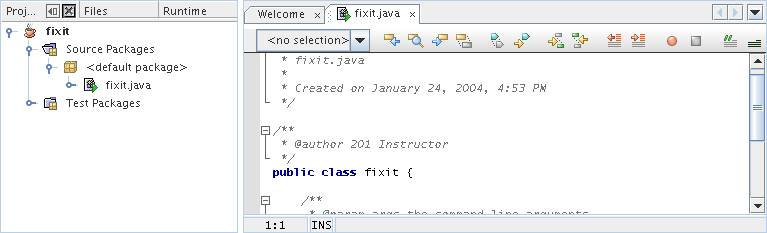
The left panel has three tabs:
Projects,
Files,
and Runtime.
The right panel has two tabs:
Welcome and
lincoln.java.
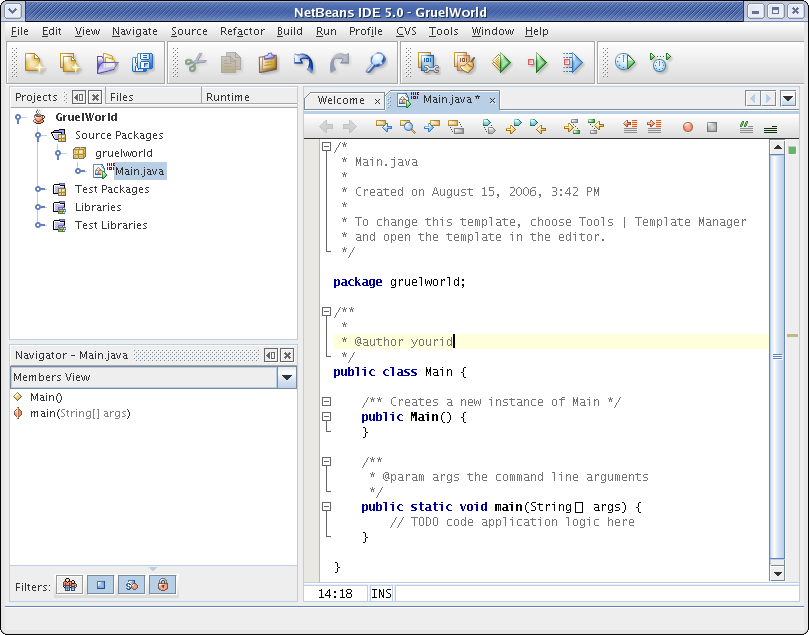
Go into the panel containing lincoln.java
and place the following single Java statement at the beginning of
your main method as shown in the screen capture above.
We suggest you cut-and-paste.
System.out.println("4*20 + 7 years ago") ;
Slowly move your mouse across NetBeans' row of icons. Find one labeled Build Main Project (F11) and press it. Be patient. Find the icon on your own.
After you build your project, you'll see a third panel labeled Output at the bottom of NetBeans window. This panel is used to display the result of compiling and running your code.
Now find the icon labeled Run Main Project (F6) and press it. You'll see that your program does very little.
Show your instructor that you have run your program.
Information regarding your project is contained in special XML, Extensible Markup Language, files stored within your project directory. These XML files really aren't intended to be read or written by human beings, but they do follow a well known standard called Ant for automating the tasks of managing large collections of classes. The development of Ant is guided by the folks at the Apache Software Foundation, who also steer the development of the popular Apache web server.
By conforming to the Ant standard, NetBeans enables its projects to be deployed on a wide range of platforms. But the interesting question from you might be: Can I take my project home for Christmas?
The answer is: Yes, but you must be careful. About the only universal tool for transmitting a collection of files between Linux and Windows (and between Windows and Windows) is ZIP, a tool invented in 1986.
In spite of its widespread usage, ZIP enjoys one-way acceptance in the Windows world. Out-of-the-box Windows XP can extract a collection of files from a single ZIP archive, but it cannot archive a collection of files into an archive. However, you can download many Windows programs, such as WinZip, PKZIP, and 7-Zip, that will archive for you.
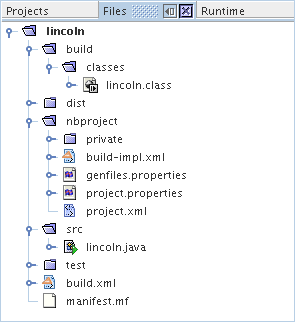
Take a quick look at all the files that compose a NetBeans project by
pressing on the Files tab. Now
press on those little turnstiles on the left side of the
Files panel to expand the
directories. At this point there are about ten files
stored in eight different directories for a Java
program that prints a single line.
How do you get all these files into a single archive?
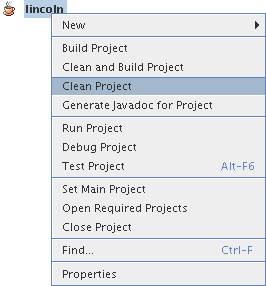
We're going to start by cleaning the project to remove
the build and distribution files.
Cleaning is easy, just return to the Projects
panel and right-click on the name of your project. This will bring
up a menu from which you can select
Clean Project. Job is done.
By the way, all of the projects you download from the CSCI 201
web pages have been cleaned.
Creating an archive ZIP file on Linux requires the use of a command line utility, so return to your command line processor (possibly for the last time in a CSCI 201 lab).
Remember that your project folder is under your csci/201 directory. So you must first connect there. Then type the command ls -R lincoln. You should see many files.
[yourid@yourmach currentdir] cd ~/csci/201
[yourid@yourmach 201] ls -R lincoln
There are a few files of interest here. For you the more important is lincoln/src/lincoln.java which contains your Java code. If you were submitting this file for an assignment, you'd submit the file lincoln.java contained within your csci/201/lincoln/src directory.
Let's get back to the task of creating a ZIP file containing your NetBeans project. That's easy. It can be done with one command:
[yourid@yourmach 201] zip -r lincoln.zip lincoln
This command will place your entire project into a single file lincoln.zip which can be transferred to almost any another computer.
Go ahead and ZIP your project. Show your instructor your success by executing the following command to list the files within your ZIP archive.
[yourid@yourmach currentdir] unzip -l ~/csci/201/lincoln.zip
There is a Linux program called the file-roller that can expand all sorts of archived files. It is very easy to use. In CSCI 201 labs incomplete or buggy projects will be distributed in ZIPed archives. You'll use file-roller to store these projects in your csci/201 directory.
The starter project for your next task is archived in fixit.zip. Press the link to start the download.
Soon you should see a window entitled Opening fixit.zip.
If its asks you if you wish to use file-roller,
agree. However, it will probably inform you that it
"does not know how to handle this file type."
You must correct this problem. Tell Mozilla that it is supposed
to use the program /usr/bin/file-roller
to open ZIP files!
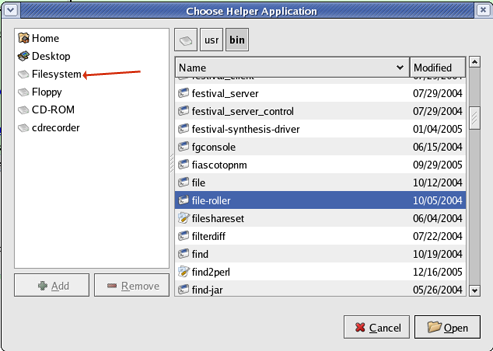
After you press OK,
the file-roller starts with a simple
window that shows you that the ZIP archive contains a single
folder called fixit. All
CSCI 201 archives will contain only one folder.
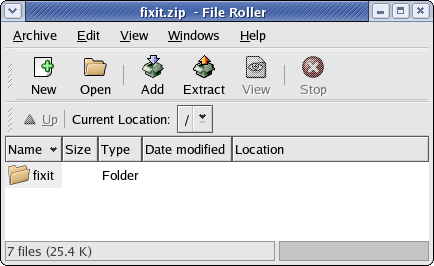
You need to press the Extract icon
to bring up the Extract window.
Within the Extract window you must navigate to
your csci/201 directory
before your press the
OK button.
When you return to the Extract window,
it is very important that you check the box
Recreate folders
before proceeding.
Also, verify that you have your csci/201
directory selected as the Destination folder.
Call your lab instructor over to see the state of your Extract window. If the instructor approves, you can then press the OK button of the Extract window. The files are extracted without fanfare. You return to the fixit.zip - File Roller window which can now be closed.
At this point the downloaded project is stored on your computer and you should be able to view it with NetBeans.
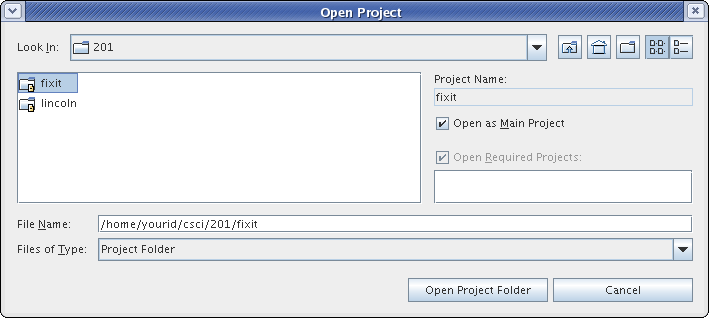
Use the menu sequence
File
→ Open Project...
to bring up a Open Project
dialog window.
From there navigate to your csci/201
directory where you should find an entry for the
fixit project.
Click once on fixit and
then select Open Project Folder.
At this point, you probably have at least two projects displayed in your project panel. We really don't want old CSCI 201 projects cluttering our view as we move on to new projects; so, for every project other than fixit, right-click on the project's name and then close it. You should end up with only fixit in your list of projects.
Click on the expanders (turnstiles) next to
fixit then
Source Packages and finally
<default package>.
Now you should see an entry for fixit.java.
Click on that entry to bring up a window displaying the Java
code for the fixit class.