home | homework index | labs index
|
|
CSCI 201
Introduction to Algorithm Design home | homework index | labs index |
FALL 2006 |
The goal for this week's lab is to learn about the computer environment and applications you'll use in your CSCI 201 labs. You don't need to have a broad knowledge of computers to write simple programs, but there are a few skills you do need. Here's what we'll cover:
In this lab we assume you are using the network Linux workstations managed by the Department of Computer Science at UNCA. We also assume you are viewing this page in a browser window. This means that you have successfully found a computer, powered it up, logged on, started an Internet browser and loaded this page. If that is not the case, please refer to First log in to Linux at cs.unca.edu to get started in the proper configuration.
Your computer should display a desktop roughly similar to the
screen capture shown below.
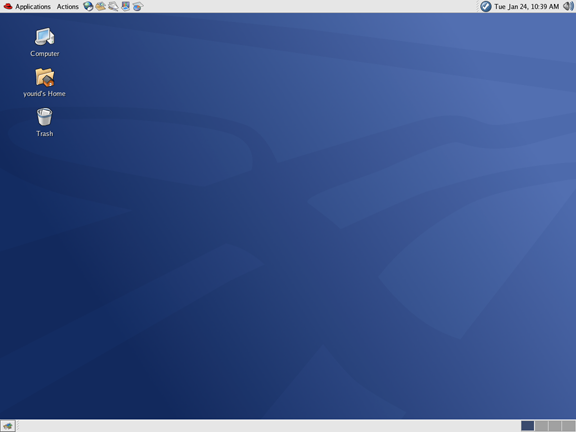
Hey. This doesn't look that different from Windows does it? In fact, the Linux and Windows user interfaces are derived from a common standard defined about a decade ago. The initial display may be slightly different on other versions of Linux. The Computer Science machines use the GNOME desktop. For a little more information on the Graphical Desktop consult Chapter 2 of the Red Hat Linux Getting Started Guide. For a lot more information on Gnome consult a recent copy of the GNOME Desktop User Guide.
At the top of the screen is the Panel.
It is very similar to the Windows "Taskbar".
On the left side of the panel is a row of "launcher icons".
![]()
The leftmost button, the one that looks like a red hat,
is the main menu button. It is similar to the Windows "Start"
button.
Select the Main Menu button with the left mouse button, and you will see a menu that allows you to run applications by selecting their icons with your mouse.
Move your mouse so that the cursor moves up and down the
selection of items on the menu. Notice that when you move the
cursor to a menu selection with a right arrow, a sub-menu is displayed
showing you more even more selections.
Navigate through the menu to start the text editor.
Start in the upper left corner of the screen.
You'll find the text editor by
going through the menu selections
Applications → Accessories →
Text Editor.
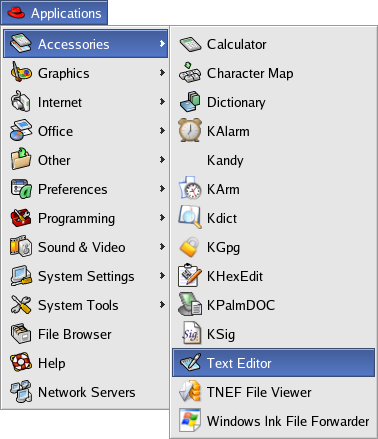
The GNOME text editor is also known as gedit.
Observe its window.
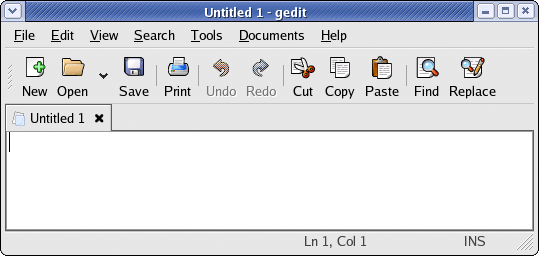
For you Windows users, it's deja-vu all over again. At the
top of the window is the titlebar which shows
the name of the application that is running. On the right side of the
title bar are three control elements:
![]() .
Directly below the titlebar is the
menubar, a row of words such as
File
and Edit.
If you
press a word on the menu bar, you will be rewarded with a
pulldown menu which can be used to direct the
actions of the applications. Below the menu bar, you'll often find a
toolbar containing many icons.
These icons can be used to perform useful actions,
such as opening and saving files.
.
Directly below the titlebar is the
menubar, a row of words such as
File
and Edit.
If you
press a word on the menu bar, you will be rewarded with a
pulldown menu which can be used to direct the
actions of the applications. Below the menu bar, you'll often find a
toolbar containing many icons.
These icons can be used to perform useful actions,
such as opening and saving files.
Let's return to those three buttons on the right end of the titlebar.
The rightmost button, ![]() ,
is the close windows button. This button terminates the running
application and closes its window. The middle button,
,
is the close windows button. This button terminates the running
application and closes its window. The middle button,
![]() ,
is the maximize button. It expands
the window to the size of the full screen. This is rarely anything
you'll want to do.
Only the leftmost or minimize button,
,
is the maximize button. It expands
the window to the size of the full screen. This is rarely anything
you'll want to do.
Only the leftmost or minimize button,
![]() ,
remains. This control suspends the application. There is
a taskbar at the bottom of the screen that can be used to revive
suspended applications.
,
remains. This control suspends the application. There is
a taskbar at the bottom of the screen that can be used to revive
suspended applications.
![]()
If you press the leftmost mouse button within the titlebar of a window, you can drag the application to different locations within the screen.
If you move the mouse to the edges or corners of a windows, the cursor will become a two-headed arrow. If you then press and hold down the leftmost mouse button, you can change the size of a window.
You may have noticed a rectangle containing four little boxes
in the middle of the panel. This is the workspace switcher.
![]()
GNOME supports four different workspaces that share a
panel.
Each workspace can display its own set of applications.
Each box of the switcher is a miniture representation of a workspace.
Clicking within the switcher "opens" other workspaces.
To move an application from one workspace to another, simply
drag it within the switcher.
You can also right-click on the
maximize button (![]() ) and choose a new workspace.
) and choose a new workspace.
There's no point in giving more explanation. It's time for you to create a text editor window. Now move, resize, minimize, and unminimize it. Now drag the text editor window onto a different workspace than your browser window.
If you have any trouble, get the attention of your lab instructor or the person in the adjoining chair.
Show your scattered windows to the lab instructor.
If you've taken CSCI 107, you should have learned about directories and files in Lab 2 of CSCI 107. If this is your first exposure to this concept, settle in for a few minutes of serious study. A file is a collection of data, generally formatted for use by a specific application, such as a database or spreadsheet. A directory is a collection of files and other subdirectories. You can think of files and directories as analogous to the structure of a file cabinet. The file corresponds to the documents you store in your file cabinet and the directories correspond to the file folders---they provide a way of grouping and organizing documents. Subdirectories are nested file folders---a folder inside of another folder.
Files and directories have names. In both the Linix and Windows worlds, these names are series of directory names separated by slashes: forward slashes, /, in Linix; and backward slashes, \, in Windows. (By the way, it was Unix, the precursor of Linux, that first used the slash.) Here are example file names in both Unix and Windows:
Notice, that both of the above file names start with a slash, which means that both emanate from a special root directory. These are called absolute file names. Windows has the additional complexity that absolute file names may start with a drive letter, as in A:/autoexec.bat, to specify the drive on which the file is located. You may also notice that in our example the Windows file name contained spaces while the Unix file name did not. Although you can put a space in a Unix file name, it is not recommended and may offend true Unix gurus. Even worse, it sometimes confuses the Java system, on both Windows and Unix. For this reason, we suggest you avoid spaces in CSCI 201 file names no matter what computer you are using.
Notice that both of our example names end with ".java". In both Unix and Windows it is common for file names to end with a period followed by an extension, "java" is our examples. The extension generally identifies the type of the file. Remember that a file is a collection of data formatted for a specific application; the type of the file indicates the application. You'll be generating a lot of files with the extensions "java" and "class" this term; I'll bet you can guess the application.
Both Unix and Windows support relative file names. These names do not begin with a slash and are considered to emanate from the current directory. So, if your current directory is /usr/bin and you speak of the file X11/mwm, you are really talking about /usr/bin/X11/mwm.
Most computer users, especially those of the Macintosh sect, use directories and files with absolutely no idea of how a slash is used in a file names. They use file explorers. Many, but not all, versions of Linux have a graphical file interface called Nautilus. Your desktop should contain an icon labeled something like yourid's home that can be used to explore your Linux files.
However, we really don't do that many fancy things with files in CSCI 201, so we're going to just use the old-fashion Unix file commands. This will allow you to access your files through a network connection and, after all, it's what all the true Linux gurus do.
All operating systems have a command line processor in which you can type commands. In Windows this is often called the DOS prompt, even in Windows operating systems that aren't based on pre-historic DOS.
In Linux, this program is called the shell. The first popular Unix shell was named the Bourne shell, after its creator Steve Bourne. Today the most popular Unix shell is a revision of the Bourne shell called bash, an acronym for the Bourne again shell.
There are a couple of ways to start bash
within its own terminal window.
You can use main menu selections,
Applications → System Tools
→ Terminal.
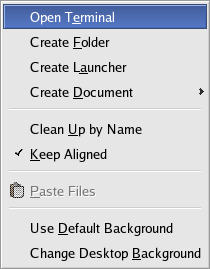
However, the fastest way of obtaining a terminal window it to
right-click on any unoccupied space of the desktop
and bring up a small menu from which you can choose
Open Terminal.
When bash is running, you'll type commands to its prompt. On most Linux systems the prompt is rather verbose: [yourid@yourmach currentdir], where yourid is your Unix user name, yourmach is the name of the Linux computer you are using, and currentdir is the name of your current directory.
Below is a summary of the commands that you'll find useful in this course. Take a look at these commands. Do not use them, you'll be asked to use several of them in the assignment section below.
| pwd |
Print Working Directory:
Prints the full pathname of your current directory. |
| cd directory |
Change Directory:
Changes your current directory |
| cd | Without an argument, cd changes your current directory to your home directory. |
| ls directory |
List:
Lists the contents of a directory or sometimes just lists a file. |
| ls | Without an argument, ls lists the contents of the current directory. |
| ls -l ... | With the -l option, ls provides a more detailed directory listing. |
| ls -a ... | With the -a option, ls lists "hidden" files, that is, files whose name starts with a period. By convention, most user "configuration" files start a "hidden." |
| ls -R ... | With the -R option, ls lists a directory and all its subdirectories. |
| mkdir directory |
Make Directory:
Creates a directory. |
| rmdir directory |
Remove Directory:
Deletes an empty directory. |
| rm file |
Remove:
Deletes a file. |
| cp oldfile newfile |
Copy:
Creates a new file that is a copy of an existing file. |
| more file |
More:
Displays a file one screenful at a time. |
To learn more about working with Unix files and directories, take a look at the Unix tutorials of the Idaho State University Computer Center.
Your account has been created in such a way that, in general, only you and the CSCI 201 instructors can access files within your csci directory. If you want to learn more about Linux file permissions (and you should), take some time to read our Unix File Permissions tutorial.
Start up a Linux terminal session as explained earlier in this section. Now you can type raw Unix commands into your terminal session.
First type the command pwd. This will print the name of your current or working directory. The command should respond with something similar to /home/yourid where yourid is your login name.
[yourid@yourmach currentdir] pwd
/home/yourid
You can list the contents of the current directory with the ls command. If this is the first time you've used your CSCI account, you'll be surprised to find that there is already a subdirectory in your home directory named csci. Try the bare ls command along with the ls -l and ls -a commands. The options -a and -l must be separated from the program name ls with at least one space. We list the commands, but not their output below.
[yourid@yourmach currentdir] ls
[yourid@yourmach currentdir] ls -a
[yourid@yourmach currentdir] ls -l
The bare ls command lists very few files and directories, probably only csci. Adding the -a, or all, option causes several hidden control files to be listed. Adding the -l, or long, option gives more information about your file. For example, you see the owner, size, creation date, and, most importantly, the permissions of the files.
Finally create a directory csci/201. Hopefully you read this section carefully and know how to create this directory. If you don't; reread the section, don't ask the instructor. (Hint: mkdir is an abbreviation for "make directory.")
You may have noticed that there was no confirmation that the directory was actually created. Linux is like that. It only speaks when something goes wrong. Repeat the command to create csci/201 and notice that Linux now complains. If you want to confirm that a file or directory exists, you should use the ls command.
Show your terminal session, with the newly created csci/201 directory, to the lab instructor.
Usually in CSCI 201 you will create your programs
using NetBeans; however, right now we want you to
do things the old-fashioned way so that you'll have
an appreciation for way the NetBeans uses files and directories.
In this section you are going to create a directory called
csci/201/CruelWorld
containing a Java file called CruelWorld.java.
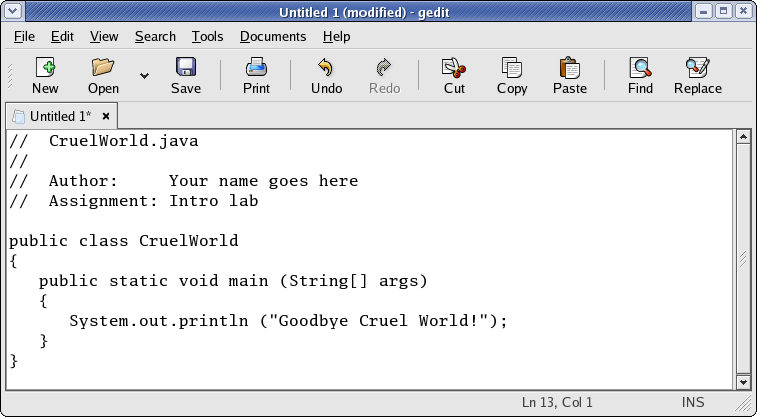
Hopefully, you still have at least one of those gedit applications running. If not, you need to start one. Now use your mouse to select and copy the following Java code from your web browser. You can perform the copy by typing Cntl-C or by using the menu selections Edit → Copy.
//  CruelWorld.java
//
//  Author:     Your name goes here
//  Assignment: Intro lab

public class CruelWorld
{
   public static void main (String[] args)
   {
      System.out.println ("Goodbye Cruel World!");
   }
}
Now paste the copied code into the text editor.
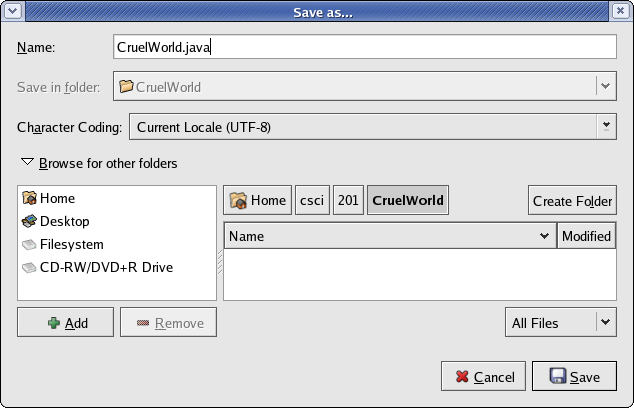
The next step is the actual saving of the file.
This is a little tricky because you must create the
CruelWorld directory
while saving the file.
After pressing gedit's
Save button, you'll see a
pop-up windows labeled Save as....
Click Browse for other folders, and use your mouse to navigate to your csci/201
folder.
Now press the Create Folder button; and type CruelWorld, the name of
your new folder. This will create a new subfolder
csci/201/CruelWorld.
Next type the file name CruelWorld.java
in the
Name text box.
If you have done this right,
your Save as... window
should look like the one below. If it doesn't, call your instructor.
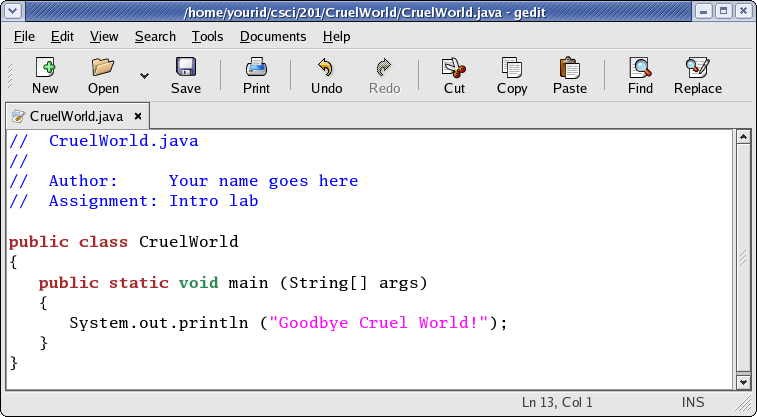
Go ahead and press Save in the
Save as... window.
You will be returned to the gedit window.
Make sure that the title bar of your gedit
window displays/home/yourid/csci/201/CruelWorld/CruelWorld.java, the desired location
for your Java file.
Now that gedit "knows" you are
typing a Java program, it will add some color to your text.
Show your instructor the result of typing the following command, which should display your new file.
[yourid@yourmach currentdir] more ~/csci/201/CruelWorld/CruelWorld.java
Java is distributed in two flavors. The JRE, or Java Runtime Environment, contains the JVM, or Java Virtual Machine, which is able to run Java applications within a browsers. Although Microsoft stopped distributing their "version" of the JRE to settle a court suit, most computer manufacturers bundle Sun Microsystems's JRE with their systems. However, the JRE isn't enough for CSCI 201. You need the JDK, Java SE Development Kit. This can be downloaded from the Java SE Downloads page. The JDK comes in two flavors: the SE (Standard Edition) and the EE (Enterprise Edition). The EE is a real pain to install. Don't get it. By the way, you can download a "bundle" that includes both JDK and NetBeans. That's the easiest way to go.
The author of the textbook has written a textbook supplement Installing and Configuring JDK 1.5 which contains far more detailed information about installing JDK on Windows than appears in this lab. He has another supplement Creating, Compiling and Running Java Programs from the Command Window with detailed instructions for running Java from the Windows command prompt.
When using a computer for Java development, the first thing you should do is check which version of Java is being run. Do this by typing the command "java -version". You should see something similar to the following output even if you are running Windows at home.
[yourid@yourmach currentdir] java -version
java version "1.5.0_07"
Java(TM) 2 Runtime Environment, Standard Edition (build 1.5.0_07-b03)
Java HotSpot(TM) Client VM (build 1.5.0_07-b03, mixed mode, sharing)
If your version is not some flavor of 1.5 you need an updated Java Development Kit (JDK).
By the way, if you have installed the Java SDK on your home Windows computer and get the following message you need to read Sun's instructions for setting your PATH in Windows.
C:\>java -version
'java' is not recognized as an internal or external command,
operable program or batch file.
Now let's change our current directory to csci/201/CruelWorld, the directory where our Java program is stored, and type the following commands which will compile your program and list the contents of your csci/201/CruelWorld directory.
[yourid@yourmach currentdir] cd ~/csci/201/CruelWorld
[yourid@yourmach currentdir] ls -l
[yourid@yourmach currentdir] javac CruelWorld.java
[yourid@yourmach currentdir] ls -l
Note that originally your directory holds only one file, CruelWorld.java, the source for your program. The command javac, compiles your program into Java bytecode, a string of numbers understood by the Java Virtual Machine. The bytecode is stored in a file called CruelWorld.class.
To run your program simple type the command "java CruelWorld". You should be rewarded with the output of your work.
Show your instructor the output of your Java program.
If you are sitting in a Computer Science Lab room right now, then NetBeans should already be installed on your computer. If you need to install NetBeans on your home computer, you must first install the JDK, Java Development Kit. Once the Java SDK is installed, you can download the NetBeans IDE. We are using NetBeans 5.0 this term in the lab. If you've downloaded the "bundled" version of JDK and NetBeans mentioned above, you're ready to go.
The textbook author has written a long tutorial called simply NetBeans 5.0 Tutorial with lots of useful information about installing and using NetBeans.
Windows users can click through the start → All Programs → NetBeans 5.0 → NetBeans IDE menu sequence of selections to run NetBeans.
Linux users have two options. They can start up a Linux terminal session and type the command netbeans to start the NetBeans IDE, or they can use the menu selections Applications → Programming → NetBeans 5.0. If you go through the menu selections and right-click on the NetBeans 5.0 entry, you'll be able to add a NetBeans launcher to your panel. This will give you a one-click means of starting NetBeans.
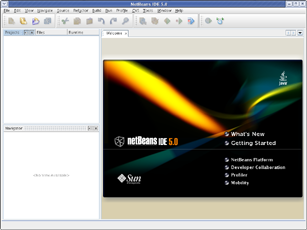
Start up NetBeans and wait
patiently for the splash to display
followed by the initial NetBeans screen.
Like many IDEs, NetBeans uses projects to organize your work. Normally the project stores your Java program files and the instructions for building and running your compiled code within a directory on your computer. In the CSCI 201 labs we will create a project for each homework and lab assignment you complete. This keeps your work in tidy little units.
Start creating a NetBeans project with
the NetBeans menu sequence
File
→ New Project..., or
use three fingers to type Ctrl+Shift-N.
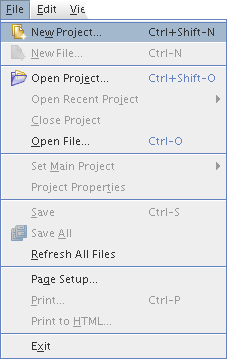
You should then see a New Project menu.
Your next step is to choose the type of your project.
Our type will be a simple Java application.
Under Categories
select General,
and under Projects select Java Application.
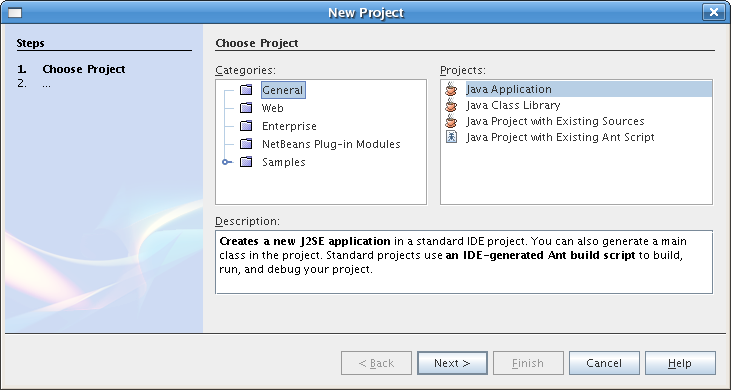
Then press Next>.
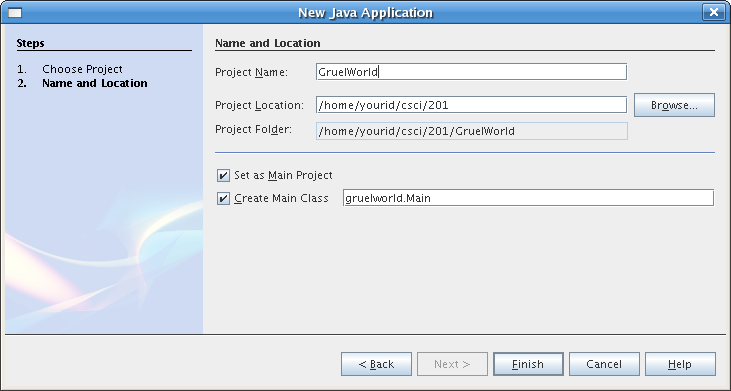
Now you have a New Java Application
window. This is where you specify the location of your project.
In the CSCI 201 labs all projects are going to be stored
under your csci/201 directory,
so go to the Project
Location field and specify
this directory. Your directory name should be
in /home/yourid/csci/201.
Next, enter the name of our first project,
GruelWorld,
in the Project Name field. Notice that this automatically sets the directory used for the
Project Folder
to /home/yourid/csci/201/GruelWorld and the main class to
gruelworld.Main.
Don't worry about the inconsistent capitalization of "GruelWorld".
It's NetBeans' way of dealing with a problem in the Windows operating system.
Finally press Finish.
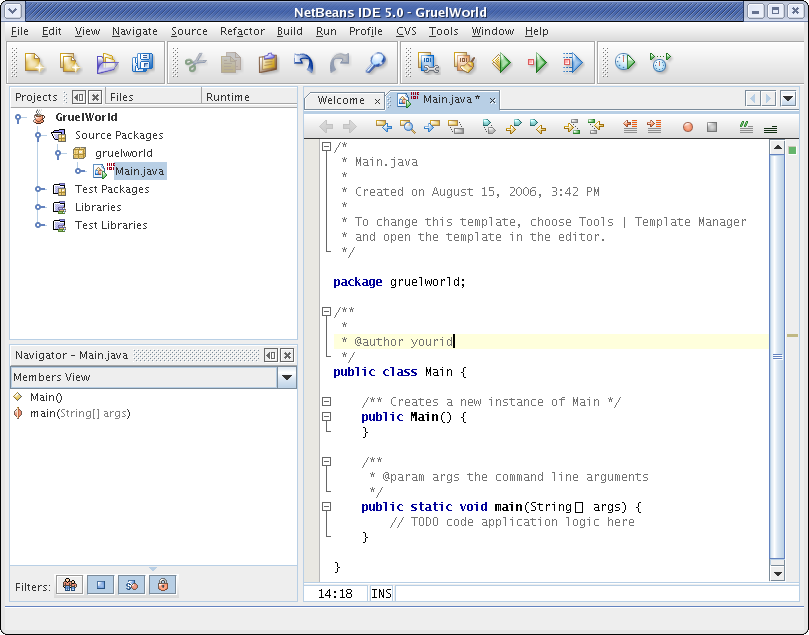
You should now have a project that contains the framework for a working Java program. Actually, it is a working Java program. It just doesn't do any useful work.
It's time to show your project to the lab instructor. The lab instructor may ask you to right-click on the project's name and bring up the Project Properties window so that the location of your project folder can be checked.
Right below NetBeans menu bar you see a row of
icons for creating files and projects and building applications.
However, most of NetBeans' screen real estate is consumed with two big panels.
The upper left panel has three tabs:
Projects,
Files,
and Runtime.
The right panel has two tabs:
Welcome and
Main.java.
We'll ignore the lower left panel for this week.
Go into the panel containing Main.java
and place the following single Java statement
with your main method.
System.out.println("Please, sir, I want some more.") ;
You must be careful here. Main.java contains a contructor for the Main class (with a big 'M') which should not be changed.
public Main() {
}
It's the main method (with a small 'm') which should be changed and look like the following when you are done.
public static void main(String[] args) {
    System.out.println("Please, sir, I want some more.") ;
}
Slowly move your mouse across NetBeans' row of icons. Find one labeled Build Main Project (F11) and press it. Be patient. Find the icon on your own. However, if you really don't like looking for icons, you can follow the menu choices Build → Build Main Project; or, better yet, just press the F11 key.
After you build your project, you'll see a new panel labeled Output at the bottom of NetBeans window. This panel is used to display the result of compiling and running your code. Make sure that this panel states that your build was successful.
Now find the icon labeled Run Main Project (F6) and press it. Alternatively, just can just press the F6 key or use the menu choices Run → Run Main Project. The Output window should now contain the output of your program.
Show your instructor that your program has printed that famous line from Oliver Twist.
Go over and press the Files tab
in the upper-left panel.
Now press on those little turnstiles on the left side of the
Files panel to expand some
of the entries. Try to match the "tree" shown below.
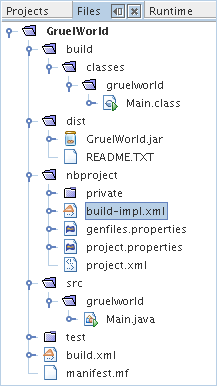
This display shows you how NetBeans manages your programming effort within a single directory with several subdirectories and files. Your code is stored within a subdirectory src. There's a subdirectory build holding the compiled Java bytecode for all the Java programs of your project. NetBeans uses a program called ant to build your code. The subdirectory nbproject contains the rather complicated files needed to control ant. One more subdirectory dist contains a Java archive, a single file used to deploy a Java application.
NetBeans uses this same directory structure for your project regardless of your operating system. This makes it possible for you to move the NetBeans project stored on your UNCA Linux account to your "home" Windows or Mac OS system. We'll talk about that a bit more next week.
For now we have one little task for you. Connect back to your terminal session and type the following command to run your program from the command line using its Java archive file. By the way, this is the command that NetBeans recommended to you after it built your program.
[yourid@yourmach currentdir] java -jar /home/yourid/csci/201/GruelWorld/dist/GruelWorld.jar
If you are a slow typist, ask your instructor about using the escape key to perform file completion.
Your instructor would like to see that Oliver Twist line a second time.
Return to the Linux terminal and execute the passwd command to change your password to something you can remember. Using the same password that you use for email at UNCA might be a good idea.
[yourid@yourmach currentdir] passwd
Changing password for user yourid.
Kerberos 5 password:  [old password Your password will not be echoed as you type it ]
New UNIX password: [new password ]
Retype your new UNIX password: [new password ]
Be sure to remember your username and password. Your lab instructor cannot reset your password during class. The best he/she can do is send you to find the system administrator.
Last modified: 08/23/06