home | homework index | labs index
|
|
CSCI 201
Introduction to Algorithm Design home | homework index | labs index |
FALL 2006 |
Most CSCI 201 labs begin with a partially completed project. This lab will show you now to download one of these incomplete projects and store it in within your Linux account. You will also be shown how NetBeans guides you in fixing typos in your code, reads input from the "terminal", and "traces" program execution.
In spite of all the talk about jar files in the NetBeans Import and Export lab we will be distributing our projects as ZIP files. There are two reasons for this: (1), Most browsers have "out-of-the-box" support for ZIP files; and (2), We ZIPed up most of the projects years ago and are too lazy to unzip and re-jar them.
The starter file for your next project is archived in Practice.zip. Press the link to start the download.
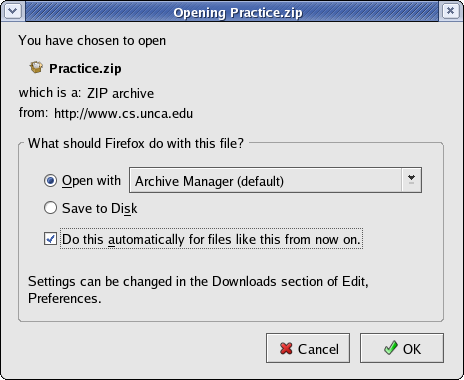
Soon you should see a window entitled
Opening Practice.zip.
It asks if you wish to use
Archive Manager to open
Practive.zip.
Before agreeing, press the checkbox beside
Do this
automatically for files like
this from now on.
That way, you won't be asked this question in the future.
Then press the OK button.
After you press OK,
the Archive Manager displays a simple
window showing you that the ZIP archive contains a single
folder called Practice. All
CSCI 201 archives will contain only one folder.
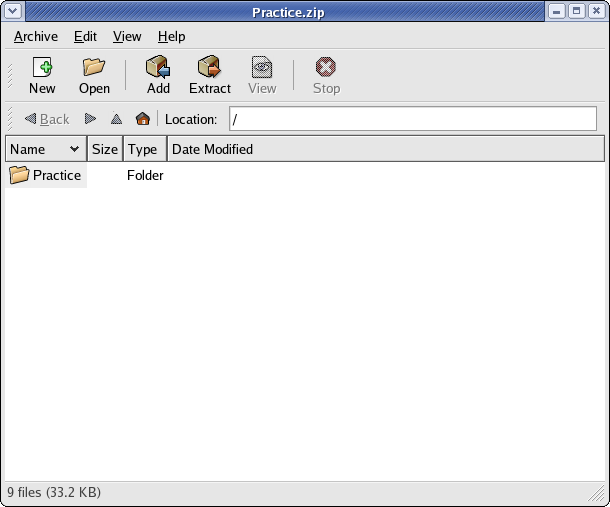
Pay attention to the next part.
Start by pressing the Extract icon
to bring up the Extract window.
At first, the Archive Manager
will offer to extract your project into the
/tmp directory which is usually
full of odd files.
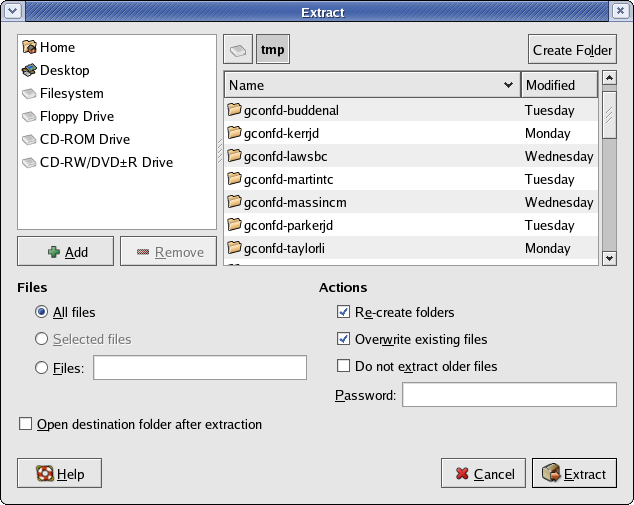
Within the Extract window you
must navigate to
your csci/201 directory.
Begin this journey by pressing on the Home
icon at the upper-right of the window.
Then work your way toward your
csci/201 directory.
Don't go on until your windows looks similar to the one below.
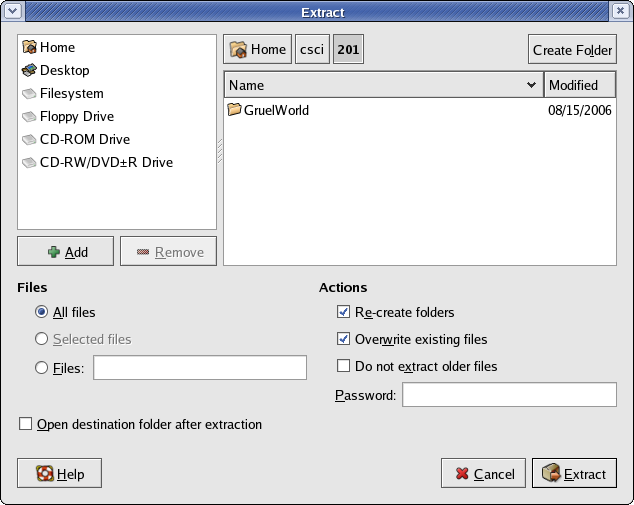
To speed up the process of connecting to your
csci/201 directory in the future,
press the Add
button.
You should now see a short cut icon for your
csci/201 directory in the upper right
panel. In the future, just press on the
201 short cut, and you'll be taken
directly to your csci/201 directory.
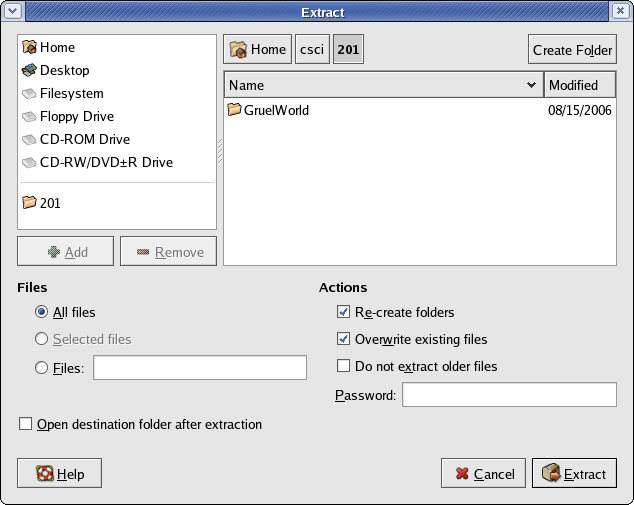
Call your lab instructor over to see the state of your Extract window. If the instructor approves, you can then press the Extract button. The files are extracted without fanfare. You'll return to the Practice.zip window which can now be closed.
At this point the downloaded project is stored in your home directory and you should be able to view it with NetBeans.
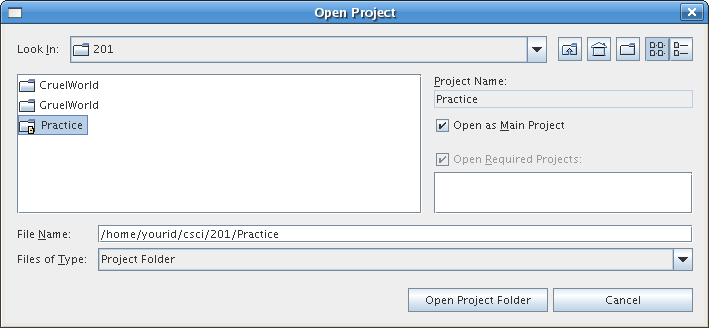
Start NetBeans and
use the menu sequence
File
→ Open Project...
to bring up a Open Project
dialog window.
From there navigate to your csci/201
directory where you should find an entry for the
Practice project.
Click once on Practice and
then select Open Project Folder.
The most common mistake here is double-clicking on
the folder name, in this case Practice.
Although that's the natural thing to do, it doesn't
open the project. It just gives you a view of the project folder's
files. Remember: single-click the folder and mash
Open Project Folder.
At this point, you probably have at least two projects displayed in your project panel. We really don't want old CSCI 201 projects cluttering our view as we move on to new projects; so, for every project other than Practice, right-click on the project's name and then close it. You should end up with only Practice in your list of projects.
Click on the expanders (turnstiles) next to
Practice then
Source Packages
and finally
practice.
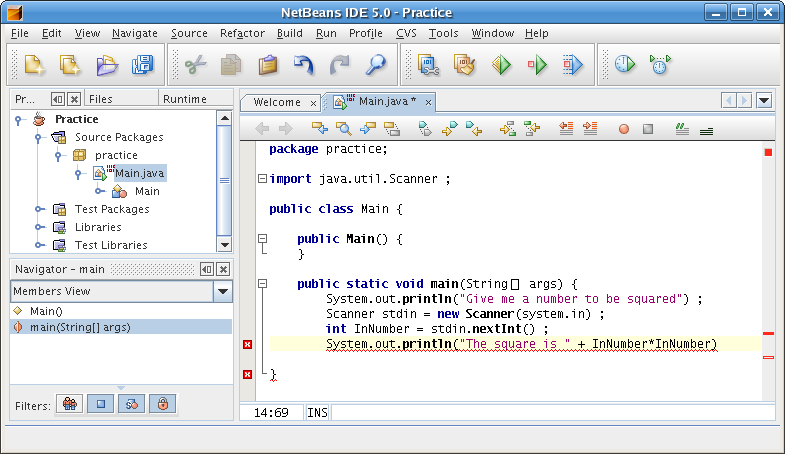
Now you should see an entry for Main.java.
Click on that entry to bring up a window displaying the Java
code for the Main class of the practice package.
Not everything that looks like a Java program is a Java program. Java programs must follow some rules. Some rules are syntatic. They are concerned with braces, semicolons, and other such. They are similar to English rules regarding the placement of punctuation. Here are a couple of important Java syntatic rules.
Java programs must also follow some semantic rules.
These are a little harder to explain. The semantic rules govern
the meaning of "names" in Java. Java can be very picky about
its semantic rules. For example, Java names are case-sensitive:
System is the name of an important Java package;
system, and SYSTEM
are not.
If you look at the window containing Main.java, you'll see two little red boxes containing cross marks. Each of these boxes mark a Java programming error. If you place your mouse on a box, you'll be rewarded with a message displaying the cause of the error.
For example, the first error occurs because this Java statement does not
end with an semicolon.

The second error occurs because there is a missing right curly brace.

Go ahead and fix these two syntatic errors.
Yes, as soon as you fix those two errors a third one shows up.
This is a semantic error. System is misspelled.

Correct this error and the boxes go away.
Build your project and show the instructor your successful compile.
This Java program reads an integer, computes its square, and prints it to the terminal. We're going to show you how to enter that integer. It's not at all hard.
Go ahead and run your program. Notice that an
Output panel appears at the bottom
on your NetBeans window. You should also see that your program
has printed "Give me a number to be squared". At the
bottom of the NetBeans window there
be a text field labeled
Input.
Press you mouse within the text field, type a number, and then
press the enter key. You program should digest your input number
and respond with its square.

You don't have to show the lab instructor your success. Squareness is its own reward.
Practice makes perfect. You're going to do it again, but this time your own your own.
Download a new project stored in Syracuse.zip and place it in your csci/201 directory. Remember to use the 201 short cut.
In NetBeans, open, build, and run the Syracuse project.
Programs often have "bugs", logic errors in need of correction. One useful way to find bugs is to step through your Java program one statement at a time. To do this, you set a breakpoint in your program. When the breakpoint is reached, NetBeans will allow you to step through the program.
You'll going to use breakpoints to step through a program that has some Java features, such as loops, that you've never seen before. Don't worry about the Java, but do read the directions very carefully.
Find the main method of your program and place your mouse
on the first line of code.
System.out.println("Please give me a number") ;
Right-click on this line of code and choose
Toggle Breakpoint from the pull-down menu.

Once the breakpoint is set, the line will be displayed on a red background.
You'll also see a little
red box just to the left of the line.

You can start the debugging process by pressing the Debug Main Project (F5) icon or navaigating the menu selections Run → Debug Main Project. However, easiest is just pressing the F5 key. By the way, if you are debugging on computer running Windows XP, you may receive a "Windows Security Alert" that "Windows Firewall has blocked some features of the program." If so, just click OK and continue.
Your program will very quickly reach the first breakpoint.
The bottom of the NetBeans windows will be split into two panels:
The leftmost will hold program output and the rightmost will display
the values of the variables of your program.
The background of the breakpoint statement should be green to
indicate that the debugger is stopped at the statement.
(Which is a little odd, as green usually means "go".)

To step "over" a line of Java code, hit the F8 key to "step over"
a statement of Java.
Slowly press the F8 key exactly three times and
watch it march through your
code. Odd, it seems to have stopped on the third F8.
Odder, the next line of code doesn't have a green background, but
has a very faint yellow background.

This statement contains a call to the stdin.nextInt method. Java
and NetBeans are waiting for you to type an integer at the
Input
prompt. Go ahead and enter the number. I recommend 42.
But don't type another F8 yet!

If you typed F8 right now, your program would "step over" the
call to the method syracuse. We know methods haven't
be covered in class yet; but, if you do exactly what we tell you
in the next paragraph,
you'll learn a little about methods.
Type F7 for "step into".
This brings you into the syracuse method.

At this point, we want you to hit the F8 key a few times and see
how Java's while causes a program to loop and
how Java's if causes a program make choices.
Select the Local Variables tab
in the lower-right panel and see how the variables N
and count change as you step through the Java statements.
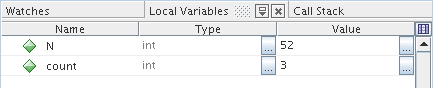
Show your lab instructor that you have gone through at least two iterations of the loop.
Last modified: 08/26/06