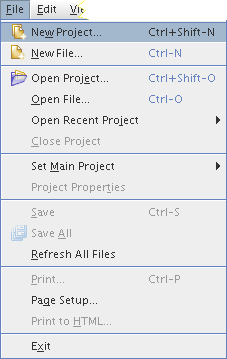
CSCI 201 -- Introduction to NetBeans

This week's lab will introduce you to the NetBeans IDE. An IDE, or Integrated Development Environment, is a powerful programming tool. It provide a graphical interface for managing program source files, compiling and debugging code, and generating installation packages.

The NetBeans IDE is written totally in Java. Consequently, it can run on any computer that supports Java. NetBeans can be used to create programs in a number of different languages, but in CSCI 201 we use it only for Java. In CSCI 202, a few of the more complex features of NetBeans will be introduced, but even professional programmers only use a smart part of NetBeans' capabilities.

The goals of this lab are to:

  1. Create and run a NetBeans project
  2. Import and export a NetBeans project
  3. Fix a Java program with lots of syntatic errors

Getting NetBeans

If you are sitting in a Computer Science Lab room right now, then NetBeans should already be installed on your computer. If you need to install NetBeans on your home computer, you should first download a recent version of the Java Software Development Kits from Sun's Java site. Be sure to download the JDK, Java Development Kit, and not merely the JRE, Java Runtime Environment. You must install version 1.5, even though it is still in its Beta 2 release, in order to run some of the programs of the textbook.

Once the Java SDK is installed, you can download the NetBeans IDE. We are using the Beta 1 version of NetBeans 4.0 this term in the lab

Starting NetBeans

Starting NetBeans under Windows

Windows users can click through the start → All Programs → NetBeans 4.0 → NetBeans IDE start menu sequence of selections to run NetBeans.

Starting NetBeans in RH004

Linux users have two options. First, they can start up a Linux terminal session and type the command netbeans to start the NetBeans IDE.

We suggest you create a GNOME laucher since you are going to be using NetBeans so much in CSCI 201. 
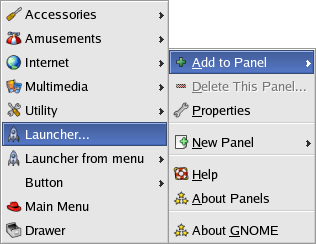
Start this process by moving your mouse into a empty area on the right-hand site of the GNOME panel, that's the grey bar at the bottom of the screen. Now right-click to bring up a menu and then go through the menu sequence Add to Panel → Launcher... as shown below.
Starting the launcher dialog
This will bring up the Create Launcher dialog window.
Create Launcher dialog

First change the Name field to something sensible, like NetBeans. To add a launcher you need to know the filename of the application to run. In our case, it's /opt/netbeans-4.0beta1/bin/netbeans. Use the Browse... button of Create Launcher to bring up a Browse dialog. Then navigate to the directory /opt/netbeans-4.0beta1/bin and select the file netbeans.
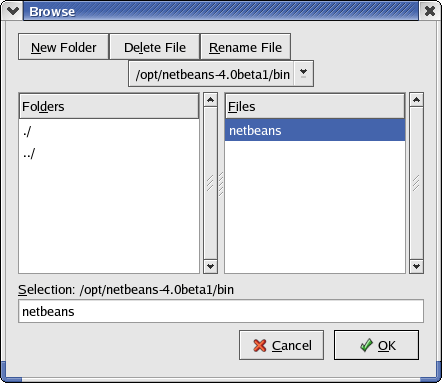
Browsing to NetBeans application
Then press OK.
NetBeans application is selected

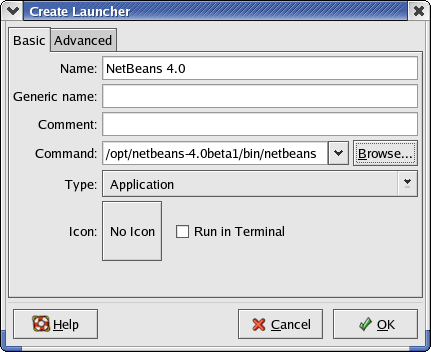
You could just press OK now, but then you wouldn't have a nice NetBeans icon at the bottom of your screen. So press the box containing the words No Icon to bring up another Browse dialog to select the icon. This time nagivate to the directory /opt/netbeans-4.0beta1/nb4.0 and choose the netbeans.png file.
Browsing to NetBeans icon

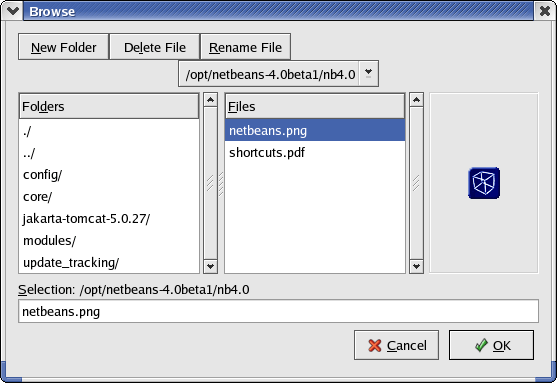
Press OK in the Browse window and another OK in the Create Launcher window and you should have a button for starting NetBeans in your panel.

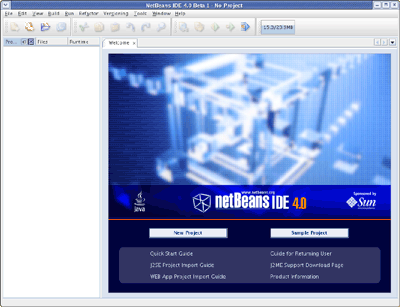
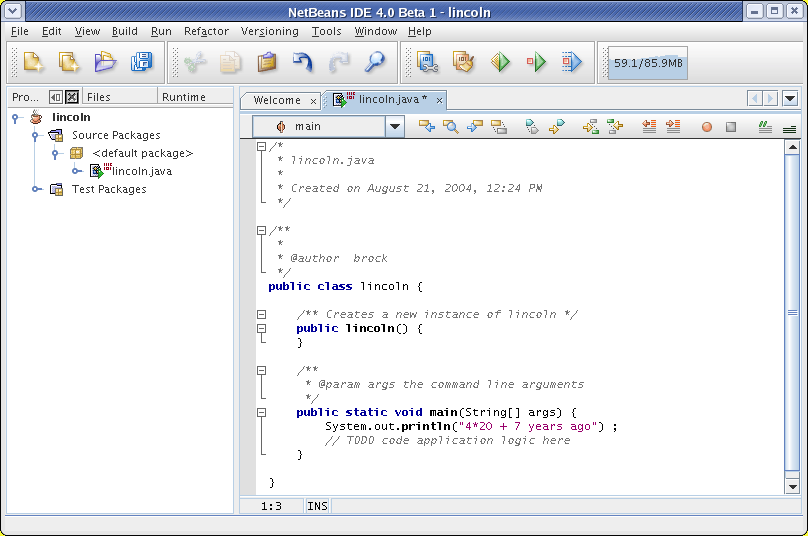
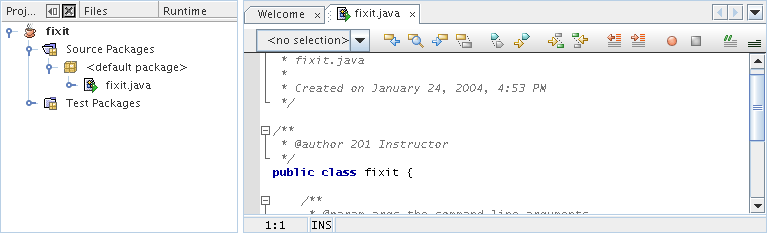
NetBeans -- first sight

Now use your button to start up NetBeans and wait patiently for a screen that looks something like this:
NetBeans 4.0 startup screen

Creating a NetBeans Project

The Project

Like many IDEs, NetBeans uses projects to organize your work. Normally the project stores your Java program files and the instructions for building and running your compiled code within a directory on your computer. In the CSCI 201 labs we will create a project for each application you develop. This keeps your work in tidy little units.

Naming your first NetBeans project

Right now, you can start creating a NetBeans project by pressing that New Project button in your NetBeans windows. However, you'll soon discover that NetBeans does not always start up displaying this Welcome windows, so let's try another method for creating a project. It's not hard: Just use the NetBeans menu sequence File → New window..., or use three fingers to type Cntl+Shift-N.
New project menu selection

You should then see a New Project menu. Your next step is to choose the type of your project. Our type will be a simple Java application. Under Categories select Standard, and under Projects select Java Application.
New Project window
Then press Next>.

Storing your first NetBeans project

Now you have a New Java Application window. This is where you specify the location of your project. In the CSCI 201 labs all projects are going to be stored under your csci/201 directory, so go to the Project Location field and specify this directory. It will be a directory name ending in yourid/csci/201. Enter the name of our first project, lincoln, in the Project Name field. Notice that this automatically sets the directory used for the Project Folder. Finally, go to the Create Main Class field and change the class name from lincoln.Main to lincoln so we won't have to teach you about Java packages in the first month of class.
New Java Application window
Finally press Finish.

You should now have a project that contains the framework for a working Java program. Actually, it is a working Java program. It just doesn't do any useful work.

It's time to show your project to the lab instructor. The lab instructor may ask you to right-click on the project's name and bring up the Project Properties window so that the location of your project folder can be checked.

Running a programing with NetBeans

The big picture

Right below NetBeans menu bar you see a row of icons for creating files and projects and building applications. However, most of NetBeans' screen real estate is consumed with two big panels. The left panel has three tabs: Projects, Files, and Runtime. The right panel has two tabs: Welcome and lincoln.java.
Initial view of licoln project

Modifying your program

Go into the panel containing lincoln.java and place the following single Java statement at the beginning of your main method as shown in the screen capture above. We suggest you cut-and-paste.

System.out.println("4*20 + 7 years ago") ;

Building and running your code with icons

Slowly move your mouse across NetBeans' row of icons. Find one labeled Build Main Project (F11) and press it. Be patient. Find the icon on your own.

After you build your project, you'll see a third panel labeled Output at the bottom of NetBeans window. This panel is used to display the result of compiling and running your code.

Now find the icon labeled Run Main Project (F6) and press it. You'll see that your program does very little.

Show your instructor that you have run your program.

Exporting NetBeans

Information regarding your project is contained in special XML, Extensible Markup Language, files stored within your project directory. These XML files really aren't intended to be read or written by human beings, but they do follow a well known standard called Ant for automating the tasks of managing large collections of classes. The development of Ant is guided by the folks at the Apache Software Foundation, who also steer the development of the popular Apache web server.

By conforming to the Ant standard, NetBeans enables its projects to be deployed on a wide range of platforms. But the interesting question from you might be: Can I take my project home for Christmas?

The answer is: Yes, but you must be careful. About the only universal tool for transmitting a collection of files between Linux and Windows (and between Windows and Windows) is ZIP, a tool invented in 1986.

In spite of its widespread usage, ZIP enjoys one-way acceptance in the Windows world. Out-of-the-box Windows XP can extract a collection of files from a single ZIP archive, but it cannot archive a collection of files into an archive. However, you can download many Windows programs, such as WinZip, PKZIP, and 7-Zip, that will archive for you.

Exporting on Linux

Take a quick look at all the files that compose a NetBeans project by pressing on the Files tab. Now press on those little turnstiles on the left side of the Files panel to expand the directories. There's almost twenty files in this project for a Java program that prints a single line.
NetBeans files

How do you get all these files into a single archive? Creating an archive ZIP file on Linux requires the use of a command line utility, so return to your command line processor (possibly for the last time in a CSCI 201 lab).

Remember that your project folder is underneath your csci/201 directory. So you must first connect there. Then type the command ls -R lincoln. You should see many files.

[yourid@yourmach currentdir] cd ~/csci/201
[yourid@yourmach 201] ls -R lincoln

There are a few files of interest here. For you the more important is lincoln/src/lincoln.java which contains your Java code. If you were submitting this file for an assignment, you'd submit the file lincoln.java contained within your csci/201/lincoln/src directory.

Let's get back to the task of creating a ZIP file containing your NetBeans project. That's easy. It can be done with one command:

[yourid@yourmach 201] zip -r lincoln.zip lincoln

This command will place your entire project into a single file lincoln.zip which can be transfered to almost any another computer.

Go ahead and ZIP your project. Show your instructor your success by executing the following command to list the files within your ZIP archive.

[yourid@yourmach currentdir] unzip -l ~/csci/201/lincoln.zip

Downloading a project

Retrieving starter projects

There is a Linux program called the file-roller that can expand all sorts of archived files. It is very easy to use. In CSCI 201 labs incomplete or buggy projects will be distributed in ZIPed archives. You'll use file-roller to store these projects in your csci/201 directory.

Unrolling a project

The starter project for your next task is archived in fixit.zip. Press the link to start the download.

Soon you should see a window entitled Opening fixit.zip. If its asks you if you wish to use file-roller, agree. However, it will probably inform you that it "does not know how to handle this file type." You must correct this problem. Tell Mozilla that it is supposed to use the program /usr/bin/file-roller to open ZIP files!
Use file-roller!

After you press OK, the file-roller starts with a simple window that shows you that the ZIP archive contains a single folder called fixit. All CSCI 201 archives will contain only one folder.
Initial file-roller window

You need to press the Extract icon to bring up the Extract window. Then you have to press Browse... to bring up the Extract to window. Within the Extract to window you'll have to navigate to your csci/201 directory before your press the OK button.
file-roller browser dialog

When you return to the Extract window, it is very important that you check the box Recreate folders before proceeding. Also, verify that you have your csci/201 directory selected as the Destination folder.
file-roller extract dialog

Call your lab instructor over to see the state of your Extract window. If the instructor approves, you can then press the OK button of the Extract window. The files are extracted without fanfare. You return to the fixit.zip - File Roller window which can now be closed.

Opening the Project

Home at last

At this point the downloaded project is stored on your computer and you should be able to view it with NetBeans.

NetBeans Open Project dialog

Use the menu sequence File → Open Project... to bring up a Open Project dialog window. From there navigate to your csci/201 directory where you should find an entry for the fixit project. Click once on fixit and then select Open Project Folder.
Open Project dialog

Cleaning up the project panel

At this point, you probably have at least two projects displayed in your project panel. We really don't want old CSCI 201 projects cluttering our view as we move on to new projects; so, for every project other than fixit, right-click on the project's name and then close it. You should end up with only fixit in your list of projects.

Opening the Java file

Click on the expanders (turnstiles) next to fixit then Source Packages and finally <default package>. Now you should see an entry for fixit.java. Click on that entry to bring up a window displaying the Java code for the fixit class.
Panels with fixit.java

Show the lab instructor that you have downloaded the fixit project and opened the fixit.java file.

Problems in computer

Syntatic and semantic errors

Not everything that looks like a Java program is a Java program. Java programs must follow some rules. Some rules are syntatic. They are concerned with braces and semicolons. They are similar to English rules regarding the placement of puncuation. Here are a couple of important Java syntatic rules.

  1. All statements in java must end in a semicolon.
  2. Brackets, such as "{}", are used to break a program into functional units which may be nested. Each opening bracket, "{", must have a matching closing bracket, "}".

Java programs must also follow some semantic rules. These are a little harder to explain. The semantic rules govern the meaning of "names" in Java. Java can be very picky about its semantic rules. For example, Java names are case-sensitive: System is the name of an important Java package; system, SYSTEM, and Sistem are not.

Finding and correcting errors with NetBeans

If you look at the window containing fixit.java, you'll see two little red boxes containing cross marks. Each of these boxes mark a Java programming error. If you place your mouse on a box, you'll be rewarded with a message displaying the cause of the error.

For example, the first error occurs because this Java statement does not end with an semicolon.
';' expected
The second error occurs because there is a missing right curly brace. '}' expected
Go ahead and fix these two syntatic errors.

Yes, as soon as you fix those two errors a third one shows up. This is a semantic error. System is misspelled.
package system does not exist
Correct this error and the boxes go away.

Build your fixit class and show the instructor your successful compile.