UNCA CSCI 107 Lab 2 -- Files and directories
In today's lab you will be introduced to the files and directory
structures on your personal computer and on bulldog. Today you
will learn the following:
- How to use folders and files with Windows 95
- How to create text files with NotePad under Windows 95
- How to use folders and files with DOS
- How to use directories and files on bulldog
- How to create text files with pico on bulldog
- How to transfer files from your PC to bulldog
At the end of this assignment you will turn in a diskette to your
instructor. Since the assignment is partially graded by a program which
verifies that certain folders and files exist on your diskette, it is very
important that create folders and files exactly where this lab
specifies.
Section 1: Folders and files with Windows 95
- Select the My Computer icon on the desktop.
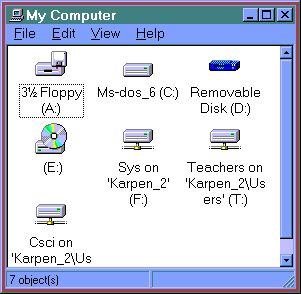
From there, select your floppy diskette, A:. If
your diskette has not been formatted, format it by selecting the
Format action from the File menu.
- Use the Properties action of the File
menu of the My Computer window to set the label of your diskette
to be your last name.
- Double-click on the A: icon of the My Computer
window to create a new window displaying the top-level files and folders of
your diskette.
- To create a new folder on theA: drive, click the
File » New »
Folder menu selections. At first the new folder name is
displayed as New Folder in reverse video (white letters on dark
background). Type in the new folder name as CSCI107. If you
somehow lose the reverse video, click twice (not double click), then
drag across the words New Folder
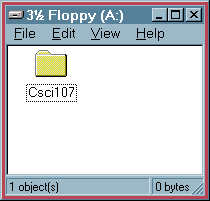
Double-click on the newly created folder to bring up a window labeled
CSCI107.
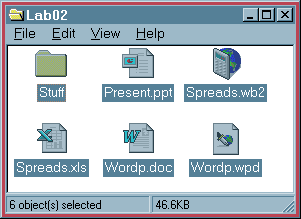
- Now we'll find some folders and files to copy to your diskette. Go back
to the My Computer and this time click through the T:,
for Teachers drive, though the csci folder, and into
the Lab02 folder. This should give you a window labeled
Lab02. You can now close all windows except for the browser window
in which you are reading this lab and the folder windows labeled
CSCI107, from the A: drive, and Lab02, from
the T: drive.
Your two folder windows should look something like:
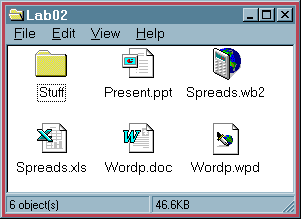
Remember -- close all other windows except these two and your browser
window.
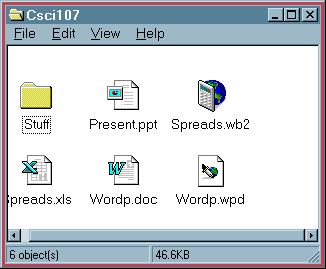
- In the Lab02 window, use the Select All
action of the Edit menu to highlight all folders and
files.
Copy these files into your diskette's CSCI107 folder by
dragging the files from the Lab02 window into the
CSCI107 window. If you've never dragged files before, ask your
instructor or a fellow classmate for some help.
- You may now close the Lab02 window.
At this time you should have only your browser window and the
CSCI107 window open. The CSCI 107 window should
look like this:
- Double-click on the Present.ppt icon. This starts Microsoft
PowerPoint. Modify the PowerPoint document by pressing the mouse on the word
"life" and changing it to the word "strife" (or something equally clever).
Then save the modified file using the File and Save
menu choices or simply by typing ^S (Control-S). Now exit
PowerPoint.
- Remove the Wordp.doc file from your diskette by dragging it
into the Recycle Bin on the desktop.
- Move the Spreads.xls document into your Stuff
folder with a drag. Notice that the file disappears from the
CSCI107 window. Dragging a file between folders on the same drive,
moves the file. Dragging between folders on different drives,
copies the file.
- If you hold the control (Ctrl) key while dragging, the file is
copied -- even within the same drive. Copy the Spreads.wb2 files
into the Stuff folder. Double-click on the Stuff folder
to make sure you were successful. It better look like:
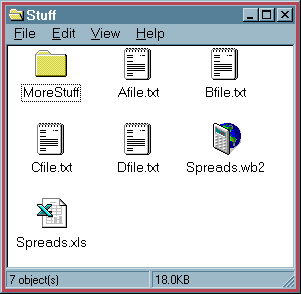
If it looks ok, go ahead and close Stuff.
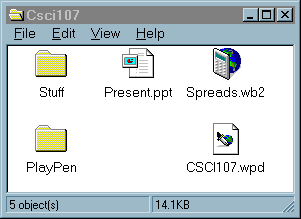
- Return to the CSCI107 folder, and change the name of the file
Wordp.wpd to CSCI107.wpd.
- Create a new folder called PlayPen within the
CSCI107 folder.
- Explore the various ways to examine files in Windows 95 by trying out the
List and Details actions of the
View menu.
- Make the Spreads.wb2 file of CSCI107 read-only by
selecting Spreads.wb2 with the mouse and then by performing the
Properties action of the File menu. You
only need to click the Read-only check block.
Section 2: Creating text files with NotePad
- Double-click on the file Afile.txt of the Stuff
folder. This will start up NotePad. Change this file and re-save it on your
disk.
- Now go though the program menu (Start »
Programs » Accessories »
NotePad) to start NotePad. Write a paragraph about your favorite
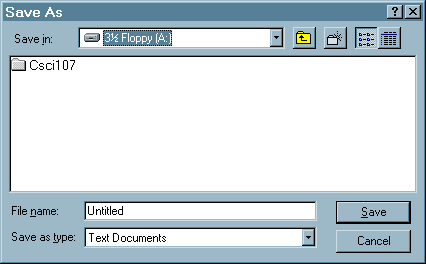
class last semester. Save this paragraph into a new file
favclass.txt with your Stuff folder by using the
Save As action of the File
menu.

- Exit NotePad.
- Close all windows except for Netscape.
Section 3: Creating directories and files with DOS
You'll notice an icon labeled MS-DOS Prompt on your desktop.
This allows you to use the original command line interface to MS/DOS.
Experienced users of Windows actually prefer the MS/DOS command line
interface for many file operations.
For more information about the MS/DOS interface, look at David Hull's tutorial Frequently Used DOS Commands.
- Click on the MS-DOS Prompt icon to start an MS/DOS command
processor.
- Type the line
to make your diskette the default drive for your MS/DOS commands.
Close your other windows now.
- Type the command
to connect to the root directory of your diskette. Now,
A:\ is your default directory.
- Type the command
to list the contents of the default directory. Notice that MS/DOS displays
more filenames in upper case letters than Windows 95 does.
- Now connect to the stuff subdirectory of CSCI107
and list its files and directories by typing
- In MS/DOS, you can use "wildcard characters" to list filenames that match
a certain pattern. Type
to list all files with an extension of txt. Now type
to list all files whose names start with the letter 's'.
- MS/DOS has commands copy and move for copying and
renaming files. Copy the file afile.txt to xfile.txt.
- Move the file bfile.txt to zfile.txt.
- The MS/DOS command del is used to delete files. Delete the
file cfile.txt. Remember, you can use dir to check your
progress.
- Use the command mkdir, or md if you prefer, to
create subdirectories called msfun and msjoy.
- Use rmdir to delete the directory MoreStuff. You'll
first have to delete all the files within the directory! The easy way to do
this is
- del MoreStuff\*.*
- rmdir MoreStuff
- MS/DOS borrowed a few nifty features from Unix. The command-line operator
> redirects the output of a command to a file. Type
the command
to store a directory listing into the file file.lst. Use the
command
to display the contents of the file you just created.
- Type the command
Annoying, isn't it. To keep this important information from flying across the
screen, use the | operator, a variant of the Unix pipe, to display
the file one screen at a time. Type
to do this. The pipe operator can be useful in many other situations. Try out
to list all the files in the root, or \, directory of the
C: drive.
- Finally, one other convention MS/DOS adopted from Unix is the use of a
single period . to refer to the current directory and of two
periods .. to refer to the parent of the current directory. Use
the command to list the contents of your parent directory.
- Terminate your MS/DOS command session.
Section 4: Directories and files on bulldog
Now we'll try some of the same commands on bulldog.
- First log into bulldog using the telnet program.
Remember, you did this in the first lab.
- When you first log in you are connected to your home directory.
Type the command:
to discover the pathname for your home directory. You can generate a
listing of your home directory with the ls command
This command just lists the names of your files and directories. If you want
a more informative listing, try the ls command with the
-l option. (By the way, that's the letter l
after the hyphen, not the number 1,)
The output of this command will be lines looking somewhat like the following:
drwxr-xr-x   2 adbradle student     8192 Sep 17 20:25 public_html
-rw-r--r--   1 adbradle student    17443 May  5  1997 ur-city.gif
In this particular case, information is being given about the directory
public_html and the file ur-city.gif. The first letter
of the line is (almost always) a d, for directory, or
-, for file. The other information includes the file's access
permissions, owner, size, and modification time.
- Use the cd command to connect to your public_html
subdirectory. This directory is where the files of your UNCA home page will
be stored.
- Create a subdirectory of public_html called
csci107. Use the mkdir command, just like in MS/DOS.
Then use the ls command to see the files and subdirectories of
your public_html directory.
- Use the cd command to move into your csci107
directory. Copy the file ~brock/107start.html into this directory.
Just like in MS/DOS, the single period . means the current
directory, and the double periods .. mean the parent directory.
The copy command in Unix is cp.
- cd csci107
- cp ~brock/107start.html .
Notice that there is space, then a
period, at the end of the second command.
- Use the Unix more command to look at your new file:
- Type the Unix command
which invokes a shell script, written by Dean Brock, which modifies the
permissions of your bulldog directory so that the files and
sub-directories of your public_html directory can be accessed by
the UNCA web server.
- Now open a second Netscape window on your PC (click on the
File menu and select New browser window)
and load the URL
http://www.unca.edu/~userid/csci107/107start.html
where userid is your bulldog user id. This
should display the page you just copied.
Useful Unix commands
Notice the strong similarity between Unix commands and MS/DOS commands.
Unix got there first.
| Command |
Action |
| cd |
Connect to a directory |
| ls |
List a directory |
| mkdir |
Make a directory |
| rmdir |
Remove a directory |
| cp |
Copy a file |
| mv |
Move a file |
| rm |
Remove a file |
| more |
Display a file |
| lpr |
Print a file |
Useful Unix shell operators
| Operator |
Action |
| * |
Matches several letters, including periods
ls /usr/bin/b* |
| ? |
Matches one letter
ls /usr/bin/d? |
| | |
Pipes the output of one program to another
ls /usr/bin | more |
| > |
Directs the output of a program to a file
ls /usr/bin > dir.lst |
If you'd like to learn a bit more about Unix, check out Paula Davidson's tutorial on
The UNIX Operating System.
Section 5: pico
The simplest Unix text editor is pico, which is distributed as
part of the pinemail system.
- Use pico to edit the 107start.html file that you
copied in Section 4 of the lab.
At the least, replace the line that says:
- REPLACE THIS LINE WITH SOMETHING INTERESTING!
Be sure to use ^O to write out your changes.
^O is one of the many pico commands displayed at the
bottom of your window. Be sure to type ^X to exit pico
when you're done.
- Go back to new Netscape window, the one displaying
http://www.unca.edu/~userid/csci107/start107.html, and
click on the reload button to refresh the view of the page
in Netscape. You should see the changes you just made.
Section 6: Transfer files
In this section, we'll show you how to use FTP
to transfer a files from your diskette to your bulldog
account.
- Start up the FTP (File Transfer Protocol) program on your PC. You'll find
FTP within the TELNETs and FTPs program group. It's called
WS_FTP95.
- When FTP starts it will bring up the FTP connection dialog window shown
below:
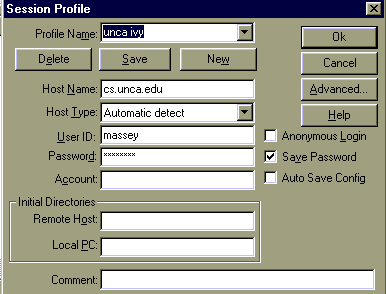
Connect to bulldog.unca.edu with your bulldog userid
and password.
- You should now see a data transfer window displaying both PC and
bulldog files.
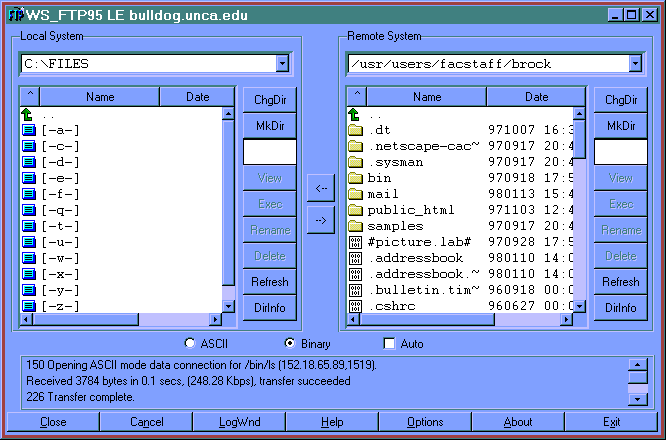
- The left side of the window is for your local files, those on the PC.
Click on the [-a-] to connect FTP to your diskette. Then click on
CSCI107 and then on Stuff to connect to your
CSCI107/Stuff directory.
- The right side of the window is for your bulldog files. Click
on public_html and then on csci107 to connect to your
bulldog directory public_html/csci107.
- Now transfer the file favclass.txt that you earlier created
with NotePad by clicking on favclass.txt and then on the
right-pointing arrow, -->, between the two sides of the
windows. Your file should now appear in the right window.
- Go back to Netscape. You should now be able to view your file with the
URL http://www.unca.edu/~userid/csci107/favclass.txt
(or maybe
http://www.unca.edu/~userid/csci107/Favclass.txt).
- Close all open windows, then hand in your disk to your instuctor.
Return to CSCI 107 home page